As an Amazon Associate, I earn from qualifying purchases.
Change lawn mower blades when they are cracked, bent, badly worn, deeply chipped, or unable to cut cleanly after proper sharpening. For many American homeowners, checking blades every 20 to 25 hours of mowing is a useful starting point, but the mower manual and actual blade condition should guide the final decision.
From spring lawn growth in Georgia to summer mowing in Texas and fall cleanup in Pennsylvania, a sharp mower blade helps keep a yard neat. Yet many homeowners focus on gas, oil, and grass height while forgetting the steel blade beneath the mower deck. That blade takes the full force of every stick, stone, and hidden root it strikes.
You do not need to replace a blade just because another mowing season has arrived. A sound blade may only need sharpening, while a damaged blade may need immediate replacement. The key is to check its cutting edge, shape, balance, and performance before deciding what to do.
This guide explains the warning signs, the difference between sharpening and replacement, and how to inspect a blade safely. It also covers seasonal mowing habits, common mistakes, and the steps to take if your lawn still looks rough after installing a new blade.
Change lawn mower blades as soon as you find a crack, bend, serious chip, or other damage that could affect safe operation. Replace them when sharpening can no longer restore the proper cutting edge or when wear exceeds the limits set by the mower manufacturer.
For routine maintenance, inspect the blade every few mowing sessions and after any hard impact. Many homeowners use about 20 to 25 operating hours as a reminder to inspect or sharpen the blade, but this is a maintenance guideline rather than a universal replacement interval.
A small suburban lawn cut once a week may put much less strain on a blade than a large rural property with rough ground. Sandy soil, frequent debris, thick grass, and accidental contact with stones can also increase wear. Let the blade’s condition and the manufacturer’s instructions determine when it needs attention.
Source: cdn.shopify.com
Replace it immediately if damaged
A cracked or bent blade should not return to service. Do not try to straighten a bent blade or weld a cracked blade unless the manufacturer explicitly provides an approved repair procedure; for ordinary mower blades, replacement is the appropriate course.
Sharpen it when the edge is dull
If the blade is straight, intact, and within its wear limits, sharpening may restore a clean cut. Follow the specified cutting-edge angle and balance requirements.
Follow the mower manual
The manual identifies the approved blade type, inspection procedure, wear limits, fastener requirements, and service intervals for your model.
How often should you inspect the blade?
Check the blade before the mowing season begins, after a suspected impact, and whenever the mower leaves an unexpectedly poor cut. During periods of frequent mowing, a quick visual inspection every few sessions can help you catch damage before it worsens.
At the same time, keep a simple record of operating hours. If you mow for one hour each week, 20 to 25 hours represents about five to six months of mowing. If you mow twice a week, the same number of hours arrives much sooner. These examples illustrate inspection timing, not a promise that every blade will last that long.
Before spring mowing
Look for rust, damage, loose hardware, and signs of wear left from storage.
After striking an object
Stop the mower, shut it down, disconnect its power source, and inspect the blade and cutting system before restarting.
During the growing season
Check cut quality and blade condition more often when mowing frequently or working on rough ground.
Seven Signs Your Lawn Mower Blade Needs Attention
The blade itself often gives the clearest clues that it needs service. Check its shape, cutting edge, and condition, then compare what you see with the mower’s cutting performance.
A rough-looking lawn does not always mean the blade is worn out. Wet grass, a clogged deck, a dull blade, and an unsuitable cutting height can all produce similar results. Use the following signs to decide whether to sharpen, replace, or troubleshoot another part of the mower.
Source: lawn.com.au
1. The grass tips look torn
After mowing, inspect several grass blades closely. Ragged or shredded tips may indicate a dull cutting edge. If the blade is otherwise sound, sharpening may solve the problem.
2. The blade has a crack
Any crack in the blade body or near a mounting area is a reason to stop using the mower and replace the blade. Do not assume a small crack is harmless.
3. The blade is bent
A bent blade may cause an uneven cut, excessive vibration, or contact with the mower deck. Replace it with the correct part and inspect the spindle and deck for damage.
4. The cutting edge has deep chips
Small areas of ordinary edge wear may be repairable through proper sharpening. Deep chips, large missing sections, or damage that would require excessive grinding usually call for replacement.
5. The blade is badly worn
Repeated sharpening removes metal. If the blade has become too narrow, thin, or otherwise worn beyond the manufacturer’s limit, replace it rather than grinding it further.
6. The mower vibrates after an impact
Strong new vibration can indicate a damaged or unbalanced blade, a bent spindle, loose hardware, or another mechanical problem. Stop mowing and inspect the equipment before further use.
7. The mower repeatedly leaves uncut strips
Uncut strips may result from dull blades, incorrect blade installation, a damaged cutting system, unsuitable overlap, or excessive ground speed. Inspect the blade, but also check mower setup and mowing technique.
How to tell whether the blade is dull or damaged
A dull blade usually has a rounded cutting edge but retains its original shape. It may leave frayed grass tips while producing little or no new vibration. A damaged blade may have a crack, bend, deep notch, missing metal, or a visibly distorted cutting surface.
If the blade looks sound but the mower vibrates, do not keep sharpening it in the hope of fixing the problem. The blade may be unbalanced, or the impact may have damaged the spindle or mounting hardware. Stop the machine and arrange a proper inspection if the cause is not clear.
Dull but intact
Sharpen the blade according to the manual, check its balance, and reinstall it correctly.
Bent, cracked, or badly chipped
Replace the blade and inspect nearby parts for impact damage.
Sharpen a blade when it is structurally sound and its cutting edge has become dull. Replace it when the blade is damaged, worn beyond its specified limits, or unsuitable for safe reuse.
Sharpening can save money and reduce waste, but it must preserve the blade’s intended shape and balance. Removing too much metal from one side can create an imbalance that causes vibration and places extra stress on the mower’s spindle and bearings.
Replacement is often the more practical option when the blade has severe damage or when the cost of professional sharpening approaches the cost of a correct replacement blade. The price alone should not decide the matter if the old blade is unsafe.
The blade is straight, has no cracks, retains sufficient material, and can be sharpened within the manufacturer’s specifications.
Choose replacement
The blade is cracked, bent, badly chipped, deeply damaged, excessively worn, or cannot be restored to the required profile and balance.
Seek professional service
Use a qualified mower service shop if you cannot assess the damage, do not have the correct tools, or suspect damage to the spindle, blade carrier, or deck.
Can you sharpen a lawn mower blade too many times?
Yes. Each sharpening removes a small amount of metal, and repeated grinding can eventually leave a blade too narrow or thin for continued use. There is no single safe number of sharpenings for every blade because starting dimensions, grinding technique, and wear vary.
Check the blade against the manufacturer’s wear limits instead of relying on the number of times it has been sharpened. If the blade no longer matches the required shape or dimensions, replace it.
Avoid excessive grinding
Remove only the metal needed to restore the correct cutting edge, following the approved angle and method.
Check balance after sharpening
Use a suitable blade balancer or the method specified by the manufacturer. A blade that is sharp but unbalanced can still cause vibration.
Do lawn mower blades need to be replaced every year?
No. Annual replacement is not necessary for every mower. A blade used on a small, clear suburban lawn may remain serviceable longer than one used on rough acreage or around frequent debris.
An annual inspection is a sensible habit, especially before spring mowing, but replacement should depend on damage, wear, and the mower manufacturer’s instructions. If the blade remains sound and within its limits, proper sharpening may be all it needs.
Light residential use
Inspect at the start of the season and during regular maintenance. Replace only when the blade’s condition requires it.
Heavy or rough use
Inspect more often, especially after impacts or when mowing areas with stones, sticks, or uneven ground.
How Mowing Conditions Affect Blade Life
Blade life depends on how much work the blade does and what it strikes. Mowing frequency matters, but ground conditions, debris, grass density, and maintenance also affect how quickly the cutting edge wears.
A lawn in a newer American subdivision with smooth ground and little debris may be easier on blades than a large property with exposed roots, gravel edges, and uneven terrain. The same mower model can therefore need different service intervals on different properties.
Use operating hours as a reminder, not as a guarantee. If the mower strikes a rock or metal object, inspect it immediately even if the blade was sharpened the day before.
Source: cdn.shopify.com
Sandy soil
Sand can act like an abrasive and wear the cutting edge more quickly. Check for dullness more often if dust and sand are common in your yard.
Sticks and stones
Debris can chip or bend a blade. Remove visible hazards before mowing and inspect the blade after a hard strike.
Thick or fast-growing grass
Heavy growth increases cutting load. Keep the grass at a suitable height and avoid forcing the mower through more growth than it can handle cleanly.
Frequent mowing
More operating hours mean more cutting-edge wear. Track hours rather than counting only calendar weeks.
Wet grass
Wet grass can cling to the deck and clog the discharge path, causing poor cutting results that may be mistaken for blade damage.
Seasonal blade care across the United States
In warm parts of the Southeast and Gulf Coast, grass may grow for much of the year, so blades can accumulate operating hours quickly. Northern homeowners may mow less often in winter but face a concentrated spring and summer workload.
In dry Western areas, dust and sandy soil may increase abrasion, while rough or rocky properties in many regions can expose blades to impacts. These are useful clues for planning inspections, not fixed rules for every state or lawn type.
Before the first seasonal cut, inspect the blade, mounting hardware, and mower deck. At the end of the season, clean the mower according to the manual and store it in a dry place to limit corrosion.
Spring
Check for rust, edge wear, and storage damage before regular mowing begins.
Summer
Inspect more often during periods of rapid growth and frequent cutting.
Fall
Check the blade after mowing around fallen sticks and other debris, then prepare the mower for storage.
Winter
If the mower is not in use, clean and store it according to the manufacturer’s guidance. Avoid starting a blade inspection by reaching under an unisolated mower.
How to Inspect a Lawn Mower Blade Safely
Always disable the mower before inspecting or removing a blade. A blade can move unexpectedly if the engine starts, the electric motor receives power, or the cutting assembly turns while you are working beneath the deck.
Read the owner’s manual first because mower designs differ. A walk-behind mower, riding mower, battery mower, and robotic mower may each require a different service position or isolation procedure.
Wear suitable work gloves and eye protection when handling the blade. Gloves protect your hands from sharp edges, but they do not make it safe to work on a mower that can start or move.
Source: lawn.com.au
Gas-powered mower
Shut off the engine, allow hot parts to cool, disconnect the spark plug wire, and secure it away from the plug. Follow the manual for fuel, oil, and mower-position precautions.
Battery-powered mower
Switch the mower off, remove the battery or batteries, and follow any additional isolation instructions in the manual.
Corded electric mower
Unplug the mower from the outlet before service and keep the plug in sight so nobody reconnects it by mistake.
Riding mower
Park on a firm, level surface, engage the parking brake, remove the key, disable the engine or electrical system as directed, and use the specified lifting and support equipment if needed.
A step-by-step blade inspection
First, make sure the mower cannot start or move. Use the manual to identify a safe way to access the blade, and never rely only on the blade brake or ignition switch.
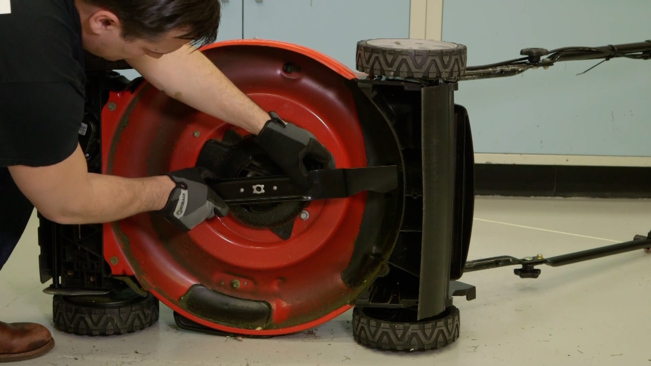
Next, examine the full length of the blade under good lighting. Look for cracks, bends, missing metal, heavy corrosion, excessive wear, and damage around the mounting holes. Check the mounting hardware and blade carrier for looseness or visible damage as well.
If you remove the blade, note its orientation before loosening the fastener. Use the correct tool and the manufacturer’s specified method to hold the blade securely. Avoid placing fingers in the blade’s path, and do not use an improvised method that could let the blade slip.
After the inspection, decide whether the blade can be sharpened safely or must be replaced. If you are unsure about a crack, wear limit, or impact-related defect, do not reinstall it until a qualified technician has assessed it.
Inspect the entire blade
Check both ends, the cutting edges, the center mounting area, and any lift surfaces that help move grass through the deck.
Check for hidden impact damage
After a hard strike, inspect the blade mounting assembly and spindle area. A visibly intact blade does not rule out damage elsewhere.
Stop if the mower is unstable
Do not crawl under an unsupported riding mower or use a jack as the only support. Use the approved lifting procedure or obtain professional service.
How to Replace a Lawn Mower Blade
Replacing a blade is manageable for some homeowners, but the correct procedure depends on the mower. Use only a blade approved for the exact model or cutting deck, and follow the manual for removal, installation, fastener torque, and balance requirements.
A blade that looks similar may have a different length, mounting hole, offset, lift profile, or rotation direction. Installing the wrong blade can damage the mower or produce poor cutting results. Never assume that a blade fits simply because its bolt hole lines up.
If the mower has multiple blades, confirm whether the blades are identical or use different positions or part numbers. Riding mowers and commercial decks may require special tools or support equipment, so a service shop may be the safest option.
Source: i.ytimg.com
Step 1: Confirm the replacement part
Find the mower model and deck identification details on the machine or in its manual. Verify the replacement blade’s part number and fit before starting work.
Step 2: Isolate all power sources
Follow the shutdown procedure for the specific engine or motor. Remove the battery or disconnect the spark plug wire as appropriate.
Step 3: Secure the mower
Use only the approved service position and support method. Keep hands, feet, and tools clear of the cutting edge.
Step 4: Remove the old blade
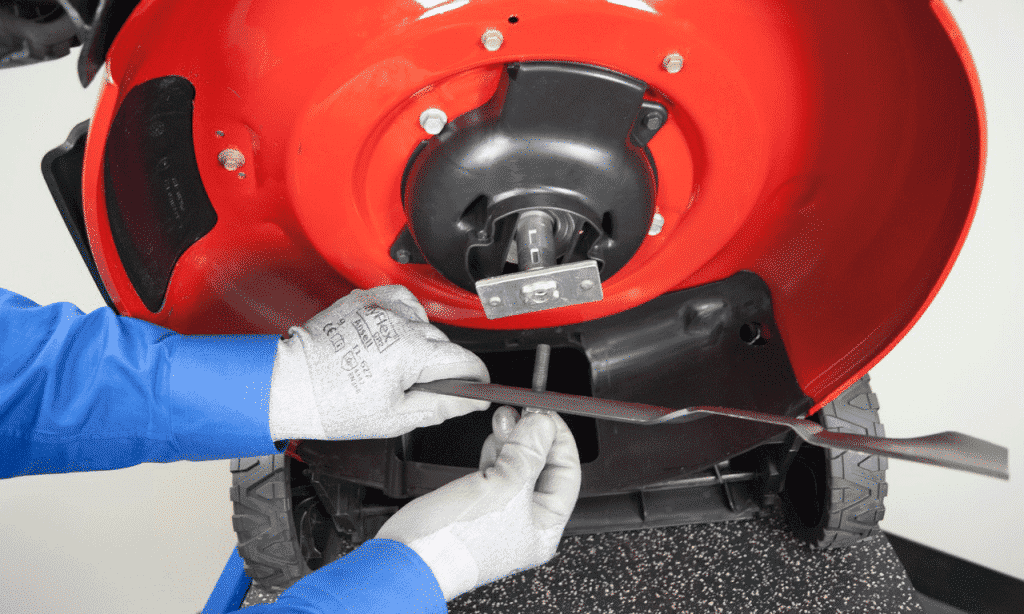
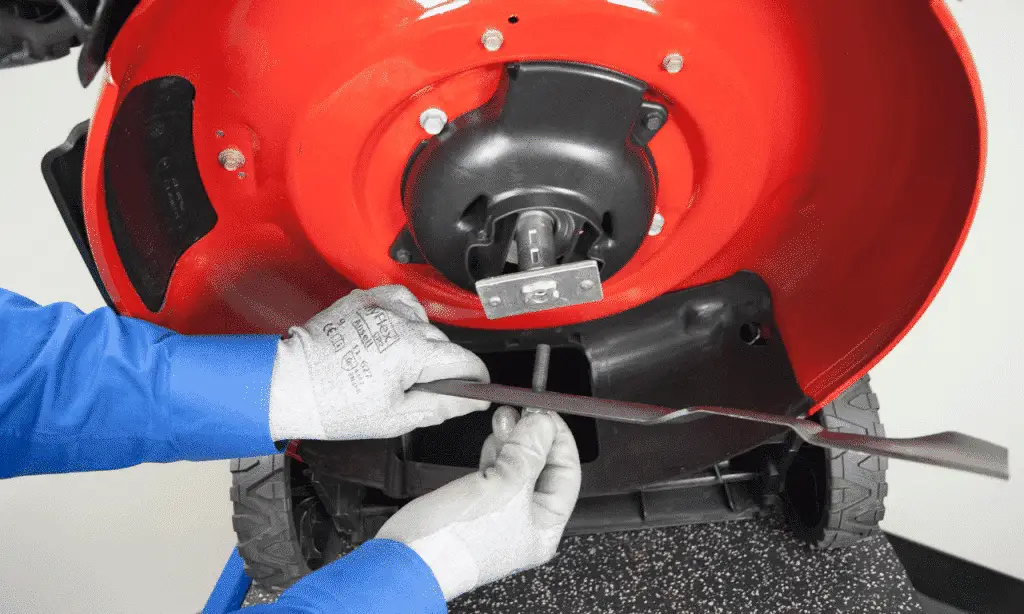
Use the correct socket or tool and the manual’s blade-holding method. Note the blade’s orientation and the order of any washers or spacers.
Step 5: Fit the new blade
Position the blade with the correct side facing the deck and the correct cutting direction. Reinstall the specified hardware in the required order.
Step 6: Tighten to specification
Use the torque value and procedure given in the mower manual. Do not guess the tightening force or substitute an unapproved fastener.
Step 7: Check the installation
Verify the blade is secure, correctly oriented, and balanced as required. Refit any guards or covers before reconnecting power.
Which side of the blade faces down?
The correct orientation depends on the blade and mower design, so follow the markings and instructions for your exact model. Many conventional rotary mower blades have a raised sail or lift section that faces toward the mower deck, but that visual clue is not a substitute for the manual.
Installing a blade upside down can cause poor cutting and discharge performance. If you are unsure about the orientation, stop and verify it before tightening the fastener or starting the mower.
Look for orientation markings
Some blades have labels such as ‘This Side Up’ or other manufacturer markings. Use them together with the mower instructions.
Check the cutting direction
Confirm the specified blade rotation and cutting-edge orientation for the machine.
Should you replace both blades on a riding mower?
A riding mower with two or more blades does not automatically require every blade to be replaced whenever one is damaged. Inspect all blades and follow the deck manufacturer’s instructions about matching blades, sets, and replacement intervals.
If blades are sold or specified as a matched set, use the required set. If one blade is damaged by an impact, inspect the other blades and the entire deck because the same event may have affected more than one component.
Check every blade
Look for differences in wear, damage, length, and balance across the cutting deck.
Use approved matching parts
Follow the manufacturer’s part-number and set requirements rather than mixing blades based on appearance.
Choosing the Correct Replacement Blade
The correct replacement blade is one approved for your mower model and cutting deck. Blade length is only one part of the fit; mounting geometry, blade offset, lift design, thickness, rotation, and manufacturer requirements can also matter.
Standard cutting blades are designed for general grass cutting. High-lift blades create stronger airflow in compatible decks and can help discharge grass into a bag, while mulching blades are shaped to recut clippings within a compatible deck. These designs are not interchangeable in every mower.
Check the manual before switching between standard, high-lift, or mulching blades. A blade marketed for a similar mower may not be safe or suitable for yours.
Source: mowersboy.com
Standard blade
Often suitable for ordinary mowing when the mower manufacturer specifies this design.
High-lift blade
Designed to move clippings more forcefully in compatible systems. Its airflow characteristics may increase power demand and dust movement in some conditions.
Mulching blade
Designed to help recut grass clippings inside a compatible mower deck. It needs the correct deck setup and operating conditions to perform as intended.
Low-lift or other specialty blade
May suit certain cutting systems or conditions. Confirm the intended use and compatibility before purchasing.
Can you use a universal lawn mower blade?
Some replacement blades are designed to fit a range of mower models, but the word universal does not mean that every blade fits every mower. The manufacturer must specify compatibility with your exact machine or cutting deck.
Before buying, compare the part number, blade dimensions, mounting arrangement, and required blade type. If the listing does not clearly establish compatibility, use the manufacturer’s parts catalog or ask an authorized dealer.
Verify the model number
Use the mower’s identification label rather than relying on its brand name alone.
Avoid forced fitment
Do not drill mounting holes, modify the blade, or use improvised spacers to make an incompatible part fit.
Common Lawn Mower Blade Problems and Their Fixes
When the lawn looks poor after mowing, check the simplest causes before buying another blade. Grass moisture, deck buildup, cutting height, ground speed, and wheel or deck settings can all affect the result.
A new blade will not fix every cutting problem. Work through the checks below in a safe order, starting with the condition of the grass and mower setup before investigating mechanical damage.
Source: cf-images.us-east-1.prod.boltdns.net
Problem: Ragged grass tips
Possible causes include a dull blade, wet grass, or excessive ground speed. Inspect the edge, mow when the grass is dry, and adjust your pace.
Problem: Uncut strips between passes
Possible causes include incorrect overlap, a damaged or incorrectly fitted blade, uneven deck height, or a worn cutting system. Check the mowing pattern and deck setup.
Problem: Excessive vibration
Possible causes include an unbalanced blade, impact damage, loose mounting hardware, or a bent spindle. Stop the mower immediately and inspect it before further use.
Problem: Grass clumps under the deck
Possible causes include wet grass, heavy growth, or deck buildup. Shut down and isolate the mower before cleaning it according to the manual.
Problem: Poor bagging
Possible causes include a dull blade, blocked discharge path, incorrect blade type, or unsuitable mowing conditions. Confirm that the blade and collection system match the mower.
Why does a new blade still leave a bad cut?
A new blade may still cut poorly if it is installed upside down, is the wrong part, or is incompatible with the deck. Grass that is wet, too tall, or packed beneath the deck can also interfere with a clean cut.
Check the blade part number and orientation first. Then inspect the deck for buildup, confirm the cutting height, and make sure the deck is level where the manufacturer requires it. If the blade vibrates or appears to strike the deck, stop using the mower and seek mechanical inspection.
Confirm blade fit and orientation
Compare the installed blade with the approved part number and installation instructions.
Check deck cleanliness
With the mower fully isolated, remove grass buildup using the cleaning method approved by the manufacturer.
Review mowing conditions
Allow wet grass to dry and avoid cutting more grass than the mower can handle in one pass.
How to Make Lawn Mower Blades Last Longer
Good mowing habits can reduce avoidable blade wear and help you get more service from a sound blade. The aim is not to stretch a blade’s life at all costs, but to prevent damage and maintain a clean cut without compromising safety.
Start by removing sticks, stones, wire, and other debris from the lawn. Keep the mower’s cutting height suited to the grass, clean the deck as directed, and inspect the blade whenever performance changes.
Source: i.ytimg.com
Clear the mowing area
Walk the lawn before mowing and remove objects that could strike the blade. Take extra care around gravel drives, tree roots, and construction debris.
Avoid cutting overly tall grass in one pass
Use staged cuts when grass has grown too long, following the mower and turf guidance. This reduces strain and can improve the finished appearance.
Use the correct cutting height
Set the deck for your grass type and growing conditions instead of cutting the lawn extremely short.
Clean the deck safely
Disconnect the power source first and use the cleaning method recommended by the manufacturer. Never reach beneath an energized or unsecured mower.
Store the mower properly
Keep the mower clean and dry when practical, and follow the manual’s storage and corrosion-prevention advice.
Keep service records
Record operating hours, sharpening dates, blade replacements, and impact incidents to make maintenance easier to plan.
Does a sharp blade really help grass?
A sharp, properly installed blade cuts grass more cleanly than a dull blade in otherwise suitable mowing conditions. A dull edge can tear the leaf tissue, leaving a ragged appearance that may become more noticeable as the cut ends dry.
Blade sharpness is only one part of lawn health. Correct mowing height, suitable watering, soil conditions, and regular mowing also matter. Sharpening the blade cannot compensate for mowing too low or cutting wet grass in conditions that cause clumping.
Look for clean leaf tips
A clean cut without widespread fraying is one useful sign that the blade and mowing conditions are working well.
Keep the whole mower in good condition
Blade maintenance works best alongside correct deck settings, clean discharge paths, and sound mechanical parts.
A Practical Blade Maintenance Schedule
A simple maintenance schedule makes it easier to catch wear before it spoils the cut or creates a safety concern. Use the mower manual as the primary reference, then adjust inspection frequency to match how and where you mow.
The schedule below is a general planning aid, not a replacement for model-specific instructions. Commercial equipment, rough-ground mowing, and blades exposed to frequent impacts may need more frequent checks.
Source: cdn.shopify.com
Before the mowing season
Inspect the blade for cracks, bends, corrosion, and wear. Check the mounting hardware and confirm that the blade is the correct part.
Every few mowing sessions
Watch for poor cut quality, new vibration, or impact damage. Inspect the blade whenever a warning sign appears.
Around 20 to 25 operating hours
Use this as a common inspection or sharpening reminder if it suits the manufacturer’s schedule. The blade may need service sooner or later depending on its condition and use.
After striking a hard object
Stop immediately and inspect the blade and cutting system before restarting. Seek service if you suspect spindle, deck, or mounting damage.
Before seasonal storage
Clean and inspect the blade, address any damage, and store the mower according to the manual.
How to estimate blade service timing
You can estimate when the next inspection is due by dividing your estimated total mowing hours by the number of hours you mow each week. For example, if you mow two hours per week, a 20-hour reminder arrives after about 10 weeks.
This calculation only helps plan an inspection. It does not mean the blade will need sharpening at that point or that it is safe to keep using a damaged blade until the reminder arrives. Condition checks always take priority.
Record hours, not just dates
Operating time provides a more useful estimate of blade use when mowing frequency changes during the season.
Inspect after unusual events
A hard impact or sudden change in mower behavior overrides the normal schedule.
Frequently Asked Questions
Q
How do I know if my lawn mower blade is too dull?
Look for ragged grass tips, a less even cut, or repeated uncut strips when mowing conditions are otherwise suitable. These symptoms can also come from wet grass, deck buildup, incorrect cutting height, or a damaged cutting system. Inspect the blade safely before deciding whether it needs sharpening or replacement.
Q
How many hours can a lawn mower blade last?
There is no single operating-hour limit for every blade. Life depends on the blade design, grass, soil, debris, mower type, and maintenance. Use the manufacturer’s service guidance and inspect the blade regularly rather than relying on a fixed lifespan.
Q
Can I keep using a chipped lawn mower blade?
It depends on the size and location of the chip, but deep chips or missing sections can make a blade unsafe or impossible to restore properly. Stop using the mower until you have assessed the damage against the manufacturer’s limits. Replace a badly chipped blade instead of removing excessive metal in an attempt to repair it.
Q
Is it better to sharpen or buy a new lawn mower blade?
Sharpen a blade if it is straight, crack-free, and within the manufacturer’s wear limits. Replace it if it is bent, cracked, badly chipped, excessively worn, or unable to meet the required balance and shape. A professional service shop can help when the condition is uncertain.
Q
Can a lawn mower blade be too sharp?
A blade should have the cutting edge specified by its manufacturer, not an excessively thin or fragile edge created by overgrinding. Removing too much metal can weaken the edge and affect blade dimensions or balance. Follow the approved sharpening angle and method.
Q
Do new lawn mower blades need sharpening?
Do not assume a new blade needs sharpening. Install it as supplied unless the manufacturer specifically instructs you to prepare the cutting edge. Unnecessary grinding can remove material, alter the intended edge, or affect balance.
Q
Why does my lawn mower vibrate after I change the blade?
Possible causes include an incorrectly installed blade, an unbalanced replacement, loose or incorrect mounting hardware, or damage to the spindle or blade carrier. Stop the mower immediately and disconnect its power source before checking anything. If the cause is not obvious, have the cutting system inspected by a qualified technician.
✦ Wrapping Up
Conclusion
The right time to change lawn mower blades depends on their condition, not simply the date or the number of seasons they have been used. Cracks, bends, serious chips, excessive wear, and damage that cannot be corrected safely are clear reasons to replace a blade. A dull but otherwise sound blade may only need sharpening.
Regular inspections help homeowners spot problems before a poor cut turns into a larger repair. Pay attention to grass tips, new vibration, and uncut strips, but remember that moisture, deck buildup, and mower setup can cause similar symptoms. Always isolate the mower before inspection and use the approved blade and installation procedure.
A clean, sharp, correctly fitted blade is one part of good lawn care. Pair it with sensible mowing height, clear ground, a clean deck, and regular maintenance to keep your lawn looking neat throughout the growing season.
💡 Key Takeaway
Before your next mowing session, check the blade for cracks, bends, deep chips, and excessive wear. If it is dull but sound, sharpen and balance it according to the manual. If it is damaged or outside the manufacturer’s limits, replace it with the correct blade before mowing again.
I enjoy sharing simple gardening ideas, lawn care tips, and honest product reviews that help make outdoor work easier. From home gardening guides to helpful tools and lawn care advice, I write easy-to-follow content to help readers create a healthier and better-looking outdoor space without wasting time or money.