
As an Amazon Associate, I earn from qualifying purchases.
Metal rods can be used to make homemade landscape rake tines. They can be secured to a wooden or metal frame for use.
Creating a homemade landscape rake can save money and provide a customized tool for your needs. Metal rods are often available at hardware stores as durable and practical tines. Attaching these rods to a sturdy wooden or metal frame ensures the rake’s functionality.
This DIY project allows for tine spacing and length adjustments, catering to various landscaping tasks. With basic tools and materials, constructing your own landscape rake becomes accessible and rewarding. You can create a reliable tool that enhances your gardening or landscaping efficiency by following simple steps.
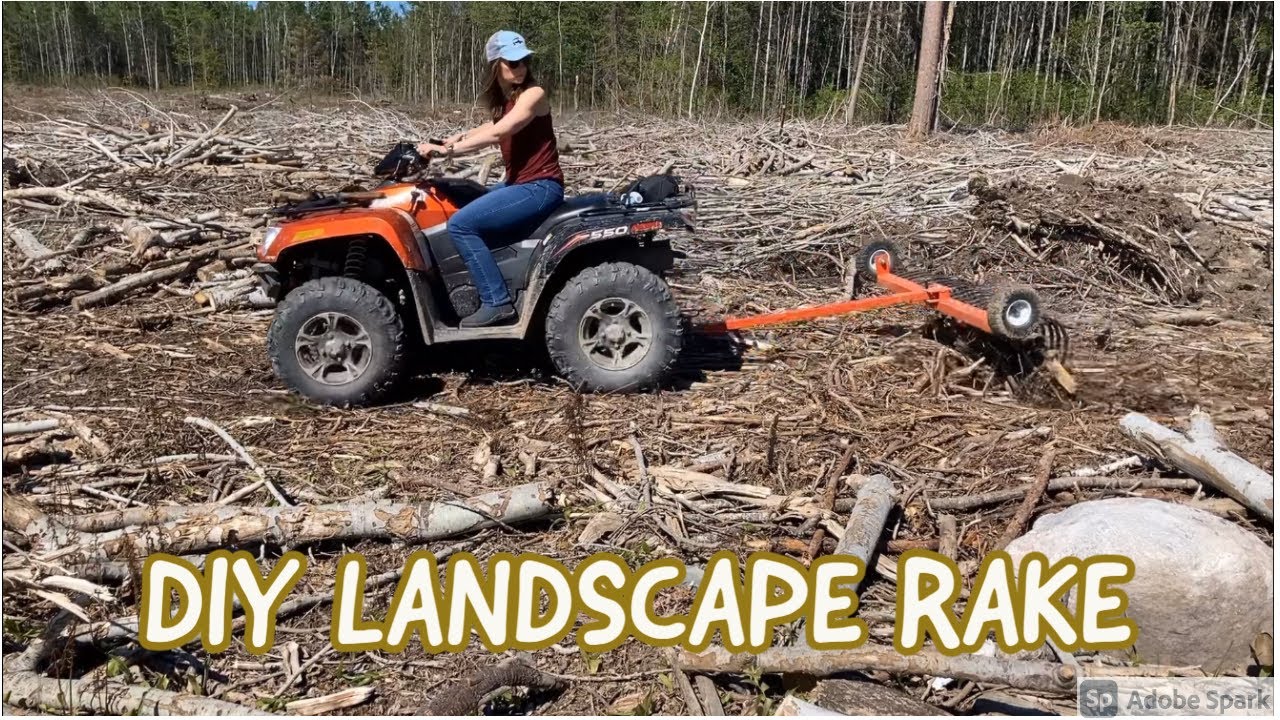
DIY Landscape Rakes
Creating your landscape rake can be a rewarding experience. It allows you to tailor the tool to your specific needs, save you money, and provide a sense of accomplishment.
The Appeal Of Homemade Tools
Homemade tools offer a unique charm. They can be customized to fit your exact requirements, and you can use materials you already have at home. This reduces waste and promotes recycling.
- Cost-effective
- Customizable
- Eco-friendly
Building your own tools also teaches valuable skills. You learn about materials, design, and construction. This can be a fun family project, too.
Benefits Of A Custom Landscape Rake
A custom landscape rake offers a host of benefits. By designing it to fit your yard perfectly, you ensure better performance and efficiency. This can lead to a more effective and enjoyable gardening experience.
Here are some benefits:
| Benefit | Explanation |
|---|---|
| Perfect Fit | The rake matches your yard’s size and shape. |
| Personal Touch | You can add unique features to your rake. |
| Cost Savings | Using home materials reduces expenses. |
Custom landscape rakes can be more durable. You can choose strong materials that last longer. This means fewer replacements and less hassle.
Creating a homemade landscape rake is an excellent DIY project. It combines creativity, practicality, and sustainability.
Credit: www.mytractorforum.com
Essential Materials For Rake Tines
Creating homemade landscape rake tines can save you money. You need suitable materials for a sturdy and effective rake. Here, we will explore essential materials for making rake tines.
Choosing The Right Metal
When it comes to rake tines, metal is a top choice. It’s renowned for its durability and strength. However, not all metals are created equal, and choosing the right one is crucial.
Steel is the best choice. It is strong and long-lasting, and galvanized steel resists rust, making it a great option for outdoor use.
Aluminum is another choice. It is lighter than steel and is resistant to rust, but it is not as strong as steel.
Alternative Materials
While metal is a popular choice, there’s a world of other materials out there that can be just as effective for different types of rakes. Understanding these alternatives can help you tailor your rake to your specific needs.
- Wood – Wood can be used for lighter tasks. It is easy to work with and cheap.
- Plastic – Plastic is lightweight and doesn’t rust. It is best for small garden rakes.
- Bamboo – Bamboo is eco-friendly and lightweight. It is flexible but less durable than metal.
| Material | Benefits | Drawbacks |
|---|---|---|
| Steel | Strong, durable, rust-resistant (if galvanized) | Heavy, can be expensive |
| Aluminum | Lightweight, rust-resistant | Less strong than steel |
| Wood | Easy to work with, inexpensive | Not very durable |
| Plastic | Lightweight, rust-resistant | Not very strong |
| Bamboo | Eco-friendly, lightweight | Not very durable |
Tools And Equipment Needed
Creating homemade landscape rake tines can be a fun and rewarding project. To get started, you’ll need the right tools and equipment. This section covers everything you need to assemble your landscape rake tines efficiently.
Basic Workshop Tools
First, gather your essential workshop tools. These will help you cut and shape materials.
- Measuring Tape: Essential for accurate measurements.
- Hacksaw: Useful for cutting metal rods and pipes.
- Drill: Needed to create holes in metal or wood.
- Wrench Set: Ideal for tightening nuts and bolts.
- File Set: Helps smoothen rough edges.
Safety Gear
Remember your safety gear. Safety should always come first.
- Safety Glasses: Protect your eyes from debris.
- Gloves: Keep your hands safe from sharp edges.
- Ear Protection: Essential when using loud tools.
- Dust Mask: Prevents inhalation of fine particles.
- Steel-toe Boots: Protect your feet from heavy objects.
Designing Your Rake Tines
Creating your homemade landscape rake tines can be fun and rewarding. A well-designed rake can make garden work more accessible. Let’s explore how to design the perfect tines for your rake.
Tine Shape Considerations
The shape of your rake tines is crucial. There are a few shapes to consider:
- Straight Tines: Ideal for levelling soil.
- Curved Tines: Better for gathering leaves and debris.
- Flat Tines: Best for smoothing surfaces.
Choose a shape based on your primary use. Straight tines are versatile. Curved tines work well in gardens. Flat tines suit landscaping projects.
Spacing For Optimal Use
Tine spacing affects how well your rake works. Proper spacing ensures efficient work. Here are some tips:
- Narrow Spacing: Good for acceptable debris like leaves.
- Wide Spacing: Better for more extensive materials like rocks.
- Even Spacing: Ensures uniform rake performance.
| Spacing Type | Best For |
|---|---|
| Narrow Spacing | Leaves, small debris |
| Wide Spacing | Rocks, large debris |
| Even Spacing | General use |
Test different spacings to find what works best for your needs. Narrow spacing helps clean up small areas. Wide spacing works well for larger debris. Even spacing is a good all-round choice.
Fabrication Process Step-by-step
Creating your homemade landscape rake tines can be a rewarding project. This guide will walk you through the fabrication process step-by-step. Follow these instructions to build durable and practical tines for your rake.
Cutting The Materials
First, gather all the necessary materials. You will need:
- Metal rods or flat steel strips
- Measuring tape
- Metal cutting saw
- Safety gear (gloves, goggles)
Measure the length needed for each time. Mark the measurements on the metal rods or strips. Use the metal cutting saw to cut the pieces to the desired size. Be sure to wear safety gear to protect yourself while cutting.
Shaping The Tines
Once you have cut the materials, the next step is shaping the tines. Follow these steps:
- Heat the ends of the metal pieces with a blowtorch.
- Bend the heated ends into a hook shape.
- Allow the metal to cool and harden.
Shaping the tines ensures they can grip and move debris effectively. Make sure each time has a consistent shape and size.
Attaching Tines To The Rake Head
With the tines shaped, it’s time to attach them to the rake head. You will need:
- Drill
- Bolts and nuts
- Wrench
Drill holes in the rake head where each line will be attached. Align each tine with a hole and insert a bolt through the tine and the rake head. Secure each bolt with a nut using a wrench. Ensure all tines are tightly fastened and evenly spaced.
Your homemade landscape rake is now ready for use. Enjoy the satisfaction of using a tool you built yourself!
Credit: www.mytractorforum.com
Strengthening Your Rake Tines
Strengthening Your Rake Tines is essential for maximizing the efficiency and durability of your homemade landscape rake. Properly fortified tines can endure heavy use and last much longer. In this guide, we delve into two crucial methods for strengthening your rake tines: heat treatment and rust prevention coating. By applying these methods, you can significantly enhance the performance and lifespan of your rake.
Heat Treatment Basics
Heat treatment can significantly enhance the strength and flexibility of your rake tines. Follow these steps to heat-treat your tines effectively:
- Prepare the Tines: Clean the tines thoroughly to remove any dirt or grease.
- Heat the Tines: Heat a propane torch or forge until they glow red.
- Quench Rapidly: Quickly submerge the heated tines in oil or water.
- Temper the Tines: Reheat them to a lower temperature (around 400°F) and then allow them to cool slowly.
Coating For Rust Prevention
Rust can weaken your rake tines and shorten their lifespan. Applying a protective coating can prevent rust and corrosion. Here’s how to coat your tines:
- Clean the Tines: Ensure the tines are free from dirt and rust.
- Apply Primer: Use a metal primer to prepare the surface.
- Paint the Tines: Apply a rust-resistant paint or coating.
- Dry Properly: Allow the coating to dry completely before use.
By following these steps, you can ensure your homemade landscape rake tines remain solid and durable, providing you with reliable performance for years.
Assembling The Rake
Building your landscape rake tines at home can be a rewarding project. This guide will help you assemble the rake efficiently. Follow the steps to ensure your rake is sturdy and functional.
Securing Tines To The Frame
First, gather all the tines and the frame. Make sure you have the necessary tools. Use a measuring tape to mark where each time will be placed. This ensures even spacing.
Next, drill holes into the frame at each marked spot. Insert the tines into the drilled holes. Secure each tine with bolts and nuts, tightening them firmly with a wrench.
Double-check all times to ensure they are secure. A loose time can cause problems later. Here’s a quick checklist for this step:
- Measure and mark spots on the frame
- Drill holes at marked spots
- Insert tines into holes
- Secure tines with bolts and nuts
- Tighten all bolts firmly
Handle Installation
Now, it’s time to attach the handle. Choose a sturdy handle that is comfortable to hold. Place the handle in the designated spot on the frame. Use screws to attach the handle securely.
Ensure the handle is aligned correctly with the frame. This will make using the rake easier. Here are the steps for installing the handle:
- Choose a sturdy and comfortable handle
- Place the handle in the designated spot
- Use screws to attach the handle
- Ensure the handle is aligned properly
After attaching the handle, test the rake for stability. Make sure it feels comfortable and secure.
With these steps, your homemade landscape rake tines are ready for use.

Credit: diymyway.net
Maintenance And Care For Longevity
Taking care of your homemade landscape rake tines ensures they last longer. Proper maintenance keeps them efficient and ready for use. Here are some essential tips for maintaining your rake tines.
Cleaning Tips
Regular cleaning removes dirt and debris from your rake tines. Use a stiff brush to scrub the tines after each use. This prevents rust and maintains performance.
- Rinse the tiles with water to remove any loose dirt.
- Dry them thoroughly to avoid rust formation.
- Use a wire brush to clean stubborn dirt off the tines.
- Apply a light coat of oil to prevent rust.
Storage Solutions
Proper storage is key to keeping your landscape rake tines in good condition. By storing them in a dry, cool place, you can be confident that you’re preventing damage and ensuring their longevity.
- Hang the rake on a wall hook in your garage.
- Store it in a shed away from moisture.
- Use a cover to protect the tines from dust and dirt.
- Avoid placing heavy items on the rake to prevent bending.
| Task | Frequency |
|---|---|
| Clean tines | After each use |
| Dry tines | After each use |
| Oil tines | Monthly |
| Inspect for damage | Monthly |
Following these tips ensures your landscape rake tines stay in top shape. Proper care extends their life and keeps your garden looking great.
Troubleshooting Common Issues
Maintaining homemade landscape rake tines can sometimes be tricky. This guide will help you troubleshoot common issues. Addressing problems quickly can extend the life of your rake.
Time Alignment
Ensuring proper time alignment is crucial for effective raking. Misaligned tines cause uneven raking and damage to your landscape.
- Check alignment: Lay the rake on a flat surface. Ensure all tines touch the ground equally.
- Adjust tines: If tines are uneven, use pliers to bend them gently.
- Secure tines: Tighten any loose bolts or screws that hold the tines.
Wear And Tear
Homemade landscape rake tines can wear out over time. Regular inspection helps catch issues early.
| Issue | Signs | Solution |
|---|---|---|
| Bent Tines | Tines appear crooked or twisted | Bend back with pliers or replace |
| Rust | Tines show rust spots | Sand off rust and apply rust-proof paint |
| Broken Tines | Tines break off or crack | Replace damaged tines |
Regular maintenance can prevent major issues. Keep your rake in good shape for longer use.
Safety Precautions
When working with homemade landscape rake tines, safety should be your top priority. Following proper safety precautions ensures a smooth and accident-free experience. Let’s dive into the key aspects of safety precautions.
Proper Usage
Using homemade landscape rake tines correctly is essential. Follow these steps for proper usage:
- Ensure the tines are securely attached to the rake frame.
- Wear protective gloves to avoid cuts and splinters.
- Always use the rake on a stable, even surface.
- Avoid using the rake in wet or slippery conditions.
Injury Prevention
Preventing injuries while using landscape rake tines is crucial. Here are some tips:
- Check the rake for any loose parts before each use.
- Keep a first aid kit nearby in case of minor injuries.
- Maintain a clear workspace to avoid tripping hazards.
- Teach children about the dangers of sharp tools and keep them away.
| Safety Tip | Details |
|---|---|
| Wear Safety Gear | Always use gloves and protective eyewear. |
| Inspect Tools | Check for damage before and after use. |
| Clear Workspace | Remove obstacles to prevent tripping. |
Frequently Asked Questions
What Are Landscape Rake Tines Made Of?
Landscape rake tines are typically made of durable, high-quality steel. This ensures strength and longevity for heavy-duty tasks.
What Is The Difference Between A Harley Rake And A Landscape Rake?
A Harley rake is a powered attachment for levelling and grading soil, while a landscape rake is a manual tool for collecting debris and smoothing surfaces.
What Is The Difference Between A Rock Rake And A Landscape Rake?
A rock rake is designed to collect rocks and debris. A landscape rake smooths soil and levels surfaces for landscaping.
Why Do Landscape Rakes Have Wheels?
Landscape rakes have wheels to maintain consistent depth and level. Wheels improve control, reduce strain, and enhance efficiency.
Conclusion
Creating homemade landscape rake tines is both economical and rewarding. You can customize the design to fit your needs. With simple materials and tools, you can enhance your gardening experience. Try making your rake tines and enjoy a well-maintained landscape.
Happy gardening!