

As an Amazon Associate, I earn from qualifying purchases.
To root plumeria cuttings, dip the cut end in rooting hormone and plant in well-draining soil. Water lightly and provide bright, indirect light.
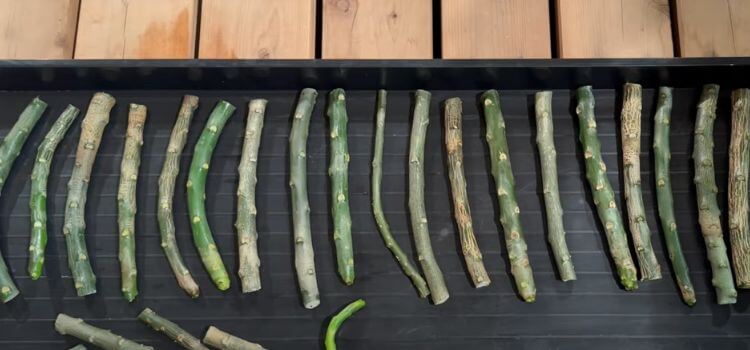
Rooting plumeria cuttings are famous for propagating these beautiful, fragrant plants. Plumerias, or Frangipani, thrive in warm climates and are beloved for their vibrant flowers. To successfully root cuttings, it’s essential to use healthy, disease-free stems.
Select a firm, green cutting and let it dry for a few days to prevent rotting. Using the rooting hormone can enhance the growth process. Plant the cutting in a well-draining soil mix and keep it in a location with bright, indirect sunlight. Light watering helps the roots establish without causing rot. Patience is vital, as roots can take several weeks to develop.
Choosing Cuttings
Rooting Plumeria cuttings can be a fun and rewarding experience. Plumeria, also known as Frangipani, are beautiful flowering plants. They can increase from cuttings. The first step is choosing the suitable cuttings. This guide will help you with the best practices for selecting and rooting Plumeria cuttings.
Ideal Cutting Length
The ideal cutting length for Plumeria is significant. The right length can ensure the cutting roots well. Aim for cuttings between 12 and 18 inches long. Shorter cuttings may not root properly, and longer cuttings can be harder to handle.
Here are some key points:
- 12 to 18 inches is the best length.
- The cutting should have at least 3 to 5 leaf nodes.
- Avoid cuttings with flowers or buds.
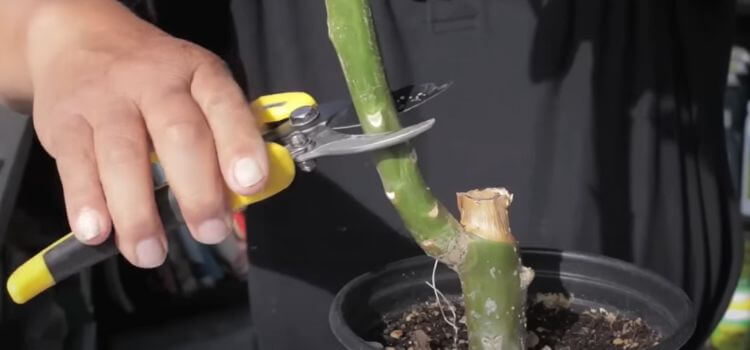
Cut the stem at a 45-degree angle. This helps the cutting to take in more water. Use a clean, sharp knife or pruning shears. Make sure the cut is smooth and even. A jagged cut can slow down rooting.
Best Time For Cutting
The best time to take Plumeria cuttings is during the growing season, which is usually in spring or early summer. During this time, the plant is actively growing, which increases the chances of successful rooting.
Here are some timing tips:
- Take cuttings in spring or early summer.
- Avoid taking cuttings in winter or late fall.
- Morning is the best time of day for taking cuttings.
Morning cuttings tend to be more hydrated. This helps them to root better. Make sure the parent plant is healthy. A healthy plant will provide better cuttings. Avoid taking cuttings from a stressed or diseased plant.
Preparation Steps
Rooting Plumeria cuttings is a fun and rewarding gardening project. Plumerias are known for their beautiful and fragrant flowers. They are easy to grow, but proper preparation is crucial. This guide covers the essential steps to root Plumeria cuttings successfully. You can enjoy these lovely plants in your garden with a few tools and some patience.
Cleaning Tools
Clean tools are essential for rooting Plumeria cuttings. Dirty tools can spread diseases and harm your plants. To clean your tools, follow these simple steps:
- Gather all the necessary tools: pruning shears, a sharp knife, and a bucket.
- Fill the bucket with warm, soapy water.
- Wash each tool thoroughly in the soapy water.
- Rinse the tools with clean water to remove all soap residues.
- Dry the tools with a clean towel.
- Rub alcohol on the blades of your tools to disinfect them.
Ensuring your tools are clean protects your Plumeria cuttings from infections. This step is simple but essential. Always have clean tools before you start any gardening task.
Preparing The Cuttings
Proper preparation of Plumeria cuttings is critical to successful rooting. Follow these steps to prepare your cuttings:
- Select a healthy branch from the Plumeria plant.
- Cut a 12-inch section from the branch with clean tools.
- Remove any leaves from the bottom half of the cutting.
- Allow the cutting to dry for a few days. This helps to form a callus on the cut end.
- Once the callus forms, dip the cut end in rooting hormone powder.
- Plant the cutting in a pot filled with well-draining soil.
Water the soil lightly after planting the cutting. Keep the soil moist but not soggy. Place the pot in a warm, sunny spot. In a few weeks, roots should start to form. Be patient and avoid overwatering the cutting. This will help your Plumeria cutting to grow strong and healthy.
Rooting Hormones
Plumeria cuttings can be an exciting way to grow new plants. Rooting hormones play a crucial role in this process. These hormones help cuttings develop roots faster and more robust. They provide the necessary boost to kick-start root growth. Learning about rooting hormones and their application methods is critical to successful propagation.
Types Of Hormones
Rooting hormones come in different types. Each type serves a unique purpose. Here are the main types:
- Auxins: These are the most common rooting hormones. They are natural plant hormones.
- IBA (Indole-3-butyric acid): This synthetic hormone is very effective. It promotes root growth quickly.
- NAA (Naphthaleneacetic acid): Another synthetic option. It is often used in commercial propagation.
- Powder form: Easy to use and store. Dip the cutting into the powder.
- Liquid form: Often mixed with water. Provides more control over concentration.
- Gel form: Clings well to cuttings. Offers a balanced and even application.
Choosing the right hormone type depends on your needs. Some types work better for woody plants, and others are best for herbaceous plants. Always check the label for instructions.
Application Methods
Applying rooting hormones correctly is crucial for success. Here are some standard methods:
- Direct dipping: Dip the cut end into the hormone powder. This is quick and easy.
- Solution soaking: Mix the hormone with water. Soak the cuttings for a few hours.
- Gel application: Apply the gel to the cut end. This method ensures even coverage.
Always follow the instructions on the hormone package. Too much hormone can harm the cutting. Too little may not be effective. Here is a simple guide:
| Hormone Type | Application Time | Best for |
|---|---|---|
| Powder | Immediate | Quick use |
| Liquid | Soak for 1-2 hours | Controlled application |
| Gel | Immediate | Even coverage |
The proper application ensures the best results. Rooting hormones are a valuable tool for plant propagation. Use them wisely to grow healthy plumeria cuttings.
Soil Selection
Rooting Plumeria cuttings can be a fun and rewarding process. The key to success lies in selecting the suitable soil. The right soil mix and good drainage are crucial for healthy roots. Let’s explore the best soil mix and the importance of drainage for Plumeria cuttings.
Best Soil Mix
Choosing the best soil mix is essential for rooting Plumeria cuttings. Plumeria needs a well-draining soil mix to thrive. A mix that retains moisture but stays cool is ideal. Here is a recommended soil mix for Plumeria cuttings:
- 1 part coarse sand
- 1 part perlite
- 1 part potting soil
Coarse sand helps with drainage and prevents water from pooling around the roots. Perlite is a lightweight material that keeps the soil airy and prevents compaction. Potting soil provides the nutrients the cuttings need to grow. Combine these three ingredients to create the perfect mix for Plumeria cuttings.
Always ensure the soil is light and fluffy. Heavy or compacted soil can hinder root development. Add more perlite or sand to improve its texture if the soil feels heavy. This will create a healthier environment for your Plumeria cuttings to root and grow.
Drainage Importance
Drainage is a crucial factor in rooting Plumeria cuttings. Good drainage prevents water from sitting around the roots, which can cause rot. Here’s why drainage is so important:
- Prevents root rot
- Ensures oxygen reaches the roots
- Helps the plant absorb nutrients better
Poor drainage can lead to root rot, a common problem for Plumeria cuttings. When water sits in the soil, it can suffocate the roots and cause them to rot. This is why a well-draining soil mix is vital. Proper drainage ensures that the roots get the oxygen they need. It also helps the plant absorb nutrients from the soil more effectively.
To improve drainage, use pots with drainage holes. This allows excess water to escape easily. You can also place a layer of gravel or small stones at the bottom of the pot. This helps create a barrier between the soil and excess water. Ensuring good drainage will help your Plumeria cuttings develop solid and healthy roots.
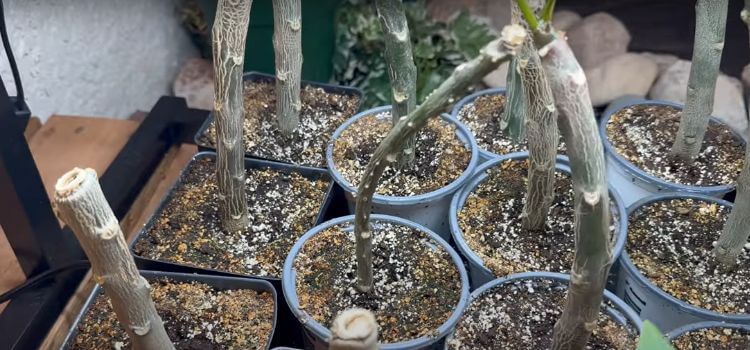
Planting Cuttings
Plumeria plants are known for their beautiful, fragrant flowers. Rooting plumeria cuttings can be an exciting gardening project, but planting cuttings is a crucial step for successful growth. Here, we will explore the best practices for cultivating depth and spacing cuttings to ensure healthy plumeria plants.
Planting Depth
Proper planting depth is essential for rooting plumeria cuttings. The cutting should be deep enough to support the plant but not too deep to cause rot.
Follow these steps for the correct planting depth:
- Trim the cutting: Remove any leaves from the bottom half of the cutting.
- Prepare the soil: Use well-draining soil to prevent waterlogging.
- Insert the cutting: Plant the cutting about 4 to 6 inches deep.
The depth ensures the cutting remains stable and allows roots to develop properly. Too shallow planting may cause the cutting to fall, and too deep planting may result in rot.
Water the cutting lightly after planting. Overwatering can cause root rot, so be cautious. Ensure the soil remains moist but not soggy.
Spacing Cuttings
Spacing cuttings correctly helps avoid competition for nutrients. It also ensures proper air circulation, which prevents disease.
Consider the following spacing guidelines:
- Distance between cuttings: Place cuttings at least 12 inches apart.
- Rows spacing: Maintain a distance of 24 inches between rows.
Proper spacing ensures each cutting has enough room to grow. It also makes it easier to water and care for each plant. Overcrowding can lead to poor growth and increased disease risk.
Using stakes can help support the cuttings, preventing them from toppling over as they grow. Ensure the stakes are close enough to avoid damaging the roots.
Watering Techniques
Growing Plumeria can be a rewarding experience. Rooting Plumeria cuttings is a popular method to propagate these beautiful plants. Proper watering techniques are crucial for success. Here, we explore how to water Plumeria cuttings effectively to ensure healthy growth.
Initial Watering
The first watering is crucial for Plumeria cuttings. It helps establish the roots. Start by soaking the base of the cutting in water for about an hour. This will hydrate the stem. After washing, plant the cutting in well-draining soil.
Water the soil thoroughly after planting. This ensures the soil is evenly moist. Be careful not to overwater. Overwatering can lead to root rot. Here are the steps to follow:
- Soak the base in water for one hour.
- Plant in well-draining soil.
- Water the soil thoroughly.
Avoid watering again until the soil is dry. This prevents waterlogging. Check the soil moisture regularly. Use your finger to test the top inch of the soil. If it’s dry, it’s time to water again. This helps the cutting develop strong roots.
Maintaining Moisture
Consistent moisture is critical to rooting Plumeria cuttings. Once the initial watering is done, maintain a careful watering schedule. Water the soil when the top inch feels dry. This helps keep the soil moist but not soggy.
Use a spray bottle for light watering. This method ensures the soil stays evenly moist. Heavy watering can wash away soil and damage roots. Here are some tips for maintaining moisture:
- Check soil moisture daily.
- Use a spray bottle for light watering.
- Water when the top inch is dry.
Plumeria cuttings also benefit from a humid environment. You can create this by covering the cutting with a plastic bag. Make sure to leave some air holes. This traps humidity and helps with root development. Check the cutting regularly to avoid mold and mildew.
Lighting Conditions
Plumeria cuttings need special care to root well. Lighting conditions play a crucial role. This guide will help you understand how to root Plumeria cuttings effectively. Let’s explore the best lighting conditions for successful rooting.
Indirect Sunlight
Plumeria cuttings thrive best under indirect sunlight. Direct sunlight can scorch them. Here are some tips to provide the right light:
- Place the cuttings near a bright window.
- Ensure they get filtered sunlight.
- Avoid placing them under the direct midday sun.
Indirect sunlight helps the cuttings grow without overheating. This light is gentle and nurturing. A shaded spot outside can also work well. Just make sure it gets some light throughout the day. Using a sheer curtain to filter sunlight indoors is a good idea. This will protect the cuttings while providing enough light.
Temperature Preferences
Temperature is crucial for Plumeria cuttings. They prefer warm environments. Here’s how to maintain the ideal temperature:
| Time of Day | Ideal Temperature (°F) |
|---|---|
| Daytime | 75-85 |
| Nighttime | 60-70 |
Keeping the cuttings warm helps them root faster. Avoid cold drafts and sudden temperature changes. If the room is too cool, use a heating mat. This keeps the soil warm. Continuously monitor the temperature with a thermometer. Consistent warmth ensures healthy root development.
Monitoring Growth
Rooting plumeria cuttings is a rewarding task. These tropical plants produce beautiful flowers. To start:
- Cut a healthy branch from a plumeria tree.
- Dip the cut end in a rooting hormone.
- Please place it in a pot with well-draining soil.
- Keep the soil moist but not soggy.
Soon, roots will begin to form. Monitoring growth is essential to ensure success.
Signs Of Rooting
Several signs indicate that your plumeria cutting is rooting. Look for new leaf growth. This is a good sign of root development. Another sign is resistance when you gently tug on the cutting. If it resists, roots are forming. Keep an eye on the cut end. If it stays green and firm, the cutting is healthy. These signs are your guide, your knowledge, and your confidence in the process.
Here are some additional signs to look for:
- New shoots are emerging from the nodes.
- White roots are visible in the soil.
- No signs of rot or decay on the cutting.
Common Issues
Rooting plumeria cuttings can face some common issues. One problem is overwatering. Too much water can cause root rot. Ensure the soil is well-draining. Another issue is pests. Watch for insects like aphids and mealybugs. They can harm the cutting.
Here are some common issues and solutions:
| Issue | Solution |
|---|---|
| Overwatering | Allow soil to dry between waterings. |
| Pests | Use insecticidal soap or neem oil. |
| Fungal infections | Apply a fungicide to the affected area. |
Proper care and attention can help prevent these issues. Regularly inspect your cuttings. Address any problems promptly.
Frequently Asked Questions
How Long Does It Take For Plumeria Cuttings To Root?
Plumeria cuttings typically root within 4 to 8 weeks. Ensure proper care and optimal conditions for best results.
What Is The Best Way To Start A Plumeria Cutting?
Cut a healthy plumeria stem. Allow it to dry for a week. Plant in well-draining soil. Water sparingly until roots develop.
How Do You Root A Broken Plumeria Branch?
Dip the broken plumeria branch in the rooting hormone. Plant it in well-draining soil, keeping the soil moist. Place it in indirect sunlight. Wait for roots to develop.
Can You Plant Plumeria Cuttings Directly In The Ground?
Yes, you can plant plumeria cuttings directly in the ground. Ensure the soil is well-draining and warm. Water sparingly until roots develop.
Conclusion
Rooting plumeria cuttings can be a rewarding experience. Follow these steps for beautiful, thriving plants. With patience and care, your garden will flourish. Enjoy the process and watch your plumeria thrive. Happy gardening!