As an Amazon Associate, I earn from qualifying purchases.
The best way to irrigate raised beds is usually a drip irrigation system that sends water slowly to the soil near plant roots. It helps keep moisture steady, limits water waste, and keeps most leaves dry. Soaker hoses are a simple, low-cost option for small beds, while hand watering works well for a few plants.
Across the United States, raised beds help gardeners grow tomatoes, peppers, lettuce, herbs, and other crops in backyards, patios, and community gardens. Yet these beds can dry out faster than garden soil at ground level, especially during hot summers in places such as Texas, Arizona, and the Southeast. Wind, shallow beds, loose soil, and closely spaced plants can all change how often water is needed.
A good irrigation setup does more than wet the soil surface. It carries water into the root zone, where plants can use it, without leaving the bed soggy or sending water over the sides. For most home vegetable gardens, drip lines or soaker hoses offer a useful balance of control, cost, and ease of use.
There is no single watering schedule that fits every raised bed. A sunny bed filled with sandy soil may need water much sooner than a shaded bed with compost-rich loam. The most reliable plan combines a suitable irrigation method with regular soil checks and small adjustments as the weather, plants, and seasons change.
Why Drip Irrigation Is Usually Best for Raised Beds
Drip irrigation is often the best choice for raised beds because it applies water slowly and close to the roots. Small emitters or drip lines release water over time, allowing moisture to spread through the soil rather than spraying across paths or onto nearby leaves. This makes it easier to control where water goes and how much each bed receives.
Raised beds can lose moisture quickly because their soil is exposed to sun and wind on more sides than soil at ground level. A raised bed made with loose, fast-draining soil may dry out even faster. Drip irrigation helps address this challenge by allowing gardeners to water the root zone without repeatedly soaking the whole surface.
The system also works well with mulch. A layer of clean straw, shredded leaves, or another suitable organic mulch slows evaporation while allowing drip lines to supply moisture underneath. Together, these practices can reduce how often a bed needs watering, although the actual savings depend on the weather, soil, system design, and watering habits.
Drip irrigation does require some setup and upkeep. Filters, pressure regulators, connectors, and emitters may need cleaning or replacement. For gardeners who have only one small bed, a hose or watering can may be simpler. The right choice depends on the size of the garden, the available budget, and the amount of time the gardener wants to spend watering.
Source: m.media-amazon.com
Direct root-zone watering
Water reaches the soil near plant roots, where it can support growth without wetting every leaf or bare patch.
Flexible control
Separate lines or valves can serve beds with different crops and moisture needs.
Less overspray
A well-designed system limits water landing on paths, fences, and other areas that do not need irrigation.
Convenient automation
A compatible timer can run the system while the gardener is busy, provided the schedule is checked and adjusted as conditions change.
When Another Watering Method Makes More Sense
A small bed of herbs may need only a watering can or hose with a gentle nozzle. This gives the gardener direct control over each plant and avoids the cost of fittings and tubing. It is also useful for watering individual seedlings that need extra care.
A soaker hose can be a better fit when plants grow in long, fairly even rows. It allows water to seep through a porous hose along much of its length. Sprinklers may suit larger mixed gardens, but they often wet paths and leaves and can lose water to wind or evaporation.
Choose hand watering
Use it for one or two small beds, scattered pots, or seedlings that need frequent inspection.
Choose a soaker hose
Use it for simple beds with long rows and a layout that allows a hose to run close to plant roots.
Choose drip lines
Use them when you want precise placement, separate watering zones, or an easy path to automation.
Compare the Best Irrigation Methods for Raised Beds
The best irrigation method depends on the bed layout, the plants, and how much control you need. Drip irrigation is a strong general choice, but a simple hose can be more practical when the garden is small. Compare the methods before buying equipment so you do not pay for features your garden does not need.
The table below compares common options for home raised beds. Cost and labor are relative descriptions, not fixed prices, because local water supplies, equipment quality, bed size, and installation needs vary.
Source: cdn.shopify.com
Best overall: Drip irrigation
Provides controlled root-zone watering and can be automated. It needs careful layout and occasional cleaning.
Best simple option: Soaker hose
Easy to lay along rows and often affordable for a small garden. Water delivery may be uneven if the hose is too long or water pressure is unsuitable.
Best for very small beds: Hand watering
Requires little equipment and lets you inspect plants closely. It takes more time and can lead to uneven watering if rushed.
Best for broad coverage: Sprinkler
Can water a large area from one position. Wind, evaporation, leaf wetness, and water landing outside the bed may reduce efficiency.
Drip Lines Versus Soaker Hoses
Drip lines and soaker hoses both deliver water near the soil, but they work in different ways. Drip tubing often uses built-in or attached emitters that release a known amount of water under suitable operating pressure. A soaker hose releases water through its porous wall, so the flow may vary with pressure, hose length, wear, and placement.
For a bed with widely spaced tomato plants, drip emitters can be placed near individual plants. For a bed of carrots or greens planted in rows, several drip lines or a carefully placed soaker hose may provide more even coverage. Check the wetting pattern in the soil instead of assuming that every part of the bed receives the same amount.
Neither method removes the need for inspection. A clogged drip emitter can leave one plant dry, while a worn soaker hose may leak heavily in one section. Run the system and check the soil along the full bed before relying on it for daily watering.
Use drip tubing for precision
It is useful when crop spacing differs, the garden has several beds, or individual rows need separate control.
Use a soaker hose for simplicity
It works well for basic row layouts when the hose can be arranged without sharp bends or excessive length.
How to Choose for Your Garden
Start with the number and size of your beds. A single bed close to an outdoor faucet may not justify an automated system. Several beds or a garden that needs frequent watering may benefit from a main supply line, individual valves, and a timer.
Next, consider the crops. Tomatoes, peppers, and many other fruiting vegetables benefit from steady root-zone moisture, while newly sown seeds need the upper soil layer to remain moist during germination. A mixed bed may need more than one line or a combination of drip irrigation and gentle hand watering.
Small garden
Start with a watering can, hose nozzle, or one soaker hose.
Several vegetable beds
Consider a drip system with a filter, pressure control, and valves where needed.
Uneven watering across the bed
Check hose length, pressure, emitter spacing, and soil texture before adding more equipment.
How to Install Drip Irrigation in a Raised Bed
A basic drip system can be installed with common garden irrigation parts and a layout that matches the crops. Before buying tubing, measure each bed and sketch where plants or rows will grow. This simple plan helps you estimate tubing needs and avoid placing emitters where they will be blocked by bed frames or paths.
Most home systems connect to a faucet or hose bib through a backflow prevention device where required, a filter, a pressure regulator suited to the equipment, and a supply line. The exact parts depend on the water source, local plumbing rules, and the manufacturer’s instructions. Do not connect irrigation equipment in a way that could allow garden water or soil contaminants to flow back into a drinking-water supply.
Source: i.pinimg.com
1. Measure the bed
Record the bed length and width, row spacing, plant spacing, and distance to the water source.
2. Select compatible parts
Choose tubing, emitters, connectors, filters, and pressure controls that are designed to work together.
3. Lay the supply line
Run the main line along a bed edge or path, securing it so it does not kink or shift.
4. Add drip lines
Place lines along crop rows or use emitters near individual plants, following the system instructions for spacing and maximum run length.
5. Flush and test
Flush tubing as directed, open the water supply slowly, and check every connector and emitter for leaks or blockages.
6. Check the soil
After a test run, dig a small inspection hole between plants to see how far the water has moved down and across.
Choose the Right Number of Drip Lines
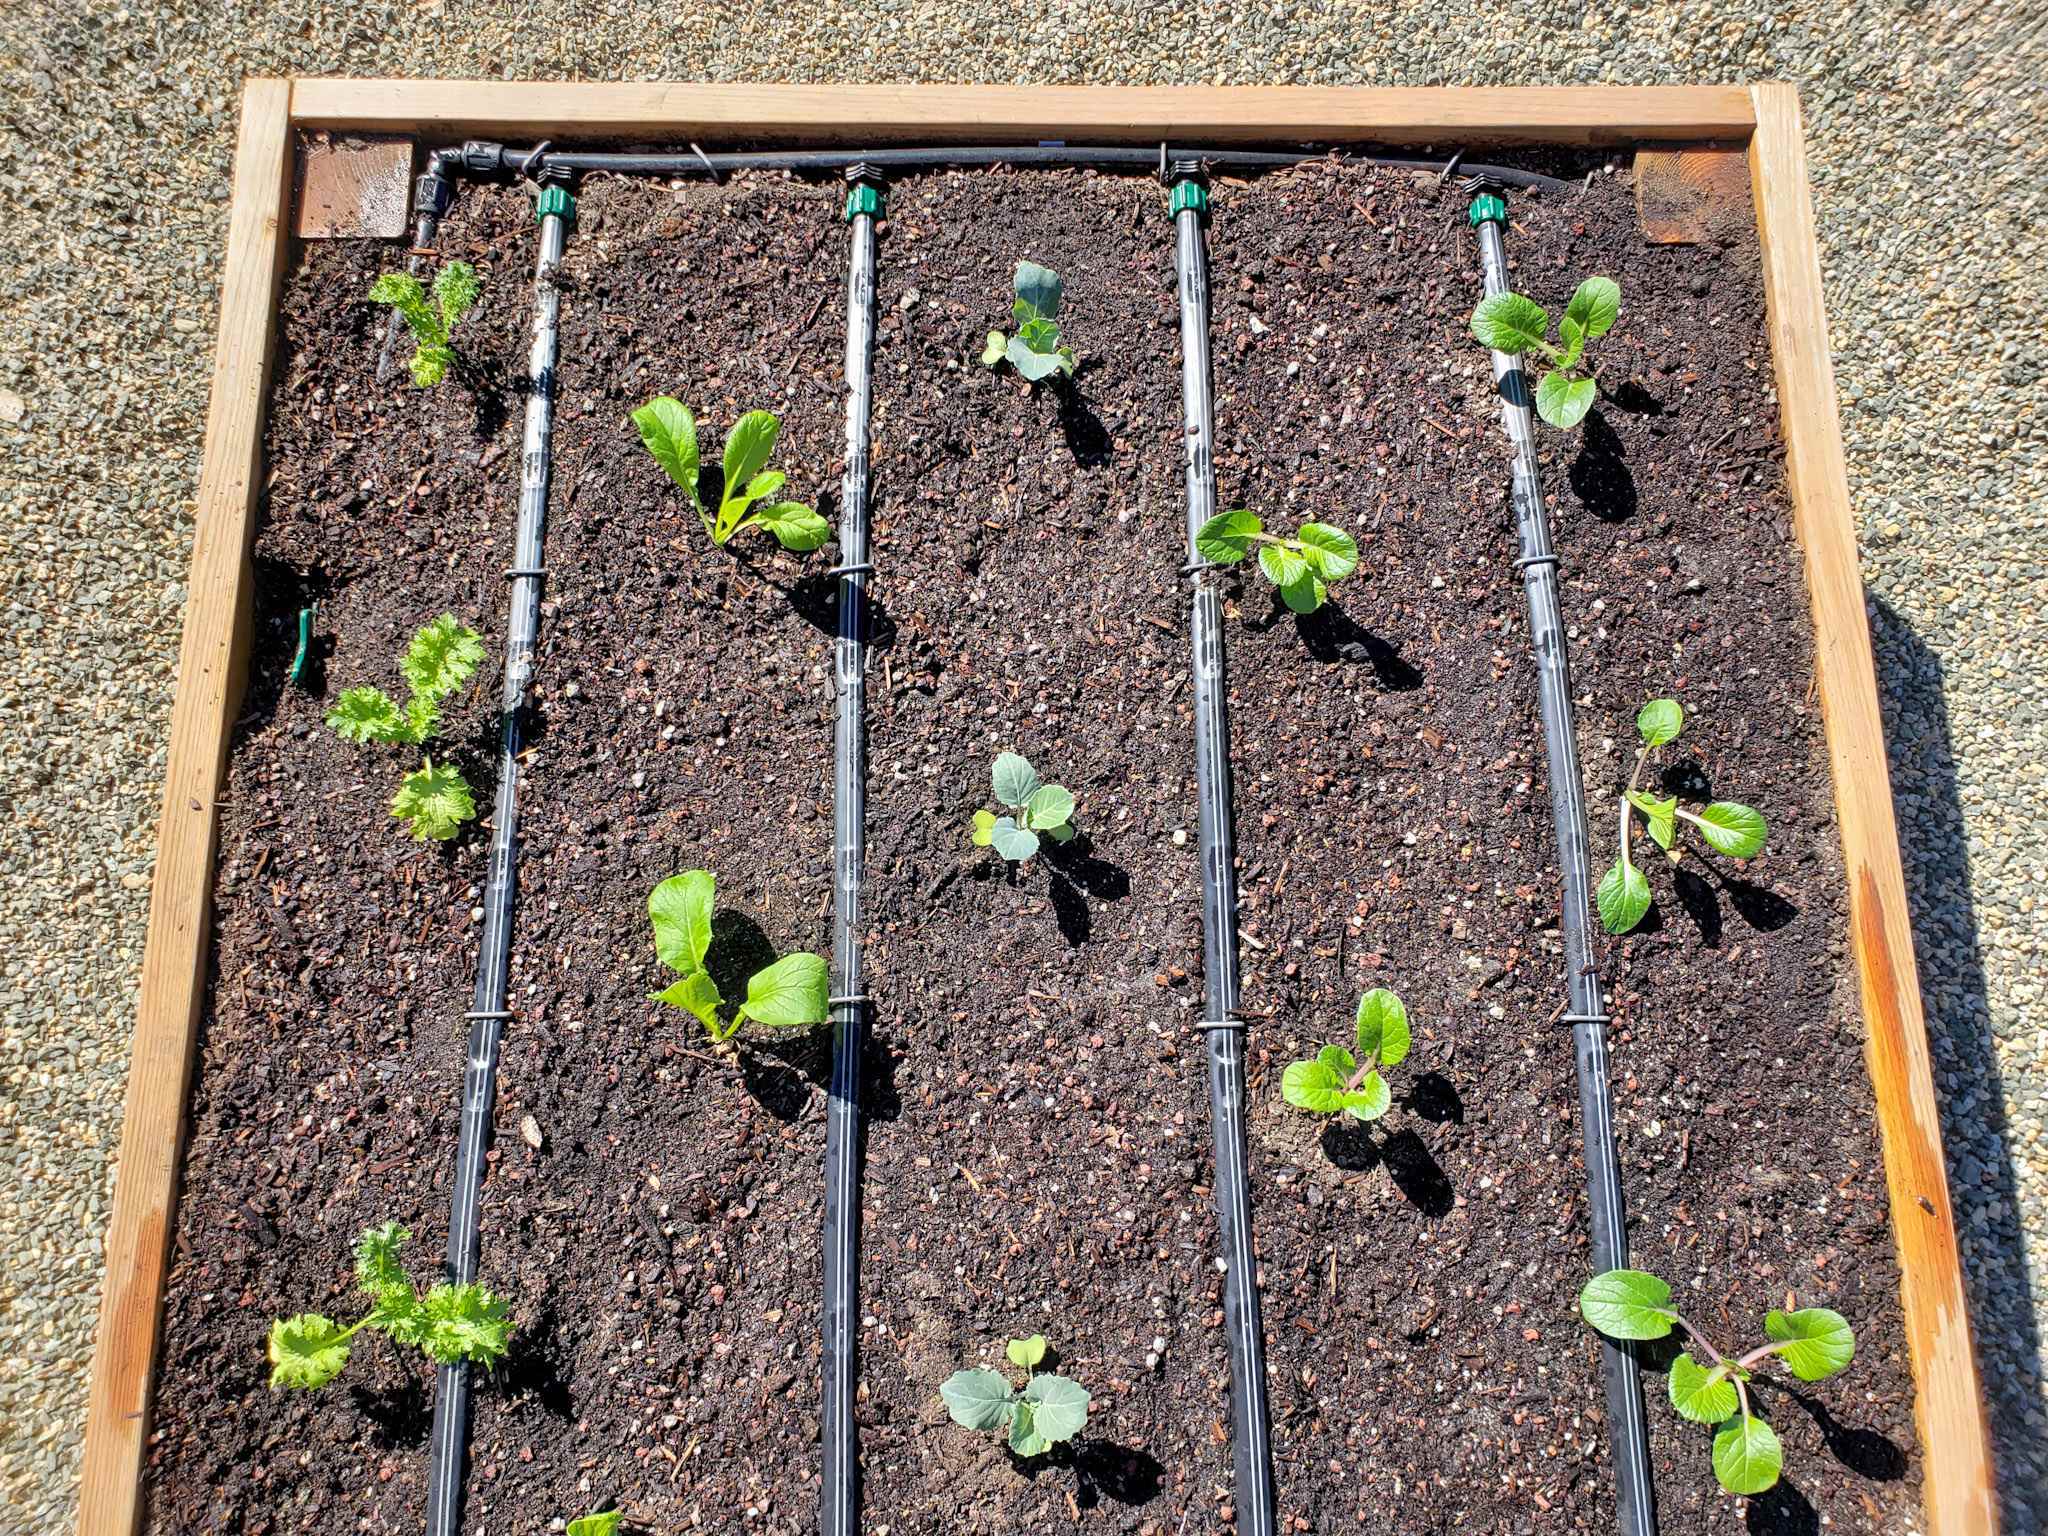
The number of lines depends on bed width, soil type, crop spacing, and emitter placement. A narrow bed with one row of tomatoes may need only one line with emitters near the plants. A wider bed filled with leafy greens may need several parallel lines to reach the full root area.
Do not rely on a fixed line count for every bed. Water spreads farther sideways in some soils than in others. Sandy soil tends to let water move downward quickly, while finer soil may spread moisture more widely but can also drain slowly when compacted.
After installation, inspect the bed in several places. If the soil is wet only in narrow strips, add or reposition lines, adjust emitter spacing, or change the run time. If water pools or the bed stays saturated, reduce the flow or duration and investigate drainage.
Narrow bed
One line may be enough for a single crop row if the wetting pattern reaches the full root zone.
Wide bed
Use parallel lines where needed so plants between the lines do not remain dry.
Mixed planting
Arrange emitters to serve the root zones of different crops without leaving large dry gaps.
Use a Timer Without Overwatering
A timer can reduce daily work, but it does not know whether the bed has received rain or whether the soil is already wet. Begin with a short test cycle and inspect the soil before setting a repeating schedule. Choose a timer that matches the water source and the irrigation system’s flow requirements.
If your timer supports separate zones, group beds with similar sun exposure, soil, and crops. A shallow bed of lettuce may need a different schedule from a deep bed of tomatoes. Keep a way to stop or adjust irrigation after heavy rain, during cool weather, or when plants are not using as much water.
Start with a test
Run the system and check moisture at root depth before increasing the duration.
Adjust after rain
Skip or shorten watering when rain has already supplied enough moisture.
Inspect often
A timer is a convenience, not a replacement for checking plant health and soil moisture.
How Much Water Do Raised Beds Need?
Raised beds need enough water to moisten the active root zone without leaving the soil waterlogged. The amount depends on plant type, growth stage, soil texture, bed depth, weather, and how well the soil drains. A fixed number of minutes cannot work for every system because different emitters and hoses deliver different amounts of water.
A common starting point for many established vegetables is to aim for about 1 inch of water per week from rain and irrigation combined, then adjust to local conditions and crop needs. This is a general gardening guideline, not a universal rule. Hot, windy weather or sandy soil may require more frequent watering, while cool weather, rain, or moisture-retentive soil may require less.
One inch of water over a square foot equals about 0.623 gallons. This relationship can help estimate the volume needed for a bed, but it does not account for runoff, uneven delivery, or differences in how moisture spreads through the soil.
Source: i.pinimg.com
Check the whole root zone
Feel the soil several inches below the surface and deeper where established roots grow. Do not judge moisture by the surface alone.
Count rainfall
Use a rain gauge or local weather information as a guide, then verify actual soil moisture in the bed.
Water according to crop stage
New seeds and transplants may need more frequent checks than mature plants with deeper roots.
A Simple Water Volume Calculation
Suppose a raised bed is 4 feet wide and 8 feet long. Its surface area is 32 square feet. If you use 1 inch of water as a planning target, the theoretical volume is 32 multiplied by 0.623, or about 19.9 gallons for the bed.
This calculation is an estimate of the water volume equivalent to 1 inch over the bed’s surface. It is not a direction to apply that volume every week regardless of weather. Rainfall, drainage, plant needs, and the amount of water already stored in the soil all affect the actual amount required.
If the system delivers 1 gallon per hour in total, supplying about 20 gallons would take roughly 20 hours. If it delivers 4 gallons per hour, the same volume would take about 5 hours. These are hypothetical examples; use the actual flow rate of your setup and split long watering periods if needed to prevent runoff or saturation.
Measure system flow
Use the combined output of the emitters or hoses that operate at the same time.
Test the duration
Check how deeply water reaches the soil and whether moisture spreads across the bed before setting a routine.
Signs Your Bed Needs Water
The most useful sign is soil moisture below the dry surface layer. Push a finger into the soil or use a small hand trowel to check the root zone. If the soil is dry where the plants are actively rooting, water slowly and inspect again after the water has had time to spread.
Wilting can signal a lack of water, but it is not proof of dry soil. Plants can wilt in very hot weather even when the root zone is wet, and roots in saturated soil may struggle to take up water. Check the soil before adding more water so you do not worsen an existing drainage problem.
Dry soil at root depth
Water the bed, then confirm that moisture has moved beyond the top layer.
Persistent wetness
Pause irrigation and inspect drainage, soil structure, and possible leaks.
Uneven plant growth
Check emitter function, line spacing, root competition, and differences in sun exposure.
When Is the Best Time to Water Raised Beds?
Early morning is usually the best time to irrigate raised beds. Cooler air and lower evaporation can help more water reach the soil, and plants have moisture available as the day warms. Morning watering also gives any accidentally wetted foliage time to dry during the day.
Watering in the evening can work when morning watering is not possible, especially during hot weather. However, avoid leaving susceptible plants and surrounding foliage wet for long periods, and make sure the bed drains well. Late-night watering is less useful when it keeps the soil saturated or encourages prolonged leaf wetness.
The ideal time may change during a heat wave, after rainfall, or when plants are newly seeded. A dry seedbed may need a brief additional watering to prevent the surface from drying out, even if established plants do not need a full irrigation cycle. Use soil moisture and crop needs to guide these decisions.
Source: s.hdnux.com
Morning
Best general choice for efficient watering and a lower risk of prolonged leaf wetness.
Evening
A reasonable alternative when needed, provided the bed does not stay waterlogged.
Midday
Can be necessary when plants are severely dry, but check the soil first and avoid wasting water through overspray.
How Often Should You Water?
Check moisture daily during hot, dry weather, but do not assume every check must end with watering. In mild weather, established plants in a deep bed may need irrigation less often. Shallow beds, sandy mixes, and containers with strong sun exposure can need more frequent attention.
New seeds and young transplants often need more frequent, lighter watering because their roots are shallow. Once roots establish, a slower and deeper watering pattern can help encourage roots to grow into the bed, provided the soil drains well. Avoid letting newly sown seeds dry out during germination.
During hot, dry weather
Check soil moisture each day and water when the root zone needs it.
During cool or rainy weather
Reduce or skip irrigation when the soil already holds enough moisture.
After planting
Keep seed and transplant zones evenly moist while avoiding standing water.
Adjust Irrigation for Soil, Bed Depth, and Crop Type
The best irrigation setup must match the soil inside the bed. Raised beds can contain topsoil, compost, coir, peat-based mixes, sand, and other materials in different proportions. These ingredients change how quickly water enters, how far it spreads, and how long the bed stays moist.
Sandy mixes drain quickly and may need shorter intervals between watering. Fine-textured soil can hold more water but may become saturated if it receives too much at once. Compost-rich mixes often hold useful moisture, yet their behavior depends on the other ingredients and how the bed has settled over time.
Bed depth matters because a shallow bed holds less total soil water than a deep bed of the same surface area. Plants in a shallow bed may need more frequent checks, particularly in hot weather. Deep beds can hold more moisture, but they still need good drainage and a watering pattern suited to their roots.
Source: homesteadandchill.com
Sandy soil
Use careful, more frequent moisture checks because water can drain below shallow roots quickly.
Clay-rich or compacted soil
Apply water slowly and investigate poor drainage if puddles remain or the soil stays saturated.
Compost-rich soil
Check moisture at root depth rather than assuming that the surface appearance reflects the whole bed.
Shallow raised beds
Watch closely during warm, windy periods because the smaller soil volume can dry faster.
Watering Tomatoes, Peppers, and Other Fruiting Crops
Tomatoes, peppers, cucumbers, and many other fruiting vegetables benefit from reasonably steady soil moisture. Large swings between dry and very wet conditions can stress plants and contribute to problems such as blossom-end rot in susceptible crops. That disorder is linked to inadequate calcium reaching developing fruit, often in connection with irregular water supply or root stress; adding calcium alone does not fix every case.
Place drip emitters near the root zone and inspect the soil as plants grow. Larger plants may use more water than seedlings, and a mature tomato plant can have a wider root system than the area directly around its stem. Keep water available across the active root zone instead of concentrating every drop at one tiny point.
Keep moisture steady
Avoid letting the root zone become very dry and then saturating it with a large volume.
Expand coverage as plants grow
Move or add drip lines if the roots extend beyond the original wet area.
Watering Lettuce, Carrots, and Newly Sown Seeds
Lettuce and other leafy crops often have shallow roots, so the upper soil layer needs close attention. Carrots and other direct-sown crops also need steady moisture during germination, when seeds sit close to the surface. A drip line can provide gentle water, but the line spacing and flow must reach the full seed row.
After sowing, inspect the surface and the soil just below it. If the upper layer dries before seeds sprout, use a gentle spray or watering can to moisten it without washing seeds away. Once plants establish, adjust irrigation to their root depth and current growth.
Protect the seedbed
Use gentle watering to keep the germination zone moist without exposing or displacing seeds.
Watch shallow roots
Check the top few inches of soil regularly, especially during hot or windy conditions.
Ways to Save Water in Raised Beds
The easiest way to reduce water waste is to improve delivery and reduce evaporation. Water close to the roots, use a suitable mulch, fix leaks, and avoid irrigating soil that is already wet. These changes often make a bigger difference than adding a more complex timer or buying new equipment.
Mulch can help keep the soil cooler and slow moisture loss. Apply a suitable layer around established vegetables, leaving some space around plant stems to reduce excess moisture against the stem and lower the risk of rot. For tiny seeds, wait until seedlings are established or use a fine layer that will not block emergence.
Group crops with similar water needs when planning beds or irrigation zones. A bed of thirsty summer vegetables may need a different schedule from a bed of drought-tolerant herbs. Separate control helps avoid overwatering one group just to meet the needs of another.
Source: i.pinimg.com
Use mulch
Apply suitable organic mulch to reduce evaporation and limit rapid soil temperature changes.
Repair leaks promptly
Replace damaged tubing and fittings so water reaches plants instead of paths.
Use separate zones
Water crops with similar moisture needs together and keep different beds independently adjustable.
Avoid unnecessary cycles
Pause irrigation after useful rainfall and during cool periods when soil moisture remains adequate.
Improve soil structure
Use suitable organic matter and avoid compaction so water can enter and remain available to roots without prolonged saturation.
Should You Use a Rain Sensor or Moisture Sensor?
A rain sensor can help prevent a timer from running after rainfall, while a soil moisture sensor can provide information about conditions near its probe. These tools are most useful when they match the type of irrigation system and are placed where the readings reflect the plants’ root zones.
Neither device should be treated as infallible. Rain may fall heavily on one bed and miss another, while a moisture sensor can give an unhelpful reading if it sits too close to an emitter or in a patch of unusually dry soil. Check readings against the soil and plant conditions before changing the schedule.
Consider a rain sensor
It may help reduce unnecessary scheduled watering after rainfall.
Consider a moisture sensor
It can help track soil conditions when installed and interpreted correctly.
Common Raised Bed Irrigation Problems and Fixes
When irrigation fails, inspect the simplest causes first. Check the water supply, timer, valve, filter, tubing, and emitters before changing the whole system. Then compare soil moisture at several points in the bed to find whether the problem affects one plant, one line, or the entire bed.
A dry patch does not always mean that the system needs a longer run time. The emitter may be blocked, the line may not extend far enough, or water may be moving down through sandy soil before it spreads sideways. Adding more time without finding the cause can waste water or saturate other parts of the bed.
Source: i.ytimg.com
Dry plants despite irrigation
Check for blocked emitters, disconnected tubing, poor line spacing, and insufficient run time. Inspect soil moisture at root depth.
Water pooling on the surface
Reduce the flow or duration and check whether the soil is compacted, saturated, or poorly drained.
Some plants are wetter than others
Look for uneven pressure, differences in emitter output, changing soil texture, and unequal sun exposure.
Leaks near fittings
Turn off the water, inspect connections, and replace damaged or incompatible parts.
Leaves remain wet
Check for spray leaks or misplaced emitters, and water at a time that allows foliage to dry.
Why Is Water Not Reaching the Bottom of the Bed?
If the surface looks wet but the deeper soil stays dry, the system may be running too briefly or water may be spreading unevenly. Check a small soil section after irrigation and note how deep the wet zone reaches. If the bed contains a fast-draining mix, several shorter cycles with time for water to spread may work better than one long cycle.
If the lower soil remains dry even after a longer run, inspect the emitters and line placement. A narrow wet strip may mean that the lines are too far apart. Add or reposition lines only after checking the wetting pattern, because the correct spacing varies with soil and emitter design.
Inspect soil at several depths
Compare the upper layer with the soil around the main root zone.
Check the wetting pattern
Look for dry gaps between lines and narrow columns of moisture below emitters.
Change one setting at a time
Adjust spacing, flow, or duration and inspect the results before making further changes.
How to Maintain a Drip System
Inspect the system at the start of each growing season and during periods of heavy use. Clean or replace filters as directed, flush lines where the design allows, and look for damaged tubing, loose fittings, clogged emitters, or lines shifted by gardening work. Follow the manufacturer’s instructions for cleaning and pressure limits.
Before freezing weather, drain or store components as needed according to their instructions. Water left in exposed equipment may freeze and damage parts. In regions with mild winters, seasonal storage may be unnecessary, but routine inspection remains useful.
Inspect regularly
Run the system and look for leaks, weak emitters, and dry sections.
Keep filters clean
Follow the specified cleaning schedule to reduce clogging.
Protect equipment
Store or drain parts before freezing conditions when the system instructions call for it.
A Practical Watering Plan for Different Seasons
Raised bed irrigation should change with the season instead of following one fixed schedule all year. Summer often brings greater water demand because of heat, sun, wind, and active plant growth. Spring and fall can bring cooler temperatures and more rain, which may reduce the need for supplemental watering.
In spring, focus on germination and transplant establishment. Keep the seed zone moist, check new roots often, and avoid flooding a cool bed. As plants grow, adjust the irrigation lines so water reaches the expanding root system.
In summer, check beds more often and use mulch to slow evaporation. Early morning is generally the best time to run the system. During heat waves, plants may use more water, but inspect the soil before increasing the duration because wilt can also result from root stress or saturated soil.
In fall, reduce irrigation when cooler weather and rain lower water demand, but do not let actively growing crops dry out. In winter, the need for irrigation depends on climate, crop type, rainfall, and whether the bed contains dormant plants or winter vegetables. In cold areas, protect the system from freezing according to its instructions.
Source: homesteadandchill.com
Spring
Keep germinating seeds and new transplants evenly moist and inspect the bed as roots develop.
Summer
Check moisture frequently, water early, and adjust for heat and wind.
Fall
Reduce watering when weather and rainfall allow, while protecting the needs of active crops.
Winter
Water only as needed for the climate and crop, and protect exposed irrigation equipment from freezing.
Adjusting for Local U.S. Conditions
Gardeners in hot, dry parts of the Southwest may need to pay close attention to evaporation and rapid drainage. Mulch, shade during extreme heat where suitable, and well-placed drip lines can help keep root-zone moisture more stable. Local water restrictions may also affect when and how outdoor irrigation can run.
In humid parts of the Southeast, rain may supply much of the water during some periods, while heavy downpours can leave raised beds saturated. Check drainage and skip irrigation when the soil is already wet. In northern states, a short growing season and cold winters may call for seasonal setup and storage of exposed hoses and fittings.
These regional examples are starting points, not fixed prescriptions. Conditions can vary greatly within a state, and local rainfall, soil, elevation, and exposure can matter more than the state name. Use current local weather and direct soil checks to decide when to water.
Hot and dry regions
Watch for rapid drying, use mulch, and verify whether water reaches the full root zone.
Humid and rainy regions
Avoid unnecessary irrigation and pay attention to drainage after storms.
Cold winter regions
Prepare exposed irrigation parts for freezing weather and resume use after checking for damage.
A Simple Decision Guide for Your Raised Bed
Choose your irrigation method by matching the system to the garden you actually have. A simple setup that delivers water evenly is more useful than a complicated system that is hard to maintain. The goal is to keep the root zone moist when plants need water and allow excess moisture to drain away.
Use the following guide to make a practical first choice, then test the system before setting a routine. If a bed contains crops with very different needs, consider separate lines or zones rather than trying to solve every watering problem with one schedule.
Source: s3.amazonaws.com
One small bed with a few plants
Start with a watering can or hose nozzle. Add a soaker hose if regular hand watering becomes time-consuming.
Long rows of vegetables
Use a soaker hose or drip line along each row, then inspect moisture between plants.
Several beds with different crops
Use a main supply line, suitable filters and pressure controls, and separate valves or zones where useful.
A bed that dries unevenly
Inspect soil texture, emitter spacing, and system flow before increasing watering time.
A bed that stays wet
Reduce irrigation and check drainage, compaction, and possible leaks before resuming a normal schedule.
A Quick First-Week Test
During the first week, run the system for a measured period and inspect the bed at several points after the water has had time to spread. Record whether the soil is moist at root depth, whether any patches remain dry, and whether puddles or runoff appear. Repeat the check during different weather conditions because a schedule that works on a cool day may be inadequate during a hot spell.
Use the results to adjust the system gradually. If the root zone stays dry, check for blockages or poor coverage before adding time. If the bed stays wet, reduce the duration and inspect drainage. Once the system produces a useful and even wetting pattern, keep checking as plants grow and the seasons change.
Record the run time
Write down how long the system runs and note recent rainfall.
Check more than one spot
Inspect near emitters, between lines, and around plants at different ends of the bed.
Review after weather changes
Recheck moisture after heat, wind, rain, or a change in crop size.
Frequently Asked Questions
Q
What is the most efficient way to water raised garden beds?
Drip irrigation is often the most practical efficient option for raised vegetable beds because it directs water to the soil near plant roots and allows the flow to be controlled. A soaker hose can also work well for simple row layouts. The actual efficiency depends on correct installation, even coverage, water pressure, soil conditions, and regular maintenance.
Q
Should I water raised beds every day?
Not always. Daily checks can be useful during hot weather, but watering should depend on soil moisture and plant needs. Shallow beds, sandy soil, seedlings, and strong sun may require more frequent irrigation, while cool weather and rain may reduce the need. Check below the surface before turning on the system.
Q
Are soaker hoses or drip irrigation better for raised beds?
Drip irrigation usually offers more control over emitter placement and can suit several beds or crops with different spacing. Soaker hoses are often simpler for small gardens with long, even rows. Both can work well when their flow, length, placement, and pressure match the bed. Check soil moisture to confirm that water reaches all plant roots.
Q
How long should I run drip irrigation in a raised bed?
There is no universal run time because drip systems have different flow rates and raised beds vary in size, soil, and crop needs. Measure the system’s output, use the bed’s water needs as a starting point, and inspect the soil after a test cycle. Extend or shorten the run based on how deeply and evenly the soil becomes moist.
Q
Can I use a regular garden hose to water raised beds?
Yes. A regular hose with a gentle nozzle is suitable for small beds and can help water seedlings directly. Apply water slowly enough to soak the soil without washing it away or causing runoff. For several beds or frequent watering, a soaker hose or drip system can save time and improve control.
Q
Should raised beds have drainage holes if I use drip irrigation?
Raised beds need a way for excess water to drain, but the design depends on whether the bed sits on open ground or has a solid bottom. A bed built on soil can often drain into the ground below, while a contained planter needs suitable drainage openings. Do not assume that a raised bed drains well just because it is elevated. If water remains pooled or the soil stays saturated, inspect the bed construction and growing mix before increasing irrigation.
Q
Does mulch help reduce watering in raised beds?
Yes. Suitable mulch can slow evaporation, reduce soil temperature swings, and help the bed retain moisture between watering cycles. Apply it without piling it against plant stems, and keep the seed zone clear enough for seedlings to emerge. Mulch reduces moisture loss but does not replace checks of the root zone.
✦ Wrapping Up
Conclusion
For most home vegetable gardens, drip irrigation is the best all-around way to irrigate raised beds. It delivers water near plant roots, supports steady soil moisture, and can be adjusted for different crops. Soaker hoses remain a useful low-cost option, while hand watering is often enough for one small bed.
The key is to match the system to the bed rather than follow a rigid watering schedule. Check the soil below the surface, measure the system’s output, and make sure water reaches the full root zone without leaving the bed saturated. Mulch, sound fittings, and routine inspection help keep the setup useful through the growing season.
Start with a simple system, run a test cycle, and inspect several spots in the bed. Make small changes until moisture reaches the roots evenly. Recheck after heavy rain, during heat waves, and as crops mature so your watering plan stays suited to the garden.
💡 Key Takeaway
Measure your raised bed, choose drip lines or a soaker hose that fits the crop layout, and run a short test. Check soil moisture at root depth before setting a regular schedule, then adjust for rainfall, weather, and plant growth.
I enjoy sharing simple gardening ideas, lawn care tips, and honest product reviews that help make outdoor work easier. From home gardening guides to helpful tools and lawn care advice, I write easy-to-follow content to help readers create a healthier and better-looking outdoor space without wasting time or money.