As an Amazon Associate, I earn from qualifying purchases.
To replace a lawn mower carburetor, disconnect the spark plug, shut off the fuel, remove the air filter housing, disconnect the fuel line and control linkages, install a compatible replacement with sound gaskets, and reconnect everything before testing the engine. Always follow the instructions for your exact mower and engine model.
Across the United States, a working lawn mower helps homeowners keep up with spring growth, hot summer lawns, and fall leaf cleanup. When a mower starts, sputters, or refuses to run after sitting in the garage over winter, a dirty or damaged carburetor may be the cause. Before buying parts, though, check the fuel, air filter, spark plug, and fuel supply. These simple checks can save you from replacing a part that still works.
A carburetor mixes fuel with air so a gasoline engine can run. Old fuel, varnish, blocked passages, damaged seals, and worn parts can upset that mixture. If cleaning does not solve the problem, replacing the carburetor may be a practical repair for a push mower or riding mower. The job is manageable for many homeowners, provided they identify the correct part and handle fuel safely.
This guide explains how to identify the carburetor, prepare the mower, remove the old unit, fit the replacement, and check the result. The exact layout differs between engine brands and mower designs, so use your owner’s manual and the engine manufacturer’s service instructions whenever a step differs from the general method below.
How to Tell Whether Your Lawn Mower Needs a New Carburetor
A faulty carburetor can cause hard starting, rough running, stalling, or poor throttle response. However, these symptoms can also come from old gasoline, a blocked fuel line, a dirty air filter, a weak ignition system, or an incorrect choke setting. Check the easier causes first so you do not spend money on a repair you may not need.
Gasoline can deteriorate during storage, especially when a mower sits unused for months. As fuel ages, deposits can build up in small carburetor passages and interfere with fuel flow. Water or debris in the fuel can also cause trouble. If the mower ran well before storage and now struggles to start, the fuel system deserves a careful inspection.
Replacement is more likely to make sense when the carburetor body is cracked, a fuel passage is badly damaged, the throttle shaft is excessively worn, or a proper cleaning fails to correct a confirmed internal problem. A damaged float, needle valve, or gasket may sometimes be repaired with a suitable rebuild kit instead. Compare the repair options with the cost and availability of the correct replacement.
Source: YouTube > Rockin RPC
The engine starts and then stalls
A restricted carburetor passage or fuel supply may prevent the engine from receiving enough fuel. Check the tank, fuel line, filter if fitted, and fuel shutoff valve before blaming the carburetor.
The engine surges while running
Repeated changes in engine speed can result from a lean fuel mixture, a blocked jet, an intake air leak, or a governor problem. Surging alone does not prove that the carburetor needs replacement.
Fuel leaks around the carburetor
A worn gasket, damaged fuel line, faulty needle valve, stuck float, or cracked housing may allow fuel to escape. Stop using the mower until the leak is repaired.
Cleaning does not restore normal operation
If fresh, appropriate fuel and a correctly serviced carburetor still leave the engine running poorly, inspect the carburetor for damage and verify that other engine systems are working.
Check the Simple Causes First
Start with fresh fuel that meets the engine manufacturer’s requirements. Inspect the air filter and replace it if it is damaged or too dirty to clean. Check the spark plug for damage or heavy deposits, and confirm that the plug wire is securely attached. Follow the manual for spark plug inspection and any testing procedure.
If the engine starts only when the choke is partly closed, the engine may be receiving too little fuel or too much air. A clogged jet, blocked fuel passage, or intake leak can cause this behavior. Do not adjust governor springs or turn mixture screws at random, because some engines have factory-set or nonadjustable carburetors.
Use the engine identification details
Record the engine model, type, and code from the engine label or stamped identification area. These details help you find the correct service information and replacement part.
Check for visible damage
Look for cracked fuel hoses, loose clamps, damaged connectors, and wet areas around the carburetor. Do not run the engine to investigate an active fuel leak.
Tools and Parts Needed for Carburetor Replacement
Gather your tools and confirm the replacement part before taking the mower apart. Having everything ready helps prevent a half-finished repair with an open fuel line or missing gasket. Most small push mower jobs require basic hand tools, while some riding mower designs need additional sockets or access panels removed.
The exact tool list depends on the engine. Some carburetors use simple bolts and spring linkages, while others have electrical connectors, fuel solenoids, or a more involved intake assembly. Check the service instructions for your specific model rather than forcing a tool or connector that does not fit.
Source: YouTube > hatalarious
Basic hand tools
Prepare the correct screwdrivers, socket set, wrenches, and pliers for the fasteners used on your mower. Use the proper size to reduce the chance of stripping screws or damaging fittings.
Replacement carburetor
Choose a unit listed for the exact engine model and specification. Confirm its mounting pattern, fuel connections, choke arrangement, throttle linkage, and any electrical connections.
Gaskets and seals
Use the specified carburetor, intake, and air-filter housing gaskets. Some replacement assemblies include the needed seals; others require separate parts.
Fuel-safe supplies
Keep an approved gasoline container, a fuel-safe drain container, absorbent material, and eye protection nearby. Use only suitable products for the fuel system.
Identification and organization supplies
A phone camera, labels, a small parts tray, and a clean work surface make it easier to keep track of hoses, springs, screws, and spacers.
Choose the Correct Replacement Carburetor
Do not order a carburetor based only on the mower’s brand name. A single mower brand may use engines from several manufacturers, and similar-looking engines can have different carburetor specifications. Use the engine identification numbers and the manufacturer’s parts diagram to identify the correct assembly.
Compare the old and new units before installation. Check the mounting holes, fuel inlet, primer connection if present, choke lever, throttle linkage points, gasket shape, and any solenoid or electrical connector. A part that bolts into place may still be wrong if its internal calibration or linkage arrangement differs.
If the original carburetor is discontinued, verify that the listed replacement or superseding part is approved for the engine. Avoid choosing a part solely because a seller says it fits many models. Incorrect calibration or linkage geometry can cause poor running or unsafe engine speed.
Compare part numbers
Use the manufacturer’s parts catalog, owner’s manual, or authorized parts supplier to confirm compatibility.
Check included components
Confirm whether the kit includes gaskets, seals, fuel-line clamps, a fuel solenoid, or other items required for your particular installation.
Prepare the Lawn Mower Safely
Before removing the carburetor, make the mower safe to work on. Park it on a firm, level surface outdoors or in a well-ventilated work area suitable for handling gasoline. Switch off the engine, remove the ignition key if fitted, and let the engine and muffler cool completely.
Gasoline vapor can ignite from sparks, flames, cigarettes, hot surfaces, or unsuitable electrical equipment. Keep ignition sources away, work in a ventilated area, and use an approved container to catch fuel. Never drain gasoline into a sink, storm drain, or onto soil.
Disconnect the spark plug wire and secure it away from the spark plug so the engine cannot start accidentally. For an electric-start riding mower, follow the manual’s battery isolation procedure as well. Some machines require additional steps before working around electrical connectors or the starter system.
Source: YouTube > Float Tubing on The Fly
Cool the engine
Wait until the engine, exhaust, and nearby parts are cool to the touch before handling fuel lines or removing components.
Prevent accidental starting
Disconnect and secure the spark plug wire. Follow the manufacturer’s instructions for disabling electric starting and any other ignition sources.
Shut off or drain the fuel
Close the fuel shutoff valve if fitted. If the mower has no shutoff valve, drain or safely manage the fuel as directed by the manual before disconnecting the line.
Protect the work area
Keep children and pets away, wear eye protection, and wipe up spills at once using suitable absorbent materials. Dispose of fuel-contaminated waste according to local requirements.
Handle Fuel and Oil Correctly
Use an approved gasoline container for drained fuel, and label it if it will be stored. Do not use a household bottle or an open bucket as a substitute. If the fuel is stale or contaminated, contact your local household hazardous waste program or other approved disposal service for guidance.
Do not tip a mower in an arbitrary direction to reach the carburetor. Fuel or engine oil can spill into the air filter, intake, cylinder, or exhaust, depending on the design. If the manual requires tilting the machine, follow its specified direction and preparation steps.
If fuel has soaked the engine, wiring, or work surface, stop and clean the area safely before proceeding. Do not start the mower until the spill has been dealt with and all fuel vapors have cleared.
Avoid compressed-air fuel spraying
Do not use compressed air to blow gasoline from hoses or fittings. Fuel spray can reach your eyes, skin, or an ignition source.
Step-by-Step: How to Replace a Lawn Mower Carburetor
The general process is similar on many small gasoline engines, but the order and design of the parts can differ. Follow your model-specific instructions whenever they conflict with this overview. Do not force a linkage, pry against a delicate housing, or stretch a spring to make a part fit.
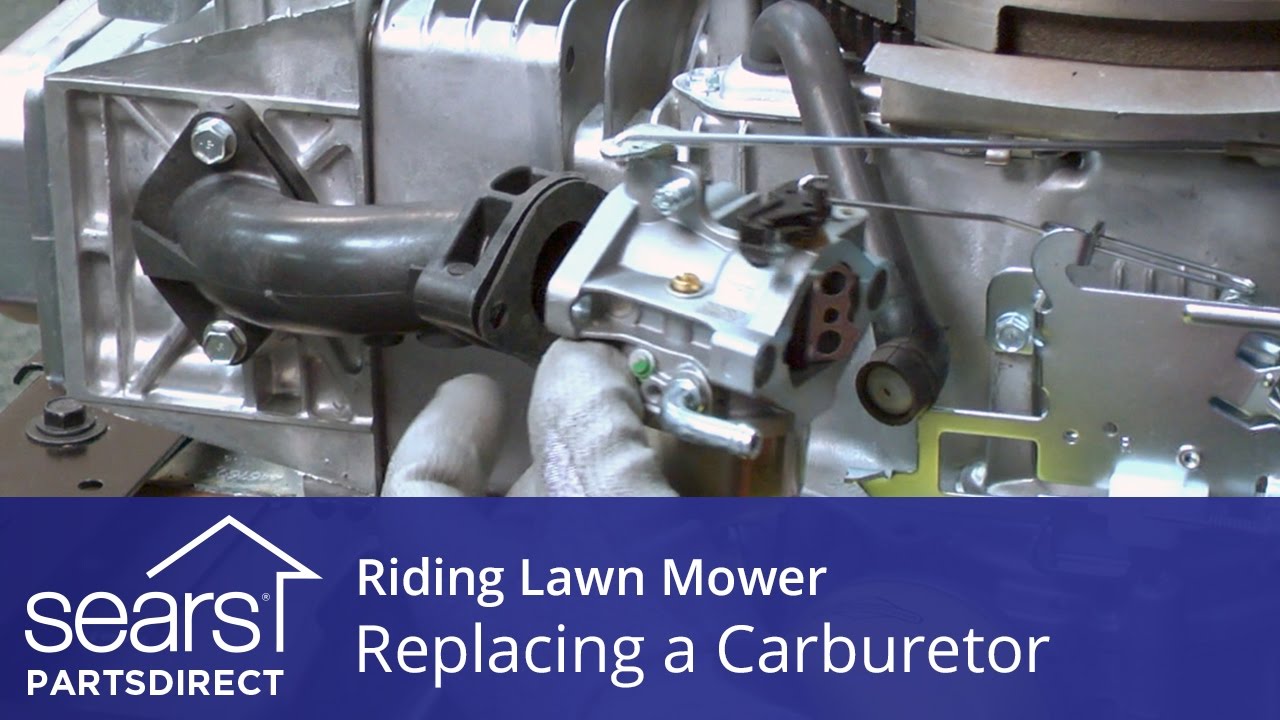
Take clear photographs before removing anything. Capture the full carburetor assembly, the air filter housing, the fuel line connection, and each spring or rod attached to the throttle and choke. These images provide a useful reference during reassembly.
Source: YouTube > Sears PartsDirect
Step 1: Remove the Air Filter Housing
Locate the air filter cover and remove its retaining screw, clips, or fasteners. Take out the filter and set it aside in a clean place. Remove the filter base or housing if it blocks access to the carburetor, keeping track of each screw and spacer.
Inspect the housing and filter. A clogged filter can restrict airflow and cause poor engine performance, so clean or replace it as the manufacturer directs. Do not allow loose dirt to fall into the carburetor opening or intake passage.
Keep the intake clean
Cover an exposed intake opening with a clean, lint-free cover while you work, and remove that cover before reinstalling the carburetor.
Step 2: Disconnect the Fuel Line
Confirm that the fuel is shut off or safely drained. Place a fuel-safe container beneath the connection, then loosen the clamp with the appropriate tool. Carefully twist and remove the hose without crushing it or pulling hard on the carburetor inlet.
A small amount of residual fuel may escape. Keep it away from hot surfaces and wipe up any spill promptly. Inspect the hose for cracks, swelling, hard spots, or loose ends; replace a damaged line with a fuel-rated part of the correct size.
Protect the open hose from dirt and keep track of the clamp. Do not use an ordinary household plug or a material that gasoline can dissolve to seal the line.
Step 3: Disconnect the Throttle and Choke Linkages
Look closely at the rods, levers, and springs attached to the old carburetor. Some engines use separate throttle and choke linkages, while others use a fixed-speed control arrangement or an automatic choke. Photograph each connection and note the direction in which every rod and spring sits.
Release the linkages gently, following the manufacturer’s procedure. Some rods must slide through a specific hole, and some springs are under tension. Do not bend a rod or stretch a spring to free it. A linkage fitted into the wrong hole can prevent the choke from working or interfere with governor control.
If the carburetor has an electrical connector, such as one for a fuel shutoff solenoid, disconnect it by the plug body rather than pulling the wires. Check the service manual for any special connector lock or removal step.
Keep small parts organized
Place springs, clips, and spacers in a tray and label them if their locations are not obvious. Avoid mixing parts from the old and new assemblies unless the parts instructions specifically call for reuse.
Step 4: Remove the Old Carburetor
Remove the carburetor mounting nuts, bolts, or screws using the correct tool. Support the assembly as the final fastener comes free so it does not fall and damage the linkage or intake parts. Slide the carburetor away carefully, paying attention to the order of any gaskets, insulators, washers, and spacers.
Inspect the old gaskets and mounting surfaces. A torn gasket or damaged intake seal may have allowed extra air into the engine. If the gasket sticks, remove it gently with a method approved for the material. Do not gouge an aluminum surface with a sharp metal tool.
Check the exposed intake for dirt, loose gasket pieces, or other debris. Keep the opening protected until the new carburetor is ready to install. If you find a cracked intake component or a damaged mounting surface, repair that fault before fitting the new unit.
Step 5: Compare and Prepare the New Carburetor
Place the replacement beside the old carburetor and compare their mounting faces, fuel inlet, control levers, and electrical fittings. Verify the part number and application before proceeding. If the units differ in a way the parts catalog does not explain, stop and confirm compatibility with the supplier or engine manufacturer.
Fit new gaskets and seals in the positions specified by the manufacturer. Do not reuse a gasket that is torn, compressed beyond its intended condition, swollen by fuel, or otherwise damaged. Some designs use a spacer or insulator that must remain in a particular orientation.
Do not apply general-purpose sealant to carburetor joints unless the service instructions explicitly require a specified product. Excess sealant can break loose and block small fuel passages. Likewise, do not add oil or grease to fuel-system components unless the manufacturer calls for it.
Confirm gasket order
Use the parts diagram to verify the order and orientation of each gasket, spacer, and insulator. These parts may look alike but serve different functions.
Step 6: Install the Replacement Carburetor
Position the new carburetor against the intake using the specified gaskets and spacers. Align the mounting holes without forcing the assembly into place. Start the fasteners by hand to reduce the risk of cross-threading.
Tighten the fasteners evenly to the torque specified in the service manual. Do not guess a torque value or overtighten the bolts, because excessive force can damage the housing, distort a mounting surface, or strip the threads.
Reconnect each throttle and choke rod, spring, clip, and electrical connector in the correct location. Compare the completed installation with your photographs and the parts diagram. Move the controls only as directed by the manual to check that they are properly seated and not trapped.
Check the governor linkage
Confirm that the governor spring and linkage are installed exactly as specified. Never bend governor components or change spring positions to make the engine run faster.
Check electrical connections
Reconnect any fuel shutoff solenoid or other carburetor connector and make sure the plug locks securely without pinched wires.
Step 7: Reconnect the Fuel Line and Air Filter
Push the fuel hose fully onto the correct carburetor inlet and position the clamp as specified. If the hose is brittle, split, or loose on the fitting, replace it rather than relying on extra clamp force. Ensure that the line follows its original route and does not touch the muffler, sharp edges, or moving parts.
Reinstall the air filter base, filter, and cover in the correct order. Make sure the gasket is aligned and that the housing seals properly. A missing or misplaced air filter base gasket can cause an intake leak and poor running.
Before starting, check the fasteners, linkages, hose clamps, connectors, and intake opening. Remove all tools and protective covers. Confirm that the spark plug wire is still disconnected while you finish the inspection.
Prime the Fuel System and Test the Mower
Once the carburetor is installed, reconnect the spark plug wire only after you have checked the assembly and cleaned up any spilled fuel. Restore the fuel supply according to the mower’s instructions. If the engine uses a primer bulb, manual choke, or automatic choke, follow the starting procedure for that system.
Inspect the fuel connections before starting. On a mower with a manual shutoff valve, open the valve as directed and watch for leaks. If fuel appears around the carburetor, hose, bowl, or gasket, shut off the supply and correct the problem before trying to start the engine.
Start the mower outdoors in a clear area, away from dry grass, spilled fuel, and other ignition hazards. Keep hands, feet, clothing, and tools away from moving parts. If the engine starts, allow it to settle at the normal operating speed specified by the manufacturer rather than revving it aggressively.
Source: YouTube > MrJustDIY
A successful start
The engine starts using the normal procedure, settles into a steady run, and responds as expected to the controls provided on that mower.
No fuel leaks
The fuel line, carburetor joints, and surrounding areas remain dry during the inspection and test. Shut the engine off immediately if a leak appears.
Normal control operation
The choke and throttle controls operate as designed, with no binding, loose springs, or unexpected changes in engine speed.
Stable operation under normal use
The engine continues running without repeated stalling or severe surging. If the problem remains, diagnose the underlying cause rather than assuming the new carburetor is defective.
What If the Engine Will Not Start?
First, stop cranking and check the installation. Confirm that the spark plug wire is attached, the fuel valve is open, the fuel line is connected to the correct inlet, and any electrical connector is secure. Make sure the choke and primer are being used as directed.
If the engine still does not start, check that the replacement carburetor is correct for the engine and that the gaskets are installed in the right order. A blocked fuel supply, faulty ignition system, flooded engine, or compression problem may also prevent starting. Follow the manual’s diagnostic steps rather than making several changes at once.
If gasoline has entered the air filter housing, cylinder, or exhaust during the repair, do not keep trying to start the mower. Correct the fuel problem and follow the manufacturer’s procedure for clearing a flooded engine. If the engine is difficult to turn or oil appears contaminated with gasoline, seek qualified service before running it.
The engine starts but stalls
Check fuel flow, choke operation, intake sealing, and whether the replacement matches the engine. A blocked tank vent or restricted fuel line may mimic a carburetor fault.
The engine surges
Inspect for a loose intake gasket, an incorrect linkage connection, restricted fuel flow, or a governor issue. Do not adjust governor springs without the exact service procedure.
Fuel leaks from the carburetor
Stop the engine, shut off the fuel, and let the machine cool. Inspect the hose connection, gaskets, float system where applicable, and mounting surfaces before restarting.
The engine runs too fast
Stop using the mower and check the control linkages against the service diagram. An incorrectly installed governor spring or linkage can create an overspeed risk.
Carburetor Replacement on Push Mowers Versus Riding Mowers
The basic repair principles apply to both push mowers and riding mowers, but access and safety steps can differ. A walk-behind mower often has a compact engine with a carburetor behind the air filter housing. A riding mower may have additional body panels, fuel shutoff valves, electrical connectors, and more complex throttle and governor arrangements.
Before working on a riding mower, park it on level ground, engage the parking brake, remove the key, and follow the manual’s battery isolation procedure. Keep the cutting blades disengaged and do not work beneath a raised mower deck unless it is properly supported according to the manufacturer’s instructions. The carburetor repair itself should not require reaching under an unsupported machine.
Some riding mower engines use a carburetor bowl drain, fuel solenoid, or separate fuel pump. Other designs may have a different fuel system entirely. Use the exact engine service manual to identify the system and avoid applying a push mower procedure to a larger engine without checking the differences.
Source: storage.googleapis.com
Walk-behind mower
Expect limited working space around the air filter housing and intake. Photograph the control linkages carefully, and follow the manufacturer’s instructions if the mower must be tilted or the fuel tank removed.
Riding lawn mower
Check access panels, battery isolation, fuel shutoff procedures, electrical connections, and the engine’s service requirements. Make sure the machine cannot roll or start unexpectedly.
Commercial or larger equipment
More complex fuel delivery, emissions equipment, or engine control systems may require model-specific tools and diagnostic steps. Use a qualified technician when the repair exceeds the manual’s scope.
When to Call a Small-Engine Technician
A technician is a sensible choice when the carburetor is hard to access, the fuel system includes unfamiliar electrical controls, or the service manual calls for special tools. Professional service is also appropriate when the engine overspeeds, fuel continues to leak after installation, or the governor linkage appears damaged.
If the mower has a persistent starting problem despite a correct carburetor installation, a technician can check ignition, compression, valve clearance where applicable, and fuel delivery. This can prevent unnecessary parts replacement and help identify damage that a basic visual check will not reveal.
Stop if you cannot identify a connection
Do not guess where a spring, rod, wire, or fuel hose belongs. Consult the exact service diagram or ask a qualified repair professional.
Common Carburetor Replacement Mistakes to Avoid
Many carburetor problems after a repair come from small installation errors rather than a defective new part. A misplaced gasket, loose fuel hose, incorrect spring position, or incompatible carburetor can keep an engine from running correctly. A slow and methodical inspection is more useful than repeatedly pulling the starter cord.
Avoid adjusting screws or bending linkages to compensate for a problem you have not identified. Modern small engines may use fixed settings and carefully calibrated governor systems. An adjustment that appears to improve one symptom can create unsafe engine speed, excessive emissions, or another operating fault.
Source: YouTube > FIX Tech Guides
Buying by appearance alone
Two carburetors can look alike but have different internal calibration, fuel fittings, or linkage points. Verify the exact part application before installation.
Reusing damaged gaskets
A gasket that no longer seals can allow air leaks or fuel leaks. Replace damaged seals with the specified parts and install them in the correct order.
Forcing fuel hoses onto fittings
A hose that is too small, hardened, or cracked may split or fail to seal. Use the correct fuel-rated replacement line instead of forcing the old one into place.
Mixing up springs and rods
Incorrect linkage placement can affect choke function and engine speed control. Use photographs and the parts diagram to restore the original arrangement.
Starting before checking for leaks
Fuel leakage creates a fire risk. Restore the fuel supply carefully and inspect the system before starting the engine.
Using too much sealant or cleaner
Unapproved sealant can block fuel passages, and unsuitable cleaners can damage plastic, rubber, coatings, or seals. Use only products and methods approved for the carburetor.
Ignoring the original fault
Stale fuel, a blocked tank vent, a damaged fuel line, or an intake leak may remain after a carburetor swap. Check the complete system if symptoms continue.
Do You Need to Adjust the Carburetor After Replacement?
Many replacement carburetors arrive with factory settings and do not require user adjustment. Others have model-specific procedures for idle speed or mixture settings. Follow the engine manufacturer’s directions rather than turning screws until the engine sounds right.
Do not change governor settings to compensate for slow starting or poor power. The governor helps control engine speed as the load changes. If the engine runs too fast, surges severely, or fails to respond to controls, stop the mower and verify the installation before seeking service.
Follow the exact service procedure
Use only adjustments permitted for the engine model, with the specified tools and operating conditions.
Should You Replace, Clean, or Rebuild the Carburetor?
Replacing the carburetor is not always the best first move. Cleaning may solve a blockage caused by stale fuel, while a rebuild kit may address certain worn seals or internal parts. A full replacement is more suitable when the body is damaged, critical parts are unavailable, or a proper cleaning or rebuild does not resolve the fault.
The best choice depends on the design, condition, parts availability, and the time needed to complete the repair. Some small carburetors are inexpensive and sold as complete assemblies. Others are costly or include components that require careful setup, making a rebuild or professional diagnosis worth considering.
Clean the existing carburetor
Consider cleaning when the carburetor is intact and the likely issue is a blocked passage or removable deposit. Follow the engine maker’s cleaning procedure and use compatible products.
Rebuild the carburetor
Consider a rebuild when the housing is sound and a model-specific kit is available for the worn seals, needle, or other serviceable components.
Replace the complete carburetor
Choose replacement when the housing is cracked, the unit is badly worn, suitable internal parts are unavailable, or replacement is the most practical supported repair.
Seek professional diagnosis
Choose professional help when symptoms persist, the fuel system is complex, or the engine has fuel leaks, governor faults, or other signs of a potentially unsafe condition.
A Simple Decision Guide
Use the following guide to narrow down the next step. It is a practical starting point, not a substitute for model-specific service instructions. If the mower has an active fuel leak or an engine-speed control problem, safety comes before the choice between cleaning and replacement.
The mower ran well before using old fuel
Drain or replace stale fuel as directed, check the fuel supply, and consider cleaning the carburetor if the engine maker permits it.
The carburetor body is cracked or badly damaged
Replace the damaged assembly with the correct part and inspect adjacent hoses and mounting surfaces.
A seal or needle valve has failed
Check whether a compatible rebuild kit covers the faulty component. Replace the full assembly if repair parts are unavailable or the housing is damaged.
The engine still fails with a verified good fuel system
Check ignition, compression, intake sealing, and other possible causes. A technician may be needed to identify the remaining fault.
Prevent Future Carburetor Problems
Good fuel habits can reduce the chance of another carburetor problem. Use fresh gasoline that meets the engine manufacturer’s fuel requirements, store it in an approved sealed container, and follow the manufacturer’s recommendations for fuel stabilizer and storage. Stabilizer can help when used as directed, but it does not restore fuel that has already degraded or remove deposits from a blocked carburetor.
Before storing the mower for an extended period, follow the exact storage procedure in the owner’s manual. Some manufacturers recommend draining the fuel system, while others specify a particular stabilized-fuel procedure. Do not assume that one storage method is suitable for every engine.
Keep the air filter clean and replace damaged fuel hoses promptly. Check for loose clamps and leaks during routine maintenance. Regular maintenance will not prevent every failure, but it can help catch small problems before they affect starting or lead to a larger repair.
Use the right fuel
Follow the engine manufacturer’s requirements for gasoline type, ethanol content, and any restrictions. Do not guess based on another mower’s recommendations.
Store fuel properly
Use an approved container and follow local storage rules. Keep fuel away from heat, flames, living areas, and other ignition sources.
Prepare the mower for seasonal storage
Use the storage procedure specified in the manual, including any directions for stabilizer, draining, or running the engine.
Inspect the fuel system
Look for cracked hoses, loose clamps, wet spots, and damaged connectors before each mowing season.
Follow routine engine maintenance
Service the air filter, spark plug, and engine oil where applicable at the intervals specified by the manufacturer.
Carburetor Replacement Cost and Repair Planning
The cost of replacing a lawn mower carburetor depends on the engine, part availability, labor rates, and whether additional parts are needed. A basic walk-behind mower may use a simple replacement assembly, while a riding mower can require more labor to access the engine and reconnect additional controls. Without the exact model and current local prices, a single cost estimate would be unreliable.
Before buying a part, compare the price of the correct carburetor with the cost of a cleaning or rebuild kit. Include any required gaskets, fuel hose, clamps, and diagnostic labor. If the mower is old or has several engine problems, compare the full repair estimate with the cost of replacing the machine.
A low-priced carburetor is not automatically a good value if it does not match the engine or comes without required components. A verified compatible part and a correct installation are more useful than a bargain part that leaves the original problem unresolved.
Confirm the exact part
Check the engine model and specification before comparing prices or ordering a replacement.
Include related parts
Allow for gaskets, seals, fuel line, clamps, and any other parts that inspection shows are worn or damaged.
Compare repair and replacement
Consider the mower’s overall condition, expected remaining service life, and any other needed repairs before committing to a major expense.
Frequently Asked Questions
Q
How long does it take to replace a lawn mower carburetor?
A straightforward replacement on an accessible push mower may take less than a few hours for someone with the right tools and repair experience. A riding mower, unfamiliar engine, rusted fasteners, or complicated linkage can take longer. Allow extra time for identifying the correct part, cleaning up fuel safely, and checking the installation before starting.
Q
Can I replace a lawn mower carburetor myself?
Yes, many homeowners can replace a carburetor if they can follow the engine service instructions, identify the correct part, and work safely around gasoline. The job requires careful handling of fuel lines, gaskets, springs, and control linkages. If you cannot identify the linkage arrangement or the engine has a persistent fuel leak, overspeed problem, or complex electrical controls, use a qualified technician.
Q
Do I need to drain the gas before replacing the carburetor?
You must control the fuel supply before disconnecting the carburetor. If the mower has a fuel shutoff valve, close it according to the manual. If it does not, use the manufacturer’s procedure to drain or otherwise safely manage the fuel and catch any remaining gasoline in an approved container. Never disconnect a fuel line near a hot engine or an ignition source.
Q
Why does my lawn mower still not start after replacing the carburetor?
Possible causes include an incompatible replacement, a misplaced gasket, a disconnected fuel line, a blocked tank vent, an incorrectly connected choke linkage, or an ignition problem. Check the installation against the service diagram and verify that the fuel supply is working. If gasoline leaks, the engine is hard to turn, or the engine speed is uncontrolled, stop and correct the fault before further testing.
Q
Should I clean a lawn mower carburetor instead of replacing it?
Cleaning can be enough when the carburetor is intact and a blocked passage or fuel deposit is causing the problem. A rebuild kit may help when a serviceable seal, needle, or similar component has worn out. Replacement is more appropriate when the body is damaged, critical parts are unavailable, or a correct cleaning or rebuild does not restore normal operation.
Q
Does a new carburetor come ready to install?
Many replacement carburetors arrive assembled and preset, but the included gaskets, fittings, and instructions vary by part. Verify compatibility, inspect the assembly, and install the correct seals and spacers. Follow the engine manufacturer’s directions for any required adjustments rather than assuming every carburetor uses the same settings.
Q
Can a bad carburetor cause black smoke or high fuel use?
Yes, a carburetor that delivers too much fuel or has a choke that stays closed can contribute to black smoke and increased fuel use. A dirty air filter or other engine fault can cause similar symptoms. Check the choke, air filter, fuel system, and installation, and stop using the mower if you notice fuel leakage or other unsafe behavior.
✦ Wrapping Up
Conclusion
Replacing a lawn mower carburetor can restore reliable starting and steady operation when the original unit is damaged or cannot be repaired effectively. The most important steps are to confirm the fault, identify the exact replacement, isolate the ignition, manage fuel safely, and reconnect every hose, gasket, spring, and control linkage correctly.
Take photographs before disassembly, use the correct service manual, and inspect the installation before starting the engine. If the mower still runs poorly, check the fuel supply, air filter, choke, ignition, and intake seals instead of assuming the new part has failed. Stop immediately if fuel leaks or engine speed becomes uncontrolled.
💡 Key Takeaway
Before ordering a carburetor, record the engine model and specification, confirm the correct replacement and gasket kit, and review the manufacturer’s removal and installation instructions. Prepare a safe work area, replace the unit carefully, and test the mower only after checking every fuel connection for leaks.
I enjoy sharing simple gardening ideas, lawn care tips, and honest product reviews that help make outdoor work easier. From home gardening guides to helpful tools and lawn care advice, I write easy-to-follow content to help readers create a healthier and better-looking outdoor space without wasting time or money.