As an Amazon Associate, I earn from qualifying purchases.
Modern garden paths combine clean lines, durable materials, simple shapes, and thoughtful planting to make a backyard look neat and feel easy to use. Stone pavers, gravel, concrete slabs, wood, and soft outdoor lighting are practical ways to create a path that suits your home and climate.
Across the United States, a garden path can do much more than connect a patio to a back door. It can guide guests through a suburban backyard, link a vegetable garden to a tool shed, or make a small city yard feel calm and well planned. The best design fits the home, the local weather, and the way people use the space.
Modern gardenpath ideas often favor simple shapes, a small mix of materials, and clear edges. Large pavers can give a yard a crisp look, while gravel adds texture without a heavy paved surface. Native plants, ornamental grasses, and low lights can soften the design without making the path feel crowded.
Start by deciding where people need to walk and how much upkeep you can manage. A route that stays firm after rain, feels comfortable underfoot, and drains well will serve you better than a beautiful path that shifts, puddles, or becomes hard to maintain. With a clear plan, even a modest backyard can gain a useful and stylish walkway.
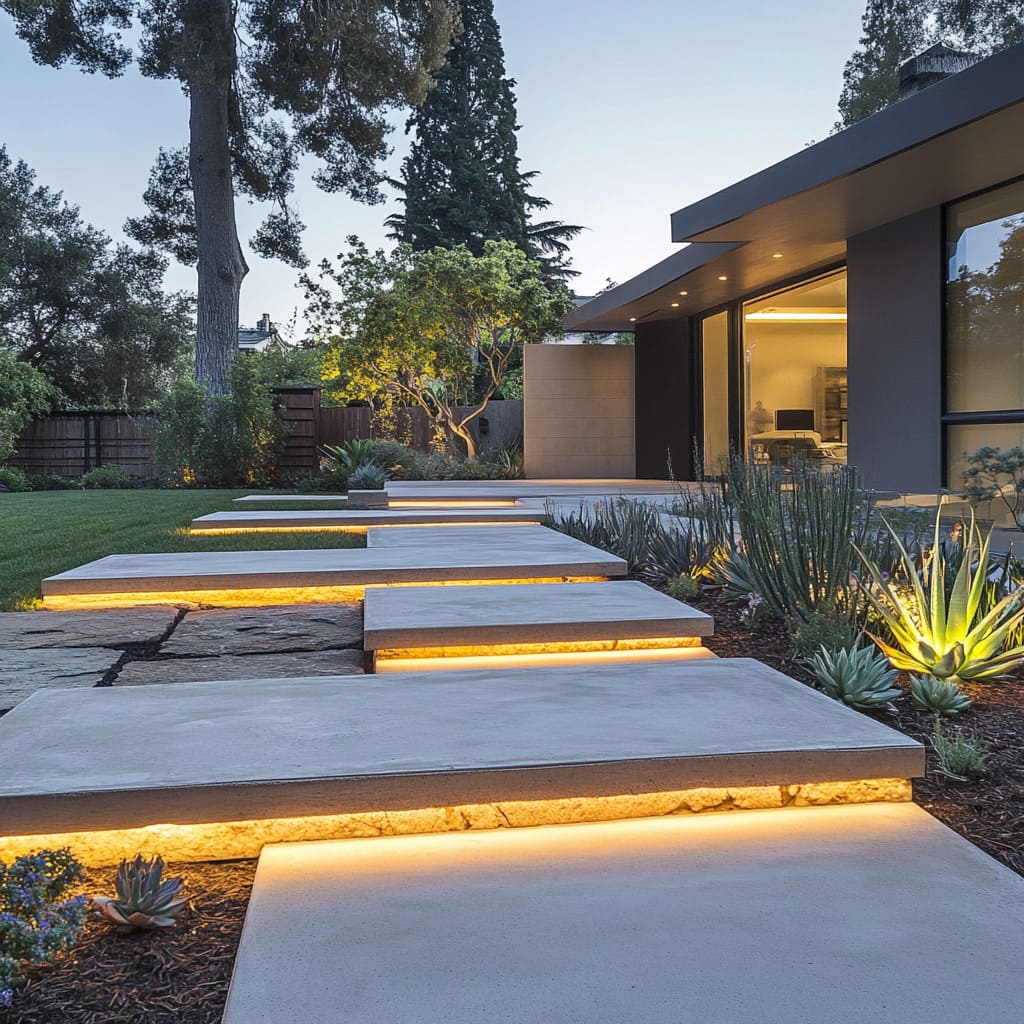
Large concrete slabs are a strong choice when you want a modern garden path with a simple, orderly look. Their broad faces and straight edges suit contemporary homes, flat-roofed additions, and outdoor spaces with clean architectural lines. Pale gray slabs can brighten a shaded yard, while darker gray creates a bold contrast with green plants.
You can lay the slabs in a straight line from the back door to a patio or arrange them as stepping pads through a planted area. Wider slabs often make a route feel calmer because there are fewer joints to interrupt the surface. Keep the spacing consistent for a planned look, and avoid gaps that are awkward for people to cross.
Concrete can handle everyday foot traffic when the slabs and base are designed for the site. However, concrete can crack, stain, or become slippery when wet if the surface is poorly suited to the conditions. Choose a suitable outdoor finish, prepare the base well, and account for water runoff before installation.
Source: artsyhome.com
Best for
Contemporary homes, geometric garden layouts, and direct routes between outdoor living areas.
Design tip
Pair gray slabs with dark gravel, restrained planting, and simple metal or wood garden furniture.
Main trade-off
Large slabs create a strong visual effect but may be heavy to handle and difficult to adjust after installation.
How to Make Concrete Slabs Look Less Plain
Use plants to soften the hard edges without hiding the slab pattern. Low-growing ground covers can work between widely spaced pads where the climate and foot traffic suit them. In other areas, clean gravel joints may be easier to manage.
Repeat one or two plant forms along the route. A row of compact grasses or small evergreen shrubs can frame the path without turning it into a busy border. Leave enough room for the plants to reach their mature size.
Use contrast
Set light slabs against dark stone or deep green foliage for a crisp outline.
Mind the joints
Use a consistent joint material and width that suit the slab system and expected movement.
2. Natural Stone Paths for Texture and Lasting Appeal
Natural stone gives a modern garden path a grounded look while adding texture that manufactured materials may lack. Granite, bluestone, limestone, and other suitable paving stones come in different colors, finishes, and shapes. The right choice depends on local availability, the appearance you want, and how the stone performs outdoors.
For a contemporary finish, choose stones with fairly consistent colors and a restrained pattern. Rectangular pieces can create a neat grid, while larger irregular slabs offer a more relaxed layout. Both can look modern when the surrounding plants, edging, and furniture follow a clear design.
Stone varies in porosity, hardness, surface texture, and resistance to weather. Some types may need sealing or more care in areas exposed to stains, frost, or heavy moisture. Ask a local supplier about outdoor suitability and slip resistance instead of choosing stone based only on its color.
Source: fancyhouse-design.com
Best for
Gardens that need a natural material with a refined appearance and a close visual link to the landscape.
Design tip
Repeat one stone color in a nearby retaining wall, planter, or patio detail to connect the design.
Main trade-off
Natural stone can cost more than basic gravel, and some types require specialist cutting or installation.
Choose the Right Stone Finish
The finish matters as much as the stone itself. Smooth, polished stone can look striking but may be unsuitable for exposed walking surfaces where rain, frost, or wet leaves are common. A textured or naturally cleft finish may provide better grip, depending on the specific stone and conditions.
Think about the local climate before settling on a material. In places with freeze-thaw cycles, water trapped in unsuitable stone or joints can contribute to damage. In hot, sunny regions, consider surface temperature and the comfort of people who may walk outside barefoot.
For a formal layout
Use rectangular stones with aligned joints and restrained planting.
For a relaxed layout
Use larger natural shapes with carefully controlled gaps and low plants along the edges.
3. Gravel Paths for a Simple, Budget-Conscious Design
Gravel is a flexible way to build a modern garden path without covering the whole yard in solid paving. It comes in many colors and sizes, so you can choose a subtle finish that works with the home and nearby planting. Gray, tan, and muted stone colors often suit modern outdoor spaces.
A gravel path works especially well along raised beds, around a shed, or between separate garden areas. A firm, well-prepared base and suitable edging help keep the gravel in place. The best gravel size depends on the type of stone, the path’s slope, the expected traffic, and whether wheels or mobility aids will use the route.
Loose gravel needs periodic care. Leaves, weeds, and soil can build up over time, while foot traffic may move stones beyond the edges. A well-designed path makes these tasks easier, but gravel is not automatically the lowest-maintenance option for every yard.
Source: garden.eco
Best for
Informal side yards, garden beds, utility routes, and projects with a limited paving budget.
Design tip
Use a clear metal, stone, or compatible edging detail to keep the path visually crisp.
Main trade-off
Gravel is often easier to install than full paving but may shift and can be uncomfortable for some users.
How to Build a Gravel Path That Stays Neat
Mark the route first and remove grass, roots, and loose organic matter. Prepare a stable base suited to the soil and expected use, then install edging and spread the chosen surface gravel to an even depth. Follow local drainage needs and the material supplier’s guidance rather than using the same construction depth for every site.
Weed control begins with good preparation. Remove perennial weeds before building, and do not assume a landscape fabric will prevent every weed for the life of the path. Soil and leaf litter can collect on top of gravel, allowing new weeds to grow even when the original ground is covered.
Keep edges clear
Use a defined border and brush loose stones back onto the path when needed.
Plan for water
Avoid creating a low channel that directs runoff toward the house or neighboring property.
4. Stepping-Stone Paths Through Green Planting
Stepping stones make a garden path feel light because they leave more of the ground visible between each piece. This design works well in small backyards, planted courtyards, and spaces where a solid walkway would look too heavy. Large square or rectangular stones create a modern pattern without needing a wide paved strip.
Set the stones at comfortable walking intervals and keep them stable underfoot. The correct spacing depends on the users, the stone size, and the route, so test the layout by walking it before fixing the stones in place. A path used for groceries, garden tools, or frequent trips to a shed may need a more continuous surface.
The gaps can hold gravel, suitable ground cover, or other materials that tolerate the site conditions. Choose plants that can handle the amount of sun, moisture, and foot traffic they will receive. Avoid fragile plants in the main stepping zones, and do not use loose decorative stones where they could make footing unstable.
Source: uk.pinterest.com
Best for
Small gardens, lawn crossings, planted courtyards, and paths that serve occasional foot traffic.
Design tip
Repeat the same stone shape and use a limited plant palette for a calm, planned effect.
Main trade-off
Stepping stones use less paving but may be harder to navigate for people who need a smooth, continuous route.
Pick the Right Ground Cover Between Stones
For sunny areas, choose a low-growing plant that suits the local climate and can cope with occasional contact. In shaded spots, select shade-tolerant options that also handle the site’s moisture levels. Native ground covers can be useful where suitable species are available.
If the path receives regular traffic or needs to stay easy to sweep, use gravel or another firm joint material instead of living ground cover. The goal is to make the gaps part of the design without creating a route that becomes muddy or uneven.
For a softer look
Use a suitable low ground cover in areas where people do not regularly step.
For easier upkeep
Fill gaps with a compatible aggregate and keep the stone edges clear.
5. Straight Paths for a Crisp Architectural Style
A straight garden path is one of the simplest ways to give a backyard a modern feel. It creates a direct visual line between two points and works particularly well with rectangular houses, square patios, and geometric planting beds. The route also makes it easy to see where the walkway begins and ends.
Use a straight path when people need to move efficiently between the house, driveway, garden gate, or shed. Keep the route clear of overhanging plants and objects that narrow the walking space. A straight line can make a small yard feel organized, but it should follow a practical route rather than forcing people to take an awkward detour.
You can create this look with concrete slabs, brick, stone, or a compacted path system designed for pedestrian use. Repeat the same material and edge treatment along the full route. If the path crosses a slope or carries water during storms, design the grade and drainage before installing the finish.
Source: freshpatio.com
Best for
Modern homes, narrow side yards, direct access routes, and symmetrical garden layouts.
Design tip
Align the path with a door, window, fence line, or major garden feature.
Main trade-off
A direct route is efficient but may feel rigid in a naturalistic garden with irregular planting.
Use Repetition to Strengthen the Design
Repeat a few strong elements instead of adding many different details. Matching planters, evenly spaced lights, and a consistent paving pattern can make a basic path look intentional. Leave enough open space for the path itself to remain the main feature.
For a softer result, place ornamental grasses or compact shrubs in groups along one or both edges. Keep plants low near corners and entrances so they do not block views or crowd the walking surface.
Align key features
Use the path to connect important destinations along a clear visual axis.
Avoid visual clutter
Limit the number of paving patterns, edge materials, and decorative objects.
6. Curved Paths That Make a Garden Feel Larger
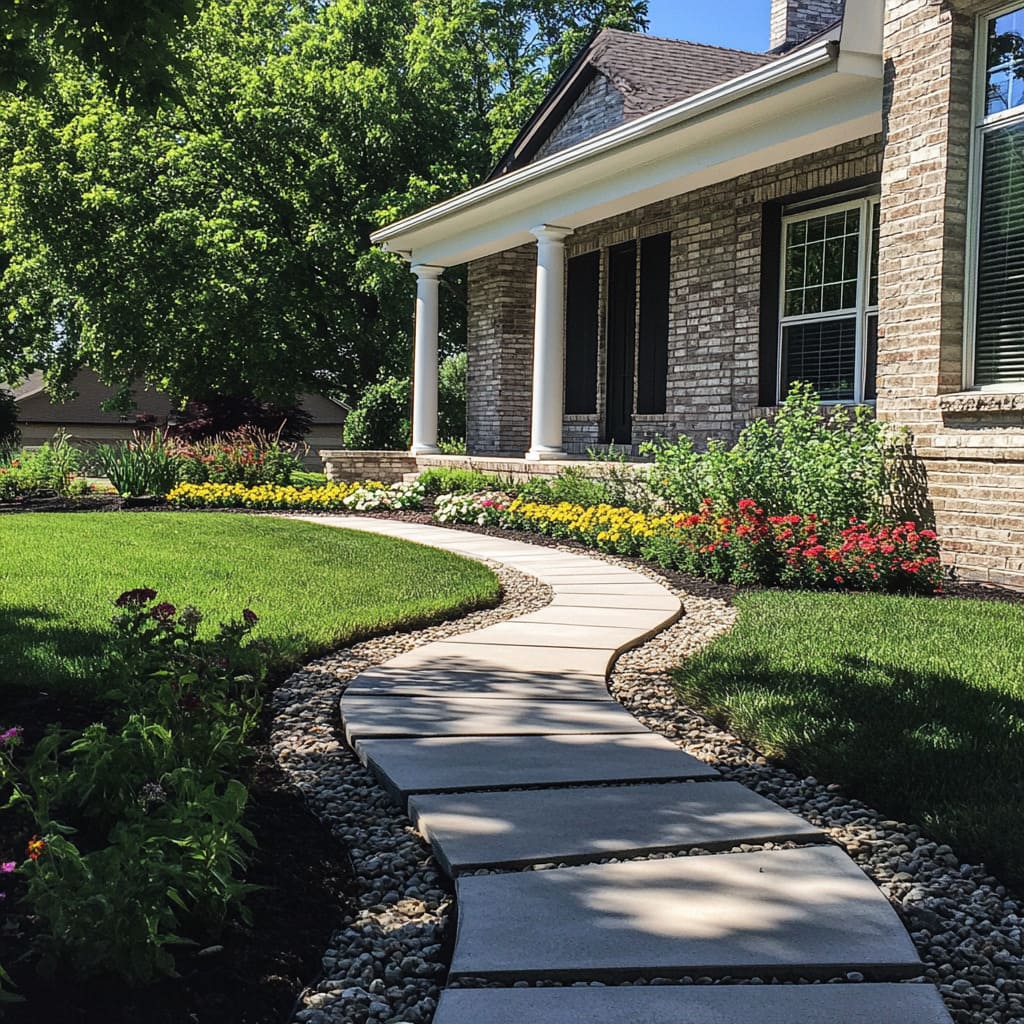
A gently curved path can make a garden feel less formal and invite people to explore. It works well when the route passes trees, flower beds, a water feature, or a tucked-away seating area. The curve should have a clear purpose, such as moving around an existing tree or connecting spaces without cutting through planting.
Keep curves broad enough for comfortable walking and maintenance. Tight bends can make paving harder to lay and may create awkward turns for wheelbarrows or garden carts. If the path is a primary access route, prioritize a smooth line and enough clear width for the people who use it.
Curves look most natural when they relate to the rest of the yard. Repeat the curve in a nearby bed edge or use rounded plant groups to tie the layout together. Avoid adding a winding route to a very small yard simply because curved paths appear in design photos.
Source: www.pinterest.com
Best for
Informal gardens, wooded backyards, and spaces with planting beds or features worth walking around.
Design tip
Use a smooth, broad curve and keep the material consistent to avoid a busy appearance.
Main trade-off
A curved route may use more material and take longer to build than a direct walkway.
Make the Curve Look Natural
Lay out the proposed route with a garden hose or rope before digging. Walk it from both directions and check that the curve leads naturally to its destination. Adjust the line if it feels forced or cuts off useful lawn space.
Planting can help define the curve, but it should not hide the walking surface. Choose plants that stay within the intended border or plan to prune them as they grow. Clear sightlines are especially useful near gates, steps, and other points where people change direction.
Test before building
Use a temporary line to check the shape, turning space, and relationship to existing features.
Keep the route readable
Use consistent edges or repeated planting to show where the path goes.
7. Composite Wood Paths With a Warm Modern Finish
Composite decking boards can create a warm, linear garden path that feels different from stone or concrete. Their wood-like appearance pairs well with modern homes, raised planters, and outdoor seating areas. A raised walkway may also help cross a spot where a conventional ground-level path would be difficult to keep firm, provided the structure is properly designed.
Composite boards are made from a blend of materials that varies by product. Their resistance to moisture, fading, and staining depends on the exact formulation, surface, installation, and care. Do not assume that every composite board is suitable for direct ground contact or a free-standing walkway.
Follow the manufacturer’s requirements for joist spacing, fastening, ventilation, drainage, and clearances. If the path is raised above ground, its support structure and any steps or rails need appropriate design. A ground-level composite surface may also require a prepared support system rather than simply placing boards over soil.
Source: freshpatio.com
Best for
Contemporary patios, raised garden areas, and designs that use decking elsewhere in the yard.
Design tip
Run the boards in the direction of travel to emphasize the route and make the layout feel longer.
Main trade-off
Composite can reduce some wood-care tasks, but the initial material and structural costs may be higher than gravel.
Connect the Path to a Deck or Patio
Choose board colors that relate to the existing deck, fence, or outdoor furniture. A close color match can make separate spaces feel connected, while a contrasting border can define the route. Keep the palette restrained so the path does not compete with the house.
Check how the surface behaves in direct sun and rain. Some products can become hot under strong summer sun, and wet surfaces differ in grip. Use the product’s outdoor performance information to guide placement, especially near pools, steps, and shaded damp areas.
Match the details
Use compatible board tones and neat transitions where the walkway meets the patio.
Follow installation rules
Allow for drainage, movement, ventilation, and the support spacing specified for the product.
8. Mixed-Material Paths With Gravel and Stone
Combining two materials can add depth to a modern garden path without requiring an elaborate design. A common approach uses broad stone or concrete pads set within gravel. The solid surface provides clear places to step, while the gravel creates contrast and keeps the overall look visually light.
The key is to give each material a clear role. Use pavers as the main walking surface and gravel as the infill, border, or drainage layer only where the construction system supports that use. A random mix of unrelated stones, colors, and textures can make the yard look unfinished rather than modern.
Think about maintenance before committing to the combination. Small gravel may migrate onto smooth paving, while soil and leaves can collect in joints. Use compatible edging, select materials that are easy to clean, and plan a simple way to replace or top up loose material when needed.
Source: fancyhouse-design.com
Best for
Backyards that need a decorative walkway, a clear walking line, and a mix of hard and soft textures.
Design tip
Choose one dominant paving material and one supporting aggregate in a related color family.
Main trade-off
Mixed materials add visual interest but may require more careful edging and upkeep than a single-material path.
Choose a Balanced Material Pair
Light concrete with charcoal gravel creates a strong modern contrast. Natural stone with tan gravel can feel warmer and blend into a garden with dry-climate planting. The best pair is one that also suits the home’s exterior and nearby hardscape.
Avoid using many competing colors in one short walkway. If the paving has a strong pattern or varied natural color, keep the gravel and planting simple. If the paving is plain, a textured aggregate can provide enough contrast on its own.
For a bold look
Pair pale rectangular slabs with dark aggregate and simple green planting.
For a softer look
Combine warm stone with muted gravel and plants suited to the local climate.
9. Brick Paths With a Contemporary Pattern
Brick can look modern when the pattern, color, and surrounding landscape are kept simple. Red brick gives a warm contrast to gray siding and green planting, while muted brown, charcoal, or buff tones may suit a more restrained palette. A precise layout can help traditional brick work with contemporary architecture.
Patterns such as running bond or a simple grid provide a clear rhythm. A border in a contrasting direction can define the walkway, but too many bands may make a small area look busy. Use brick intended for outdoor paving rather than ordinary wall brick, and select a suitable base and joint system.
Climate and drainage affect how well a brick path holds up. In regions with freeze-thaw cycles, choose paving materials and installation methods suited to local conditions. On sloped sites, consider erosion and surface runoff so rain does not wash joint material away or leave sections uneven.
Best for
Homes with brick details, compact courtyards, and gardens that need a warmer alternative to concrete.
Design tip
Use a single brick color and a simple repeating pattern to preserve a contemporary feel.
Main trade-off
Brick offers a smaller unit size and flexible patterns, but many joints can mean more maintenance.
Make Brick Feel Fresh and Modern
Pair brick paving with straight edging and restrained planting. Modern outdoor furniture and simple metal planters can balance the warmth of the brick. Keep nearby decorative elements limited so the pattern remains clear.
If the home already has a strong brick facade, repeat a related tone rather than introducing a competing color. If the exterior is mostly white, gray, or wood, brick can serve as the main warm accent.
Keep the pattern simple
Choose one primary laying pattern and use borders only where they improve the design.
Check the paving grade
Use outdoor paving brick with a surface and installation method suited to the site.
10. Garden Path Lighting for Evening Use
Good path lighting helps people see the walking surface, edges, and changes in level after sunset. It can also make a modern garden feel welcoming without flooding the yard with bright light. The goal is to illuminate the route and key hazards rather than make every plant or paving slab glow.
Low-voltage landscape lights, suitable solar fixtures, and recessed path lights can all work in the right setting. Solar lights are easy to place in some gardens, but their output depends on sunlight, battery condition, season, and shade. Wired systems may offer more predictable operation, but they need suitable equipment and safe installation.
Position fixtures to reduce glare and avoid shining light into nearby windows or directly into people’s eyes. Use outdoor-rated products and follow the manufacturer’s instructions. Electrical work involving fixed wiring should be handled by a qualified professional when required by local codes or the complexity of the installation.
Best for
Paths used after dark, garden entrances, steps, and routes between a patio and the house.
Design tip
Space low fixtures along the route or highlight changes in level instead of placing bright lights at every step.
Main trade-off
Lighting improves nighttime visibility, but fixtures need power, upkeep, and careful placement.
Choose Lighting That Suits the Path
For a narrow path, shielded low lights can mark the edges without creating glare. For steps or changes in elevation, direct attention to the actual walking surface. Recessed fixtures can create a minimal look, but their placement, drainage, and maintenance access need careful planning.
Consider the local climate and the amount of sunlight the route receives. In shaded yards, solar lights may not charge well, particularly during short winter days. Where consistent light is essential, select a suitable system with an appropriate power source and controls.
Use light with care
Choose shielded fixtures and direct light downward to limit glare and unwanted spill.
Plan maintenance access
Keep fixtures reachable for cleaning, battery replacement, or repair.
11. Low-Maintenance Planting Along Modern Paths
The plants beside a path help tie the hard materials into the rest of the garden. A few repeated grasses, compact shrubs, or low ground covers can soften straight edges without making the walkway feel crowded. The right planting also reduces the need to trim many different shapes in a narrow strip.
Choose plants for the actual growing conditions, not just their appearance in a photograph. Sun exposure, soil drainage, rainfall, winter temperatures, and summer heat all affect plant choice across the United States. Native plants suited to the region can support local wildlife and may need less extra water once established, although every planting still needs suitable care.
Keep mature plant size in mind. A small shrub may grow over the path, while spreading roots can affect nearby paving in some situations. Leave room for growth and avoid plants with sharp foliage or thorny branches beside a narrow walking route.
Best for
Any path that needs a softer transition between paving and lawn, planting beds, or a fence.
Design tip
Repeat a small group of compatible plants rather than mixing many unrelated colors and forms.
Main trade-off
Planting makes a path feel integrated with the yard but still requires watering, pruning, and seasonal cleanup.
Plant for Your Local Climate
In hot, dry regions, consider drought-tolerant plants suited to local soil and winter conditions. In humid areas, favor plants that tolerate local moisture levels and provide enough airflow around dense growth. In colder regions, choose species that can withstand the expected winter temperatures.
For shade, look for plants adapted to the amount of light available beneath trees or beside buildings. Do not try to force sun-loving plants into a dark passage where they will need frequent replacement. A modest planting of suitable species often looks better over time than a crowded mix of plants that struggle.
Match the exposure
Check sun, shade, soil moisture, and local winter conditions before choosing plants.
Protect the walking space
Allow for mature width and keep branches, leaves, and roots from creating hazards.
12. Choose the Best Path Material for Your Yard
The best material depends on how often the path is used, the amount you can spend, and the conditions at the site. A decorative route to a quiet seating area may work well with stepping stones, while the main entrance needs a more continuous and stable surface. Consider installation costs and future upkeep together rather than focusing only on the initial price.
A low-cost surface can become expensive if it needs frequent repairs or regular replacement. Likewise, a higher-cost paving system may not be worthwhile for a path that sees little use. Compare the practical needs of the route first, then narrow the options to materials that suit the house and garden.
For a direct entrance route
Consider a firm, continuous surface such as well-installed concrete pavers, suitable stone, or outdoor brick.
For a secondary garden route
Consider gravel or stepping stones if the surface suits the traffic and mobility needs of users.
For a deck-style look
Consider composite boards when a suitable support system and product installation method are practical.
A Simple Material Comparison
Use this table as a starting point rather than a promise about exact costs or lifespan. Prices vary by region, material grade, access to the site, preparation needs, labor, and the size of the project. A local quote is the best way to compare installed costs.
Concrete slabs
Modern appearance, broad walking surfaces, and a neat geometric layout. Requires a sound base and suitable drainage.
Natural stone
Distinctive texture and natural color variation. Material cost, finish, and maintenance needs vary by stone type.
Gravel
Flexible, often budget-friendly, and useful for informal paths. Needs edging and periodic leveling or topping up.
Stepping stones
Light visual impact and less solid paving. Spacing and stability matter, especially for frequent use.
Outdoor brick
Warm color and flexible patterns. Many joints can collect debris or need repair.
Composite boards
Wood-like appearance and a clear linear pattern. Requires a compatible support structure and attention to heat and surface grip.
How Much Should You Budget?
Calculate the approximate path area before requesting estimates. For a straight rectangular path, multiply its length by its width. For example, a path that is 20 feet long and 3 feet wide covers 60 square feet. Curved paths and irregular layouts may require a more detailed area estimate.
Ask suppliers or contractors to separate material, excavation, base preparation, edging, drainage, delivery, and labor where possible. This makes it easier to compare bids and identify what each price includes. Confirm how the contractor will handle excess soil, access limits, and any existing surface that must be removed.
Measure first
Record the route length, planned width, curves, steps, and areas that need special preparation.
Compare full costs
Include the base, edging, drainage, delivery, labor, and future maintenance.
13. How to Plan and Build a Modern Garden Path
A successful garden path starts with a practical route and a stable foundation. Before choosing a finish, check where water flows, how the soil behaves, and whether the path must support carts, wheelchairs, or other wheeled equipment. These factors affect both the design and the construction method.
The exact installation steps depend on the material and site. A gravel path does not need the same construction as a mortared stone walkway or a raised composite path. Follow the chosen paving system’s installation requirements and seek qualified help when the site includes significant slopes, retaining structures, or complex drainage.
Step 1: Map the route
Mark the start, destination, width, turns, and any existing trees or structures that must remain.
Step 2: Check the site
Assess slope, soil, drainage, roots, access, and the likely amount of foot traffic.
Step 3: Select materials
Choose an outdoor-rated surface that fits the climate, use, design, and maintenance budget.
Step 4: Prepare the base
Remove unsuitable material and build a stable, well-drained foundation suited to the chosen surface.
Step 5: Install the path
Set pavers, stone, gravel, or boards according to the appropriate installation method and product guidance.
Step 6: Inspect the result
Walk the entire route and check for loose stones, rocking slabs, sharp edges, pooling water, and awkward transitions.
Check for Buried Utilities Before Digging
In the United States, contact 811 or use the appropriate state 811 service before digging for a path. The process helps arrange marking of participating underground utility lines, but it does not necessarily identify every private line on a property. Follow the local notification requirements and wait for the required markings before excavation.
Private irrigation pipes, landscape lighting cables, and other owner-installed lines may need separate identification. If you are unsure what lies below the planned route, investigate before digging rather than assuming the area is clear. This simple step can help prevent injuries, service disruptions, and costly repairs.
Before excavation
Contact the appropriate 811 service and confirm which private utilities may require separate locating.
On complex sites
Consult a qualified contractor when excavation, retaining work, or drainage changes could affect nearby structures.
Know When a DIY Project Needs Professional Help
A small gravel path or a few ground-level stepping stones may be manageable for a homeowner with suitable tools and site conditions. Large stone slabs, extensive excavation, steep slopes, and raised structures can demand more skill and equipment. The right choice depends on the scale of the project and your ability to prepare a stable base.
Seek qualified help if water regularly pools near the house, the path crosses a steep grade, or the design involves a retaining wall or major change in ground level. Check local rules before constructing steps, raised walkways, or other features that may be subject to building or accessibility requirements.
Simple project
A short path on stable, level ground with modest excavation may suit a capable DIY installer.
Complex project
Steep grades, persistent drainage problems, raised structures, or heavy paving may warrant professional design and installation.
14. Common Garden Path Mistakes to Avoid
Most path problems start with a poor route, weak base, or lack of planning for water. A well-chosen surface cannot make up for unstable soil or an awkward layout. Fixing these issues before installation is usually easier than lifting the path later.
Choosing looks over function
A narrow or broken-up route may be attractive in a photo but difficult to use every day. Plan the main walking line around actual household needs.
Skipping base preparation
Loose or poorly compacted material can lead to sinking, rocking slabs, and uneven joints. Use a base suited to the soil, surface, and expected load.
Ignoring drainage
A path that traps water may become slippery, muddy, or damaged during freezing weather. Plan the grade and runoff before laying the surface.
Using too many materials
A mix of unrelated colors and textures can make the design look cluttered. Choose one main material and one supporting material unless the wider landscape calls for more.
Planting too close to the edge
Plants may spread across the path, block lights, or make the surface harder to sweep. Allow for mature growth and keep the route clear.
Overlooking accessibility
Loose gravel, uneven stepping stones, abrupt level changes, and narrow turns can make a path hard to use. Consider a stable, continuous surface where mobility needs require it.
Installing poor lighting
Bright exposed bulbs can create glare while leaving the walking surface unevenly lit. Choose outdoor-rated fixtures and direct light toward the route.
How to Tell Whether the Finished Path Is Working
Walk the route in daylight and after dark if lighting is part of the design. Look for loose or rocking surfaces, awkward turns, blocked views, and places where rainwater collects. Check that the path connects its destinations without forcing people through planting beds.
After the first heavy rain, inspect the edges and joints. Gravel may need light redistribution, while pavers may reveal areas where water sits or soil has settled. Address small issues early before repeated use makes the problem worse.
Good result
The route feels stable, has clear edges, drains as intended, and leads naturally to the places people use.
Needs attention
Persistent puddles, moving slabs, loose edging, or recurring washouts indicate that the base or drainage may need repair.
Frequently Asked Questions
Q
What is the most modern material for a garden path?
Large concrete slabs, simple natural stone paving, and restrained combinations of pavers and gravel are common choices for a modern garden path. Each can create clean lines and a calm look. The best material depends on the home’s style, local weather, walking needs, and budget.
Q
What is the cheapest way to make a modern garden path?
Gravel is often one of the more budget-friendly options for a simple garden path, especially when the route is short and the ground is easy to access. The total cost still depends on excavation, base material, edging, delivery, and labor. Compare the full installed cost rather than the surface material alone.
Q
How wide should a garden path be?
The right width depends on the route and who will use it. A secondary garden trail may be narrower than the main route from a driveway to an entrance. For a primary route, allow enough clear space for people to pass or carry items, and check applicable accessibility guidance when a step-free route is needed.
Q
How do I keep weeds out of a gravel path?
Remove existing weeds and roots before building, prepare the base correctly, and use suitable edging to limit the movement of gravel and soil. Remove new weeds while they are small and clear leaves before they break down into a layer of soil. Landscape fabric may help in some installations, but it does not prevent all future weeds.
Q
Are stepping-stone paths practical for everyday use?
Stepping-stone paths can work well for occasional trips through a garden, but they are not ideal for every daily route. Uneven spacing, loose stones, and large gaps may make them difficult for children, older adults, or people with mobility needs. For frequent access, consider a stable and more continuous walking surface.
Q
How can I make a garden path look good at night?
Use suitable low outdoor lights to show the path edges, steps, and changes in level. Shielded fixtures can reduce glare and limit light spill into nearby homes. Solar lights may work in sunny locations, while shaded paths may need another suitable power source for more consistent lighting.
Q
Do I need a permit to build a garden path?
Permit requirements vary by city, county, state, and project scope. A simple ground-level walkway may be treated differently from a raised path, retaining wall, major grading project, or work that changes drainage. Check local requirements before construction, particularly if the path is near property lines or public rights of way.
✦ Wrapping Up
Conclusion
Modern garden path ideas work best when a clear design meets everyday needs. Large concrete slabs create a crisp look, natural stone adds texture, gravel offers flexibility, and stepping stones keep a garden feeling open. Composite boards, brick, and mixed-material designs provide more options when they suit the home’s style and the site’s conditions.
Before starting, mark the route, check the soil and drainage, and choose a material that fits your budget and maintenance goals. Prepare the base correctly, allow enough room for comfortable walking, and select plants that suit the local climate. A simple design built well can look good and remain useful for years.
You do not need to transform the entire backyard at once. Start with the route that would make daily life easier, then use matching materials, restrained planting, and suitable lighting to connect it to the rest of the landscape.
💡 Key Takeaway
Measure your proposed path, mark its route with a hose or rope, and compare two suitable surface materials before buying supplies. Check drainage and underground utilities before digging, then build a stable path that fits your home, climate, and daily needs.
I enjoy sharing simple gardening ideas, lawn care tips, and honest product reviews that help make outdoor work easier. From home gardening guides to helpful tools and lawn care advice, I write easy-to-follow content to help readers create a healthier and better-looking outdoor space without wasting time or money.