

As an Amazon Associate, I earn from qualifying purchases.
Plastic bottle gardening turns waste into planters, vertical walls, and smart watering systems.
I have built balcony walls of greens, drip lines, and self-watering planters using bottles most people toss. In this guide on plastic bottle gardening ideas, I will show you what works, what fails, and why. You will get clear steps, smart tips, and data-backed notes on safety and care. By the end, you can turn a stack of bottles into a healthy, low-cost, space-saving garden that lasts.

What is plastic bottle gardening?
Plastic bottle gardening is the practice of reusing bottles as planters, watering tools, and garden aids. It is simple, cheap, and perfect for small spaces. You can grow herbs, greens, flowers, and even small fruit. You can also build irrigation and seed systems that save time and water.
The benefits are real. You cut waste. You save money. You grow food in tight spaces like balconies, windows, and fences. You also get control over water use. This can make a big difference in hot or dry places.
There are limits. Plastic fades in sun. Bottles can crack with age. Deep-rooted crops need more soil than a bottle can hold. And some plastics are not a good match for long heat and sun. With smart choices and care, you can reduce these risks and still get great results.

Tools, materials, and bottle selection
Choose safe bottles and clean tools. Prep well and your garden will thrive.
Best bottle types:
- PET soda or water bottles for most planters and drip systems. Clear, light, and easy to cut.
- HDPE milk jugs for larger planters or reservoirs. Opaque plastic slows algae.
- Avoid PVC and unknown plastics for food crops.
What to check:
- Food-grade history. If in doubt, do not use for edibles.
- Caps that seal well. This helps with drip and self-watering builds.
- Size match to plant roots. Most herbs and greens do well in 1–2 liter bottles.
Tools you will use:
- Sharp craft knife or shears for clean cuts.
- Awl or heated nail to make drain holes.
- Sandpaper to smooth edges.
- Twine, zip ties, or wire for hanging.
- Non-toxic paint to block UV and light if algae is a concern.
- Potting mix, perlite or coco coir, slow-release fertilizer, and fine gravel.
Prep steps:
- Wash with warm soapy water. Rinse well.
- Remove labels and glue. A bit of oil helps lift residue.
- Let dry. Mark cut lines with a felt tip for accuracy.

Creative plastic bottle gardening ideas
Small space or big yard, these builds scale fast. Use one idea or mix many to create a full system.
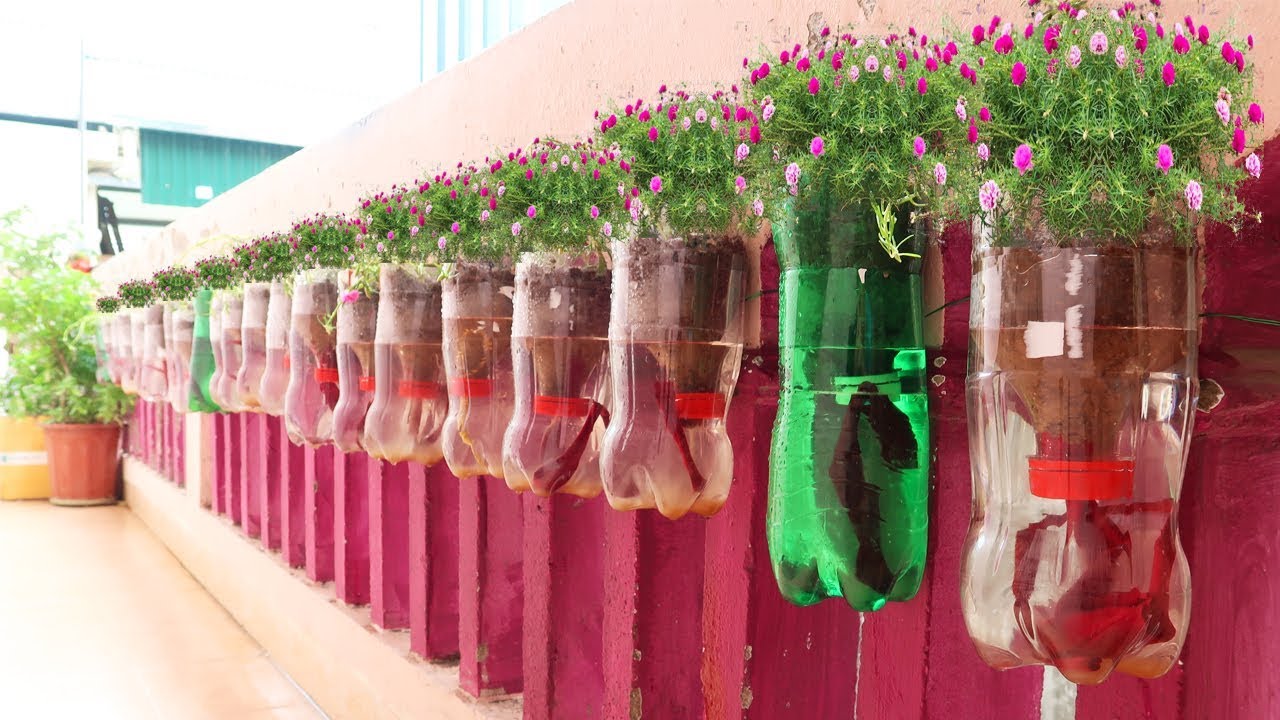
Vertical wall planters
Cut a window in the side of a 1–2 liter bottle, keep the cap on, and add drain holes at the bottom. Thread a cord through two holes near the neck and two near the base. Hang rows on a pallet or fence. Grow lettuce, basil, or pansies.
Self-watering bottle planters
Cut a bottle in half. Invert the top into the base. Add a cotton wick through the cap. Fill the base with water, the top with soil. This keeps soil moist without daily watering. It is one of my favorite plastic bottle gardening ideas for busy weeks.
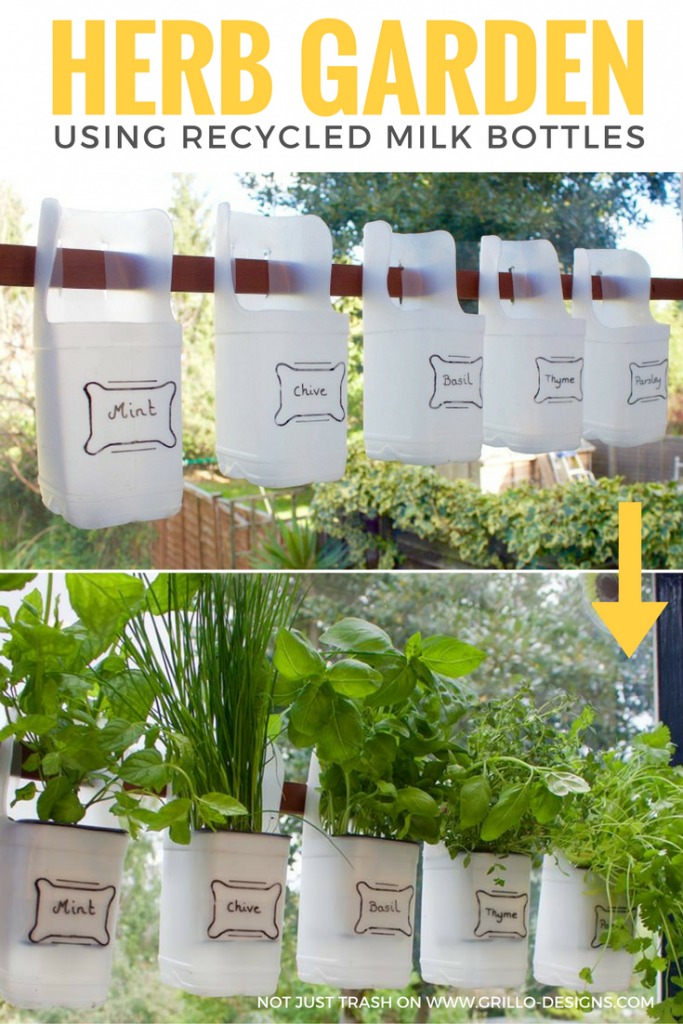
Hanging herb planters
Punch two holes near the rim and string with twine. Plant thyme, mint, or oregano. Hang near a sunny kitchen window. Rotate weekly for even growth.
Window farm columns
Stack bottles vertically with tubing that drips from top to bottom. Use a small pump or a daily pour to feed the top. This creates a living column that grows greens and strawberries.
Bottle drip irrigation spikes
Drill one tiny hole in the cap. Fill the bottle and set it upside down next to a plant. The slow drip keeps roots moist. Use two holes for sandy soils that drain fast.
Kratky hydroponic bottle for lettuce
Cut a window in a 2 liter bottle and add a nutrient solution. Float a net cup with a seedling on top. No pump, no power. Harvest in 4–6 weeks in bright light.
Seed starter mini greenhouses
Use clear bottles as cloches over seed trays. Vent with small side holes on warm days. This boosts germination and shields tender sprouts from wind.
Frost and pest cloches
Place the top half of a bottle over small plants on cold nights. Remove by mid-morning. It also slows slugs and shelters young leaves.
Strawberry towers
Cut planting slits in the sides of large bottles. Stack them on a rod with caps on to control flow. Fill with soil as you plant runners in each slit.
Wicking bed reservoir with bottles
Lay capped bottles in a larger planter base. Cover with landscape fabric and soil. The air gap improves drainage and reduces weight. Water from the top or add a side fill pipe.
Trellis ties from bottle strips
Cut bottles into long strips. Use as soft plant ties for tomatoes and cucumbers. They are gentle and reusable.
Capillary mat fed by bottles
Place plants on a damp mat. Set bottles with small holes upside down on the mat. The mat shares water with each pot. Great for weekend trips.
Compost tea feeder bottle
Fill a bottle with diluted compost tea. Drill a few tiny holes in the cap. Place it near the root zone to dose food slowly.
Pollinator guard rings
Cut smooth rings from bottle middles. Slip them around stems to make a small barrier. This deters cutworms and keeps mulch off delicate crowns.
Soil scoops and funnels
Turn the bottom half into a scoop. Use the top half as a funnel. These simple add-ons speed potting and reduce mess.
Step-by-step projects you can build today
These three builds cover most needs: watering, space, and starts.

Project 1: Self-watering herb planter
- Cut a 1 liter bottle in half. Poke a small hole in the cap and thread a cotton wick.
- Fill the top with a light mix of potting soil and perlite. Add two pinches of slow-release fertilizer.
- Fill the base with water. Nest the top in. Plant basil or mint. Refill weekly.
Project 2: Vertical salad wall
- Collect six 2 liter bottles. Cut side windows. Drill three drain holes under each window.
- Run a strong cord through holes at the neck and base. Knot each bottle in place on a fence or pallet.
- Add soil and plant leaf lettuce and arugula. Water from the top and let it cascade down.
Project 3: Bottle drip for tomatoes
- Drill a 1 mm hole in the cap. Bury the bottle neck near the root zone, cap on.
- Fill daily in hot spells, every few days in cool weather. Adjust hole size to soil type.
- Mulch around the bottle to slow evaporation and keep steady moisture.
Plant selection and care for bottle gardens
Right plant, right bottle. Match root depth to bottle size and you will see quick wins.
Good matches for small bottles:
- Herbs like basil, cilantro, chives, mint, thyme.
- Leafy greens like lettuce, arugula, spinach, and Asian greens.
- Flowers like marigold, viola, nasturtium for color and pollinators.
Better for larger bottles or towers:
- Strawberries, dwarf chilies, bush beans.
- Compact tomatoes like micro-dwarf types.
- Kale or Swiss chard if you cut and come again.
Soil and feeding:
- Use a light mix of potting soil and perlite or coco coir. This keeps air in the root zone.
- Add slow-release fertilizer or feed weekly with a half-strength liquid feed.
- Check pH if you can. Most edibles are happy near pH 6 to 7.
Light and water:
- Most herbs and greens need 4–6 hours of sun. Afternoon shade helps in hot zones.
- Self-watering builds reduce stress. For top-watered bottles, water when the top inch is dry.
- If algae forms in clear bottles, paint the outside or wrap with cloth.
Pest care:
- Hand pick pests early. Rinse leaves with water to remove aphids.
- Use neem or soap sprays as needed. Spray at dusk to protect bees.
From my balcony trials, mint loves wicking bottles and grows thick with few refills. Cilantro bolts in heat. Keep it in a shadier spot, or sow every two weeks for a steady supply. These small notes turn plastic bottle gardening ideas into easy wins.

Safety, sustainability, and longevity
Safety comes first. PET and HDPE bottles are common in food use and have a good safety record in cool conditions. Avoid heat exposure. Do not pour boiling water in them. Keep them out of extreme sun when empty to reduce wear.
UV light makes plastic brittle over time. Paint, fabric wraps, or shade can slow this. Replace planters if they crack or turn chalky. In my tests, clear PET bottles lasted one to two seasons in full sun. Painted bottles lasted longer.
On microplastics and soil health, research suggests that aging plastic can shed small particles. Limit this by replacing old bottles, shielding them from UV, and keeping them cool and moist, not hot and dry. At end of life, recycle clean bottles and caps when local rules allow. If you want a long-term setup, move proven builds to wood or terracotta and keep bottles for seed starts and irrigation.

Troubleshooting and mistakes to avoid
Simple fixes solve most issues fast.
Common problems:
- Root rot from poor drainage. Add more drain holes and lighter soil.
- Plants wilting even when watered. Check for clogged wicks or blocked drip holes.
- Algae growth in clear bottles. Block light with paint or wraps.
- Mosquitoes in open reservoirs. Keep caps on with small feed holes or use fine mesh.
- Bottles dropping from walls. Use strong cord, double knots, and weight test each row.
Mistakes I learned to avoid:
- Overfilling soil to the rim. Leave 1 inch for water and mulch.
- Planting deep-root crops in small bottles. Save carrots and big tomatoes for larger pots.
- Ignoring wind load on vertical walls. Anchor frames and keep rows short.
Frequently Asked Questions of Plastic bottle gardening ideas
Are plastic bottle planters safe for food?
Most PET and HDPE bottles are safe for cool, outdoor use. Avoid heat, replace weathered bottles, and use food-grade containers for best peace of mind.
How long do bottle planters last outside?
One to two seasons in full sun is common for clear PET. Painted or shaded bottles can last longer with gentle handling.
What plants do best in plastic bottles?
Herbs and leafy greens thrive due to shallow roots. Dwarf tomatoes, chilies, and strawberries work in larger bottles or stacked systems.
How do I stop algae inside clear bottles?
Block light with paint, tape, or fabric wraps. Opaque bottles and regular wipe-downs also help.
Can I build a vertical garden on a rental balcony?
Yes. Use pallet frames or tension racks that do not need drilling. Keep weight low and add trays to catch drips.
Do I need special soil for bottle gardens?
Use a light potting mix with perlite or coco coir. Avoid heavy garden soil, which compacts and holds too much water.
How do I water when I travel?
Use self-watering wicks or bottle drip spikes. Capillary mats with bottle reservoirs can keep plants happy for several days.
Conclusion
You can turn throwaway plastic into a living wall, a tidy herb rail, and a smart watering system. Start small with a self-watering planter, then add a vertical row or a drip bottle for your tomatoes. These plastic bottle gardening ideas save money, space, and water while giving you fresh food close at hand.
Pick one idea today and build it in under an hour. Share your results, ask a question, or subscribe for more simple, proven garden hacks you can trust.
I enjoy sharing simple gardening ideas, lawn care tips, and honest product reviews that help make outdoor work easier. From home gardening guides to helpful tools and lawn care advice, I write easy-to-follow content to help readers create a healthier and better-looking outdoor space without wasting time or money.