As an Amazon Associate, I earn from qualifying purchases.
Curved garden paths add a natural flow to your yard. Choose gravel for a budget-friendly route, stepping stones for a relaxed garden look, or pavers for a firm, lasting walkway. Match the curve, surface, and width to your space, climate, and daily needs.
In American backyards, a garden path can do much more than connect a patio to a lawn. It can lead from a back door to a vegetable garden, wind past a flower bed, or guide guests toward a shaded seating area. A gentle curve helps these spaces feel connected without making the yard look crowded.
The best curved garden path ideas balance beauty with everyday use. A loose gravel trail may suit a cottage garden in Pennsylvania, while broad stone pavers can work well in a California courtyard. In rainy parts of the Pacific Northwest, drainage and a firm walking surface may matter more than decorative details.
Before choosing materials, look at how people move through your yard. Mark the route, check slopes and wet spots, and decide whether you need a path for garden chores, guests, or quiet walks. These simple checks help you create a walkway that looks good and remains useful through changing seasons.
A curved path can suit almost any garden style when its shape and materials fit the space. The ideas below range from simple weekend projects to more involved walkways that may need professional installation.
Think about the view from your house as well as the view from the path. A walkway that looks attractive from a standing position may feel awkward when it cuts across a small lawn or leads nowhere useful. Aim for a route that has a clear purpose and a pleasing shape.
Source: garden.eco
1. Pea gravel path with soft curves
Pea gravel gives a garden a relaxed, informal feel. Its small, rounded stones work well beside cottage flowers, shrubs, and natural lawns. Install sturdy edging to keep the gravel from spreading into planting beds, and choose a compacted, stable base. Loose pea gravel may shift underfoot, so it is less suitable for wheelchairs or anyone who needs a very firm surface.
2. Large stepping stones through grass
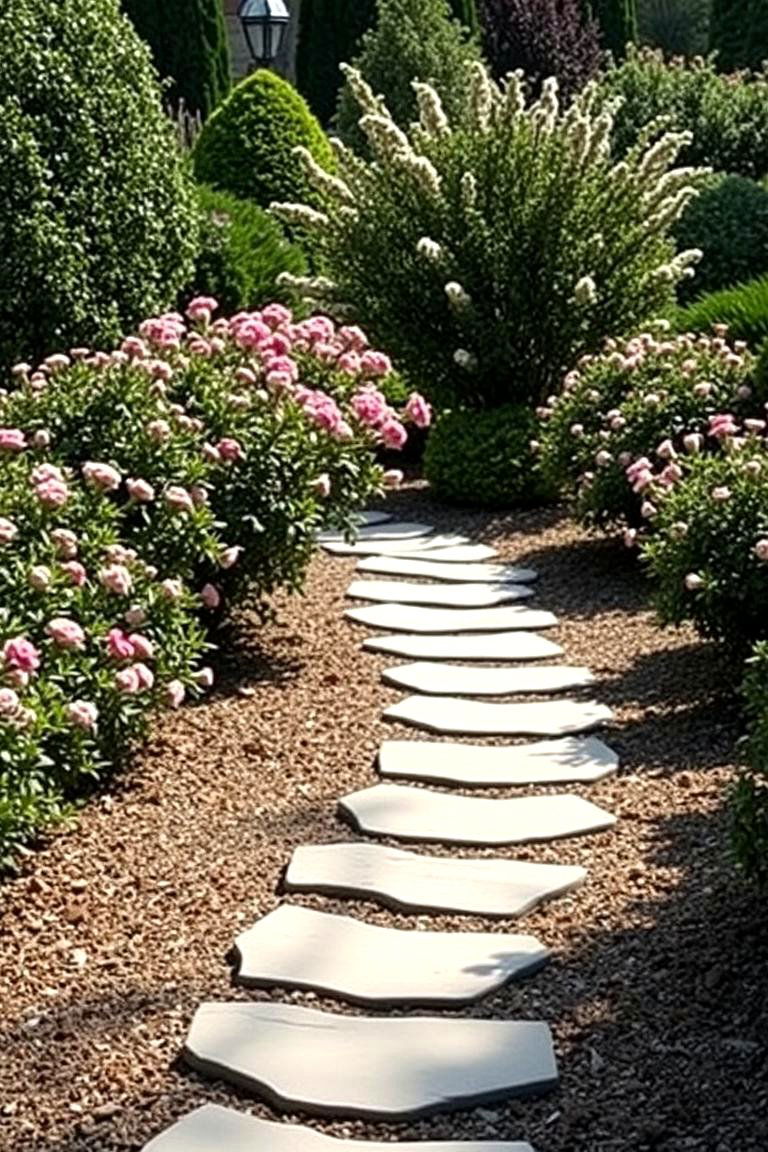
Place broad stepping stones along a gentle arc to connect a patio, garden gate, or backyard seating area. Leave consistent gaps that are easy to cross without taking unusually long steps. Set each stone firmly and keep its top close to the surrounding grade so it does not become a trip hazard. This design uses less paving than a solid walkway, but grass between stones still needs mowing and care.
3. Natural flagstone walkway
Irregular flagstones create a natural look that suits woodland gardens, mixed borders, and rustic backyards. Their uneven outlines can follow a curve without looking rigid. Choose stones with relatively flat walking surfaces, and install them on a suitable prepared base. Fill joints with an appropriate aggregate or planting material, while keeping the main walking surface stable.
4. Brick path with a traditional feel
Brick works well in Colonial-style landscapes, older American homes, and gardens with formal flower borders. A curved brick walkway can soften a straight house facade or link a porch to the backyard. Use compatible pavers and a suitable edge restraint to help maintain the curve. Plan for weeds, shifting units, and occasional joint repairs.
5. Concrete pavers in a sweeping arc
Concrete pavers come in many shapes, colors, and sizes, making them useful for both modern and traditional gardens. Smaller units can follow tighter curves more easily than large rectangular slabs. Pick a restrained color palette that works with the house and nearby hardscape. A well-prepared base and secure edges help limit movement over time.
6. Gravel path bordered by flowers
A curved gravel path surrounded by coneflowers, salvia, black-eyed Susans, or other plants suited to your region can make a plain lawn feel like a garden walk. Leave enough room for plants to mature without spilling across the route. Choose varieties that tolerate the light, soil, and moisture in the bed. Keep the center clear so the path remains easy to use.
7. Mulch trail through a woodland garden
A wood-chip trail can suit a shady backyard beneath established trees. It blends well with ferns, native woodland plants, and leaf-covered ground. Mulch is often easy to spread, but it breaks down and needs replenishing. Keep the surface away from tree trunks, and avoid using loose chips where a firm, accessible route is required.
8. Curved path with a stone border
A simple gravel or compacted aggregate walkway can look more finished with stone edging on both sides. The border defines the route and helps contain loose material. Repeat a stone type already used in a patio, retaining wall, or garden bed for a connected look. Check that the edging does not create raised edges that catch shoes or wheels.
9. Mixed-material garden walkway
Combine large pavers with gravel joints, or use a paved center with a narrow strip of decorative stone along the edges. This approach adds texture without requiring many different materials. Limit the number of finishes so the route feels calm rather than busy. Keep transitions level and avoid loose decorative stones where people turn, carry supplies, or walk in wet weather.
10. Curved path beside a raised vegetable bed
A curved walkway can link raised beds in a backyard vegetable garden and make the layout easier to navigate. Use a surface that stays reasonably firm when wet and can handle garden carts if needed. Leave room to reach the beds, turn a cart, and move compost or harvest baskets. Avoid placing the path so close to the beds that mature plants block it.
11. Stepping stones through a flower meadow
Broad stones set among low-growing plants can provide a quiet route through a meadow-style planting. Choose plants that tolerate occasional foot traffic and remain low enough to reveal the stone edges. This idea works best where people walk slowly and the ground is reasonably level. Do not rely on delicate flowers to form a durable walking surface.
12. Modern curved concrete walkway
A smooth concrete path with a broad curve suits contemporary homes and uncluttered gardens. It can connect an outdoor dining area with a lawn or poolside planting. Concrete requires careful planning because a curved form and a durable finish can take more work than a simple gravel trail. Account for drainage, control joints, and local frost conditions during design and installation.
13. Curved path leading to a garden bench
Let the walkway widen slightly near a bench, fountain, or small sitting area. The widening gives people room to stop without blocking anyone behind them. Place the destination where it offers a useful view, afternoon shade, or a quiet corner away from activity. A small landing of matching pavers or stone can make the transition feel deliberate.
14. Narrow path through layered shrubs
A narrow garden trail can work in a side yard or along the edge of a larger planting bed. Use low shrubs and ground covers to frame the route while leaving enough clearance for comfortable movement. Gentle bends create interest, but avoid sharp turns that hide obstacles. This design is best for light foot traffic rather than moving large garden equipment.
15. Curved boardwalk over a damp area
A raised timber walkway may help people cross a damp part of a yard without repeatedly walking through mud. It can also protect sensitive ground in certain garden settings. However, wet conditions, decay, slippery surfaces, and the need for structural support require careful planning. If the boardwalk crosses a steep slope, drainage channel, or unstable soil, consult a qualified local professional before building.
Which design works best for a small backyard?
For a small backyard, choose a single broad curve rather than a series of tight bends. A narrow gravel path, a few large stepping stones, or small-format pavers can connect key areas without taking over the lawn. Keep planting near the edges low enough to preserve an open view.
A path that disappears briefly behind a shrub can make a small space feel deeper, but do not hide an important entrance or create a blind corner. The route should still be easy to follow from the house.
Best for low cost
A simple gravel path with basic edging can be a practical choice when the soil and drainage conditions suit it.
Best for a polished look
Small pavers or brick units can follow a curve and create a more finished edge.
Best for minimal paving
A few broad stepping stones can connect two points without covering the entire route.
How to Choose the Right Material for a Curved Path
The right path material depends on how often people will use it, how level the ground is, and how much maintenance you can manage. A decorative trail beside flowers has different needs from a route between the garage and a vegetable garden.
Compare the surface, installation effort, upkeep, and likely performance in your local climate. A low purchase price does not always mean a low long-term cost if the path needs frequent repairs or replacement.
Source: garden.eco
Gravel
Gravel is flexible for curved layouts and can suit informal gardens. It needs a stable base, edging, occasional raking, and periodic replenishment. Fine or rounded gravel may shift more readily under foot traffic than a properly compacted angular aggregate.
Stepping stones
Stepping stones create an open look and can reduce the amount of hardscape. Their main limitation is the need for consistent placement and secure footing. Wide, level stones are easier to use than small or widely spaced pieces.
Brick
Brick gives a warm, traditional appearance and works well with many older homes. It can require careful cutting or layout along curved edges, plus occasional joint maintenance. Use paving bricks intended for ground installation rather than ordinary wall bricks.
Concrete pavers
Pavers offer many shapes and finishes and can be replaced individually if damaged. Their durability depends on the product, base preparation, drainage, and installation. Smaller units are often easier to arrange along curves than large rectangular slabs.
Natural stone
Natural stone offers varied color and texture. It can be a good fit for rustic and formal gardens, depending on the stone and layout. Check for uneven surfaces, slippery finishes, and the extra work needed to fit irregular edges.
Wood chips or mulch
Wood chips are useful for informal paths through woodland or planting areas. They are relatively simple to install, but they decompose, may shift in heavy rain, and are not as firm as paved surfaces. Replenish them as needed and keep the route clear of roots and debris.
Compare materials before you build
Use this table as a starting point rather than a universal cost or lifespan ranking. Local material prices, soil conditions, climate, and labor can change the final result. Check the cost of base aggregate, edging, delivery, and disposal as well as the visible surface.
For easy shaping
Loose aggregate and small paving units usually offer more layout flexibility than large slabs.
For a firm walking surface
Properly installed pavers or concrete can provide a more continuous surface than loose gravel or mulch.
For a natural garden look
Flagstone, gravel, and wood chips can blend into informal planting schemes when installed with suitable edging and drainage.
How to Plan the Shape and Width of a Curved Garden Path
Plan the route before you buy materials. The curve should connect useful destinations, fit the space, and leave enough room for nearby plants. A path that looks graceful on paper can become awkward if it cuts across a door swing, blocks a gate, or narrows beside a mature shrub.
Use a garden hose, rope, or marking paint suitable for the surface to lay out the proposed curve. Walk the route from both directions and carry a basket or garden tool along it if that reflects how you will use the space. Adjust the line until it feels natural and practical.
Source: dopegardening.com
Start with the destinations
Mark the back door, patio, shed, garden gate, vegetable beds, and other places the path should connect. Choose the most useful route before adding decorative bends.
Use broad, gentle curves
A sweeping curve usually feels calmer than several short zigzags. A tighter bend may work around a tree or flower bed, but it should not make the route difficult to walk or maintain.
Choose a suitable width
For a simple one-person garden trail, about 24 to 30 inches may be enough for occasional walking in some settings. A frequently used path is often more comfortable at 36 to 48 inches wide. Main access routes, wheelchairs, carts, and two-way traffic may need more room; check applicable accessibility requirements when they apply.
Check the view from the house
A curved path becomes part of the landscape even when no one is walking on it. Look from kitchen windows, the patio, and the main entrance to see whether the line frames plants or divides the lawn in an awkward way.
Leave room for plants
Allow mature shrubs and perennials to spread without narrowing the walkway. Keep thorny plants and floppy stems far enough back that they do not snag clothing or block movement.
How much should a garden path curve?
There is no single curve radius that fits every yard. A large lawn can support a long, flowing bend, while a narrow side yard may need only a slight change in direction. The key is to make the curve look intentional and preserve a useful walking line.
Avoid adding bends just to make the path seem longer. A route should have a clear destination, and a person carrying a watering can should not need to make extra turns without a good reason.
For formal gardens
Use smooth, controlled arcs and repeat the same curve language near borders or hedges.
For cottage gardens
Allow a more relaxed line that follows planting groups and reveals flowers gradually.
For modern gardens
Use one clean curve as a contrast to simple architecture and restrained planting.
How to Build a Curved Garden Path Step by Step
A durable garden path begins below the visible surface. Removing the grass and laying gravel or pavers directly on soft soil may save time at first, but the route can settle, develop ruts, or hold water. The depth and type of base depend on the material, soil, climate, and expected traffic.
The following method describes a general ground-level walkway. Follow the paving manufacturer’s instructions for the chosen product, and get qualified help for retaining structures, steep slopes, unstable ground, or paths that cross drainage features.
Source: dopegardening.com
Step 1: Mark the route
Lay a hose or rope along the planned curve. Measure the width at several points and mark the outer edges. Walk the line, check nearby doors and gates, and confirm that the route reaches the intended destinations.
Step 2: Check the ground and drainage
Look for standing water, soft soil, tree roots, utility covers, and existing drainage routes. Call 811 before digging in the United States so underground utility lines can be marked. Do not assume a shallow excavation is free of buried services.
Step 3: Remove vegetation and unsuitable soil
Remove turf and organic material from the planned footprint. Excavate to the depth needed for the surface, base, and any bedding layer. Avoid cutting major tree roots, and seek advice before altering the ground near established trees or foundations.
Step 4: Shape and prepare the subgrade
Create a stable, even formation and compact the soil where appropriate for the project. Plan the finished grade so water drains away from buildings and does not flow onto neighboring property. A path should not become a dam that redirects runoff into a basement, garage, or garden bed.
Step 5: Install the base
Add suitable compactable aggregate in layers when the selected path design requires it. Compact each layer according to the material and project specifications. Soft clay, wet ground, frost-prone areas, and heavy traffic may require a different base design from a dry, lightly used garden trail.
Step 6: Set the edging
Install edging where needed to hold gravel, pavers, or other materials in place. Follow the planned curve closely and check the width as you work. Secure edging according to its material and the manufacturer’s directions.
Step 7: Lay the walking surface
Spread gravel evenly, set pavers on the specified bedding layer, or position stepping stones at comfortable intervals. Check each section for firm footing and consistent height. Keep joints and gaps suitable for the selected material rather than filling them with loose stones that can roll underfoot.
Step 8: Test the route
Walk the path in both directions and inspect the turns, edges, and transitions. Check that water can drain and that no stone rocks when stepped on. Fix uneven spots before adding decorative plants or furniture.
Estimate how much material you need
For a simple estimate, multiply the path’s average width by its length to find the approximate surface area. For example, a curved path measuring 30 feet long and 3 feet wide covers about 90 square feet before allowing for irregular edges or waste.
For gravel, multiply the surface area by the planned depth to estimate volume. If the 90-square-foot path needs a 2-inch gravel layer, the top layer alone requires about 15 cubic feet, or roughly 0.56 cubic yard. This is a hypothetical calculation, not a recommendation for base depth; determine the proper depth and base structure for your site before ordering.
Measure the whole route
Use several shorter measurements along a curved route or measure the centerline for a practical estimate. Add a reasonable allowance for cutting and waste when the surface material requires it.
Separate base and finish material
Calculate the structural base and visible top layer separately. They have different purposes and may use different aggregate sizes.
Check supplier units
Confirm whether a supplier sells material by cubic foot, cubic yard, ton, bag, or pallet. Do not convert volume to weight without an appropriate density estimate for the material.
Planting Ideas to Make a Curved Path Look Natural
Plants help a curved walkway feel connected to the garden. Use them to soften the edges, frame a bend, or draw the eye toward a bench or doorway. The strongest planting plans repeat a few shapes or colors rather than filling every gap with a different plant.
Choose plants for your USDA hardiness zone, sunlight, soil, and local moisture conditions. A plant that thrives in a sunny Texas yard may struggle in a shaded New England garden, so confirm local suitability before buying. Native plants adapted to your region can be useful choices, especially where they support local wildlife and need less supplemental care once established.
Source: garden.eco
Use low-growing edging plants
Compact ground covers and low perennials can soften the path edge without blocking the walking surface. Choose varieties that tolerate the light and moisture in that spot and do not spread aggressively into the path.
Frame bends with shrubs
A small shrub near a broad turn can make the route feel more defined. Keep enough clearance to see the next section and avoid placing dense growth where people need to pass.
Repeat flowering plants
Plant repeated groups of coneflowers, salvias, black-eyed Susans, or other locally suitable flowers to create rhythm. Repeating the same few plants can look more settled than mixing many unrelated colors.
Add seasonal interest
Combine foliage, flowers, and a few plants with winter structure so the path remains attractive after peak bloom. Consider how plants will look in summer heat, fall rain, and winter dormancy.
Keep plants out of the walking line
Leave room for mature growth, fallen leaves, and routine trimming. Avoid thorny stems, poisonous plants in child-accessible areas, and varieties that attract heavy insect activity right beside a narrow route.
Design a layered border along the curve
A layered border can make a path feel rich without becoming hard to maintain. Place taller shrubs or ornamental grasses toward the back of the bed, medium-height perennials in the middle, and low plants near the path edge. Adjust the layers to the direction of the view and the amount of sunlight each area receives.
Do not let planting cover the path’s drainage edge or grow over the surface. In rainy areas, keep leaves and stems from trapping moisture against timber edging or making the walkway slippery.
Sunny borders
Consider drought-tolerant plants suited to the region, provided the soil drains well and the chosen varieties match the local climate.
Shady borders
Use shade-tolerant ground covers and foliage plants that suit the soil moisture. Avoid assuming that all woodland plants can tolerate dry shade beneath large trees.
Low-maintenance borders
Group plants with similar water and light needs, use mulch where appropriate, and leave enough space for mature growth.
Curved Garden Paths for Different Climates and Ground Conditions
A path that works well in one part of the United States may need changes elsewhere. Rainfall, freeze-thaw cycles, summer heat, soil type, and slope affect both the surface and the base below it. Check the conditions at the actual site instead of choosing a design based on appearance alone.
Start by observing where water collects after a storm and where the soil stays wet. If the path crosses a slope, drains toward a building, or lies over unstable ground, the project may need a more careful grading or drainage plan.
Source: thumbs.dreamstime.com
Wet climates and rainy regions
Prepare a base and surface that let water drain as intended. Keep leaves and debris from blocking drainage routes. A gravel surface can still develop puddles if the underlying soil is poorly drained or the route traps water.
Cold climates with frost
Freeze-thaw cycles can shift pavers and cause uneven spots when water collects beneath the surface. Use a base design suited to local frost conditions and keep runoff moving away from the path. Check local installation guidance before selecting base depth.
Hot and dry climates
Choose surface materials that suit local heat and glare. Pale stone may reflect more light, while some dark surfaces become hot in direct sun. Drought-tolerant plants can reduce irrigation needs when matched to the soil and exposure.
Heavy clay soil
Clay may drain slowly and soften when wet. Avoid placing a path directly on saturated soil, and do not assume extra top gravel will solve a drainage problem. A suitable base, grading plan, or drainage improvement may be necessary.
Sloping yards
A winding path can make a long route feel less abrupt, but it does not automatically make a steep slope safe. Keep the walking grade and turns appropriate for the users and surface. Significant slopes, erosion, and retaining needs may require professional assessment.
What should you do if the path holds water?
First, identify whether the water comes from the surface, the surrounding soil, or a nearby downspout. Check the grade and look for low spots where the path settles. Do not simply add another layer of gravel until you know why water is collecting.
For a minor low spot, correcting the surface and restoring the proper base may solve the problem. If water flows from a roof, crosses the property, or repeatedly reaches a foundation, have the drainage issue assessed before rebuilding the path.
Surface puddles
Check for dips, settled pavers, blocked joints, and an unsuitable finished grade.
Soft or muddy edges
Inspect edging, soil movement, and runoff from adjacent beds or lawns.
Repeated movement
Look for inadequate compaction, unstable soil, or water beneath the path rather than treating each loose stone as a separate problem.
How to Keep a Curved Garden Path Low Maintenance
A low-maintenance path starts with a material and layout that suit the site. A surface that constantly shifts, collects leaves, or encourages weeds will take more work no matter how attractive it looks when new. Spending time on preparation can reduce the number of repairs needed later.
Maintenance still matters, even with concrete or stone. Seasonal checks help catch loose pavers, blocked drainage, and plant growth before they become larger problems.
Source: i.digsdigs.com
Inspect the surface each season
Look for uneven stones, settled pavers, loose edging, cracks, and puddles. Repair small problems before regular foot traffic makes them worse.
Control weeds early
Remove young weeds from gravel and paving joints before their roots become established. Use hand tools or suitable methods for the surface, and follow label directions for any weed-control product.
Keep drainage clear
Remove leaves, sediment, and other debris that prevent water from draining. Check nearby downspouts and planting beds so they do not send extra runoff across the walkway.
Refresh loose materials
Rake gravel back into place and replenish mulch as it breaks down. If the surface repeatedly washes away, investigate the slope and water flow instead of replacing material over and over.
Trim nearby plants
Keep branches, grasses, and ground covers from encroaching on the walking line. Remove fallen leaves promptly when they make stone, brick, or concrete slippery.
Mistakes that make curved paths harder to maintain
The most common problems begin with a route that is too narrow, a base that was not prepared properly, or materials that do not suit the site’s water and traffic. A path may look finished on installation day yet begin to shift after repeated rain or winter weather.
Avoid choosing a loose surface for a route that must stay firm for wheelchairs, walkers, or loaded garden carts. Also avoid abrupt changes in level, unstable stepping stones, and sharp turns that are difficult to see around.
Skipping base preparation
Soft soil beneath the surface can lead to sinking, ruts, and uneven pavers.
Using too many materials
Frequent changes in color and texture can make the design look busy and create more transitions to maintain.
Ignoring mature plant size
Shrubs and perennials can narrow the path and make routine trimming harder.
Creating sharp hidden turns
A curve should guide people rather than conceal an obstacle or make the route hard to follow.
How to Make a Curved Garden Path Fit Your Budget
The cost of a curved path depends on the material, path length, ground preparation, access for deliveries, and whether you do the work yourself. Curves may also increase cutting and fitting time for some paving materials. Compare the full project cost instead of looking only at the price of the visible surface.
A shorter route between the most-used areas can be more useful than a long decorative trail. If funds are limited, build one well-prepared section first and extend it later using the same material and curve.
Source: cdn.diycraftsy.com
Keep the route efficient
Connect real destinations and avoid unnecessary detours. A simple curve can provide a natural look without increasing the path length too much.
Use local materials when suitable
Locally available aggregate, stone, or paving units may reduce delivery costs. Confirm that the material suits foot traffic, drainage, and the intended finish.
Do basic work yourself when appropriate
Marking the route, removing light vegetation, and spreading mulch may be manageable DIY tasks. Excavation, drainage changes, and work near large roots or steep slopes may need specialized help.
Build in stages
Complete the main access route first, then add a small branch to a bench or planting area when the budget allows. Preserve the same design language so later work looks connected.
Include ongoing upkeep
Account for gravel replenishment, mulch replacement, joint repairs, edging adjustments, and plant trimming. A slightly higher initial cost may be worthwhile if it reduces maintenance for your particular site.
Where should you spend and where can you save?
Spend on a stable base, appropriate drainage, and a surface suited to the route’s use. These hidden parts affect how well the path performs. Saving money by skipping them may lead to repairs that cost more than the original work.
You can often save on decorative extras. Start with a clear route and one or two materials, then add border plants, a bench, or low lighting later. Check outdoor lighting requirements and use suitable weather-rated products if you add electrical fixtures.
Spend on
Proper preparation, stable walking surfaces, sound edging, and solutions for existing drainage issues.
Save on
Unneeded decorative borders, complex patterns, excess path length, and plants that do not serve the design.
Frequently Asked Questions
Q
Are curved garden paths better than straight paths?
Neither shape is always better. A curved path can soften a large lawn, guide the eye toward a garden feature, and work around existing planting. A straight path may be more efficient for a direct route to a shed, gate, or entrance. Choose the shape that fits the space and how people will use it.
Q
What is the cheapest material for a curved garden path?
Wood chips, mulch, or gravel may cost less than a professionally installed stone or concrete walkway, depending on local prices and site conditions. Mulch is often simple to spread but needs replenishment. Gravel can last longer as a surface but needs edging and suitable base preparation. Compare the full installed cost rather than material prices alone.
Q
How wide should a curved garden path be?
A lightly used garden trail may work at about 24 to 30 inches wide, while a frequently used walkway often benefits from a width of 36 to 48 inches. These are practical starting points, not universal standards. A route for wheelchairs, walkers, carts, or two-way traffic may need more width and a firmer surface. Check applicable accessibility requirements for public or regulated spaces.
Q
How do I keep gravel on a curved garden path?
Use suitable edging on the sides and install gravel over a stable, well-prepared base. Choose aggregate appropriate for the slope and expected traffic, and keep water from washing across the surface. Rake loose gravel back into place when needed. If it keeps moving, review the grade and drainage instead of adding more gravel alone.
Q
Can I build a curved garden path on a slope?
Yes, a curved route can follow a slope, but its grade, surface, and drainage need careful planning. A winding layout does not automatically make a steep route safe. Avoid loose surfaces where they may wash away or become slippery, and do not create abrupt changes in level. For steep slopes, erosion, retaining walls, or unstable soil, seek advice from a qualified local professional.
Q
Which plants work best beside a curved garden path?
The best plants depend on your region, soil, sun, and moisture. Low-growing perennials and ground covers can soften the edge, while shrubs can frame wider turns. Native plants suited to your area may reduce watering and support local wildlife. Check mature size and leave enough room so branches and foliage do not cover the walkway.
Q
How do I prevent weeds from growing between pavers?
Use the correct joint material for the paving system, prepare the base properly, and remove windblown soil and leaves before weeds establish. No joint material guarantees a weed-free path forever. Pull young weeds early and follow the manufacturer’s instructions for any joint treatment. Avoid using methods that can damage the pavers or nearby plants.
✦ Wrapping Up
Conclusion
Curved garden paths can make a backyard feel more inviting by linking useful spaces and guiding the eye through the landscape. Gravel, stepping stones, brick, natural stone, and concrete pavers each offer a different balance of appearance, cost, comfort, and upkeep. The best choice depends on your garden’s layout and the people who will use the route.
Start with a clear destination and mark a broad curve on the ground. Check drainage, soil, width, and mature plant growth before choosing the surface. Build a stable base where required, keep the finished route easy to walk, and use planting or edging to help it blend into the rest of the yard.
💡 Key Takeaway
This weekend, mark a proposed curve with a garden hose and walk it from both directions. Measure its length and width, note any wet spots or obstacles, and compare two suitable surface materials before buying supplies.
I enjoy sharing simple gardening ideas, lawn care tips, and honest product reviews that help make outdoor work easier. From home gardening guides to helpful tools and lawn care advice, I write easy-to-follow content to help readers create a healthier and better-looking outdoor space without wasting time or money.