As an Amazon Associate, I earn from qualifying purchases.
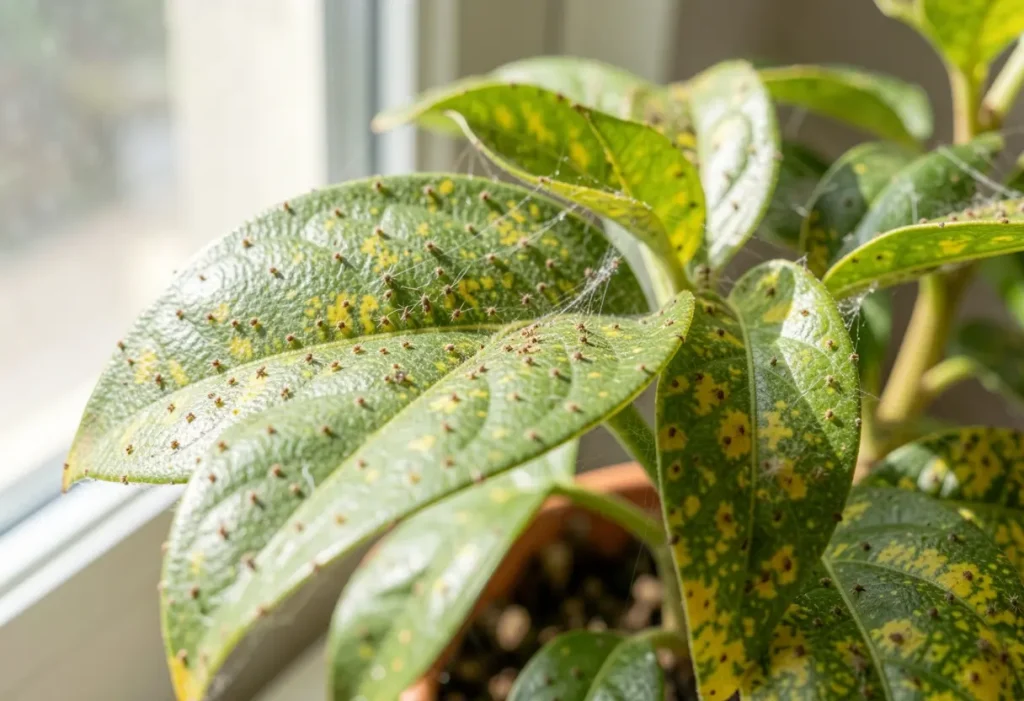
The main signs of spider mites on indoor plants are tiny pale speckles on leaves, fine silk webbing, yellow or bronze patches, and leaves that dry or fall off. Look closely at the undersides of leaves and along leaf stems. A white sheet of paper and a hand lens can help you confirm an infestation before it spreads.
In American homes, indoor plants face different growing conditions throughout the year. A sunny windowsill in Arizona, a heated living room in Minnesota, and a humid Florida sunroom can each create a different setting for houseplants. During dry weather, indoor heating, or periods of low humidity, spider mites may become a problem, especially on plants that are already stressed.
Spider mites are tiny relatives of spiders, not insects. They feed on plant cells and can leave leaves looking dusty, faded, or dotted with small yellow marks. Early damage can look like a watering problem or a lack of nutrients, so it helps to know which signs to check before changing your plant care routine.
You do not need special equipment to begin. Check a few leaves, look for fine webbing, and tap a leaf over a sheet of white paper. If tiny moving specks appear, inspect the plant more closely and check nearby plants as well. Finding the problem early gives you a better chance of protecting healthy leaves and stopping the mites from spreading.
What Are Spider Mites, and Why Do They Damage Indoor Plants?
Spider mites are very small arachnids that feed on the contents of plant cells. Many species attack houseplants, including common foliage plants such as pothos, ivy, dracaena, palms, and some types of ficus. Their small size makes them easy to miss until the plant begins to show visible damage.
Unlike chewing pests, spider mites do not leave large bites or ragged holes in leaves. They pierce individual plant cells and remove their contents. As more cells are damaged, the leaf develops many tiny pale marks that can merge into larger faded areas.
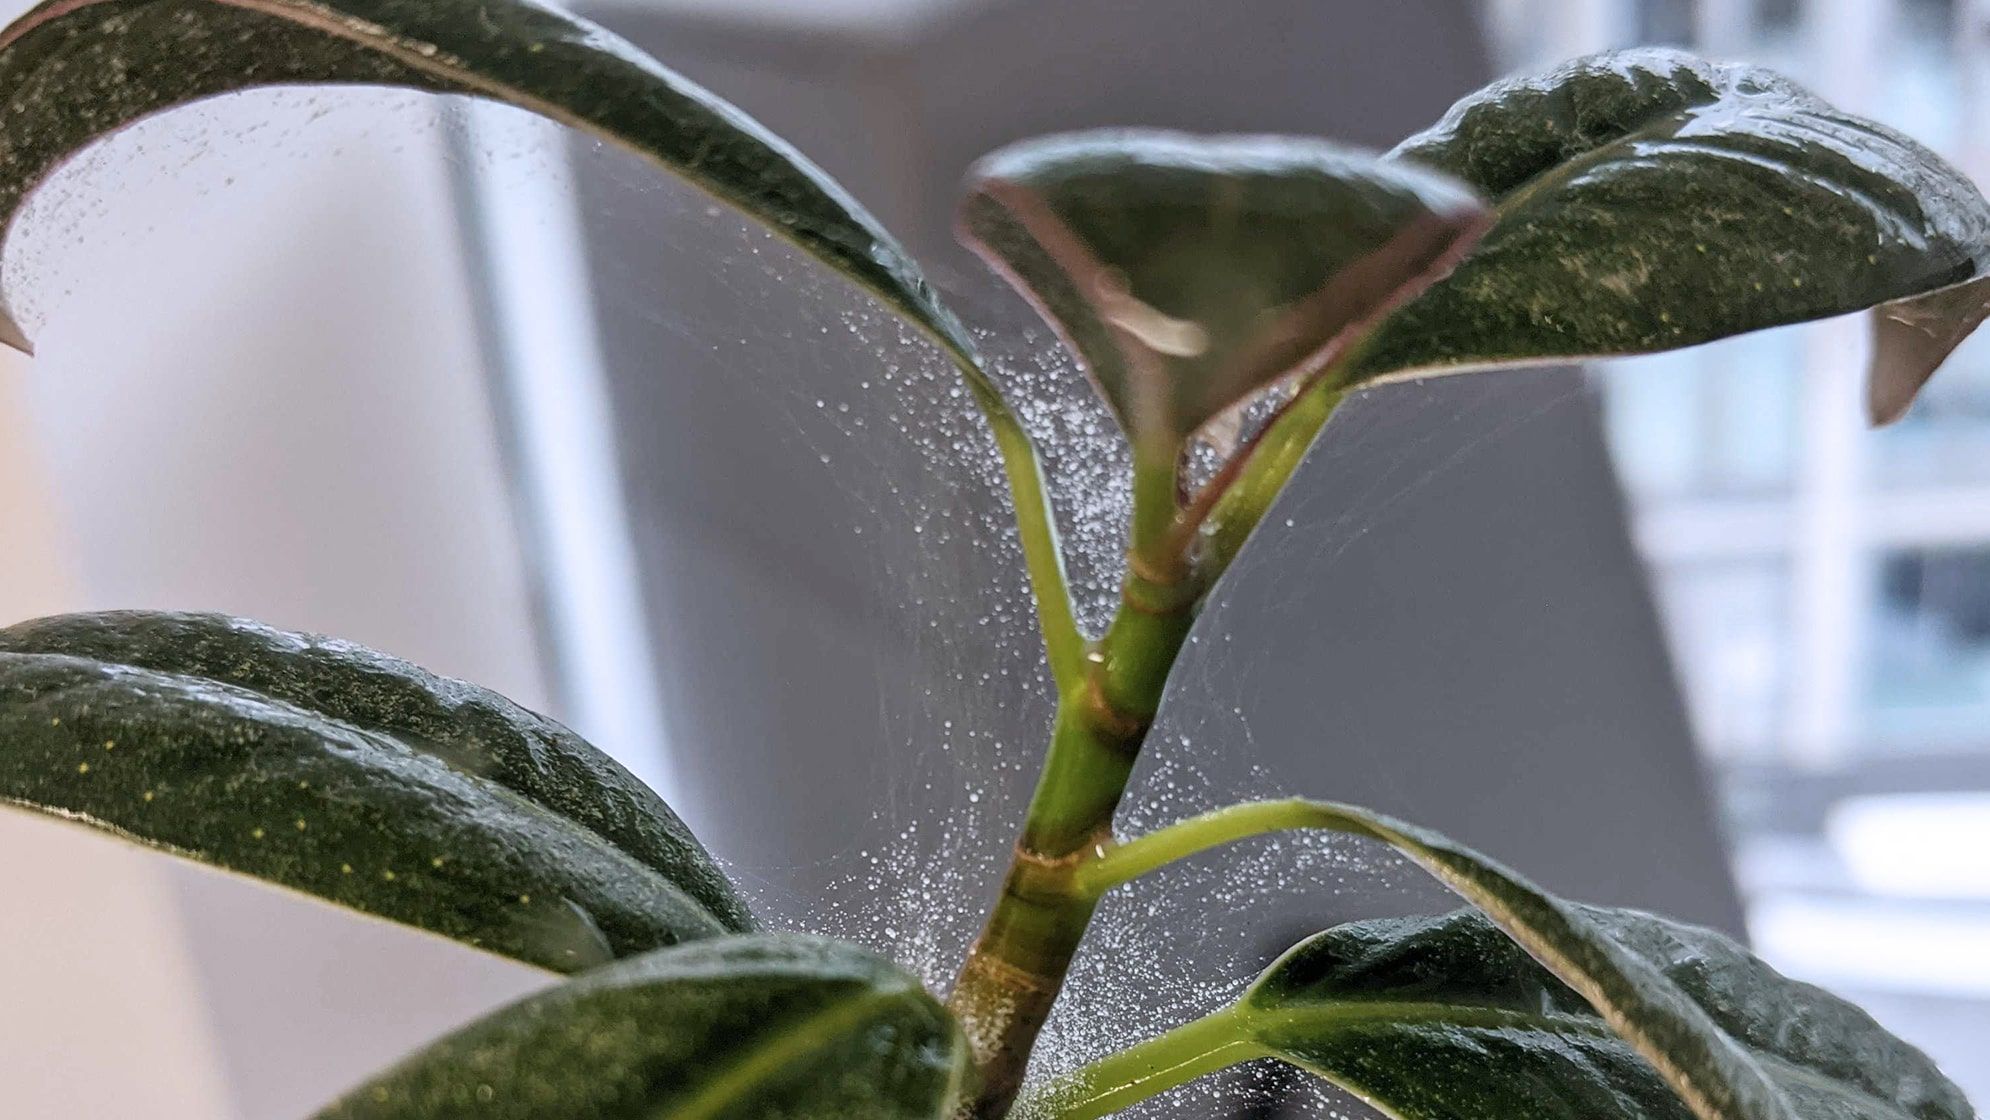
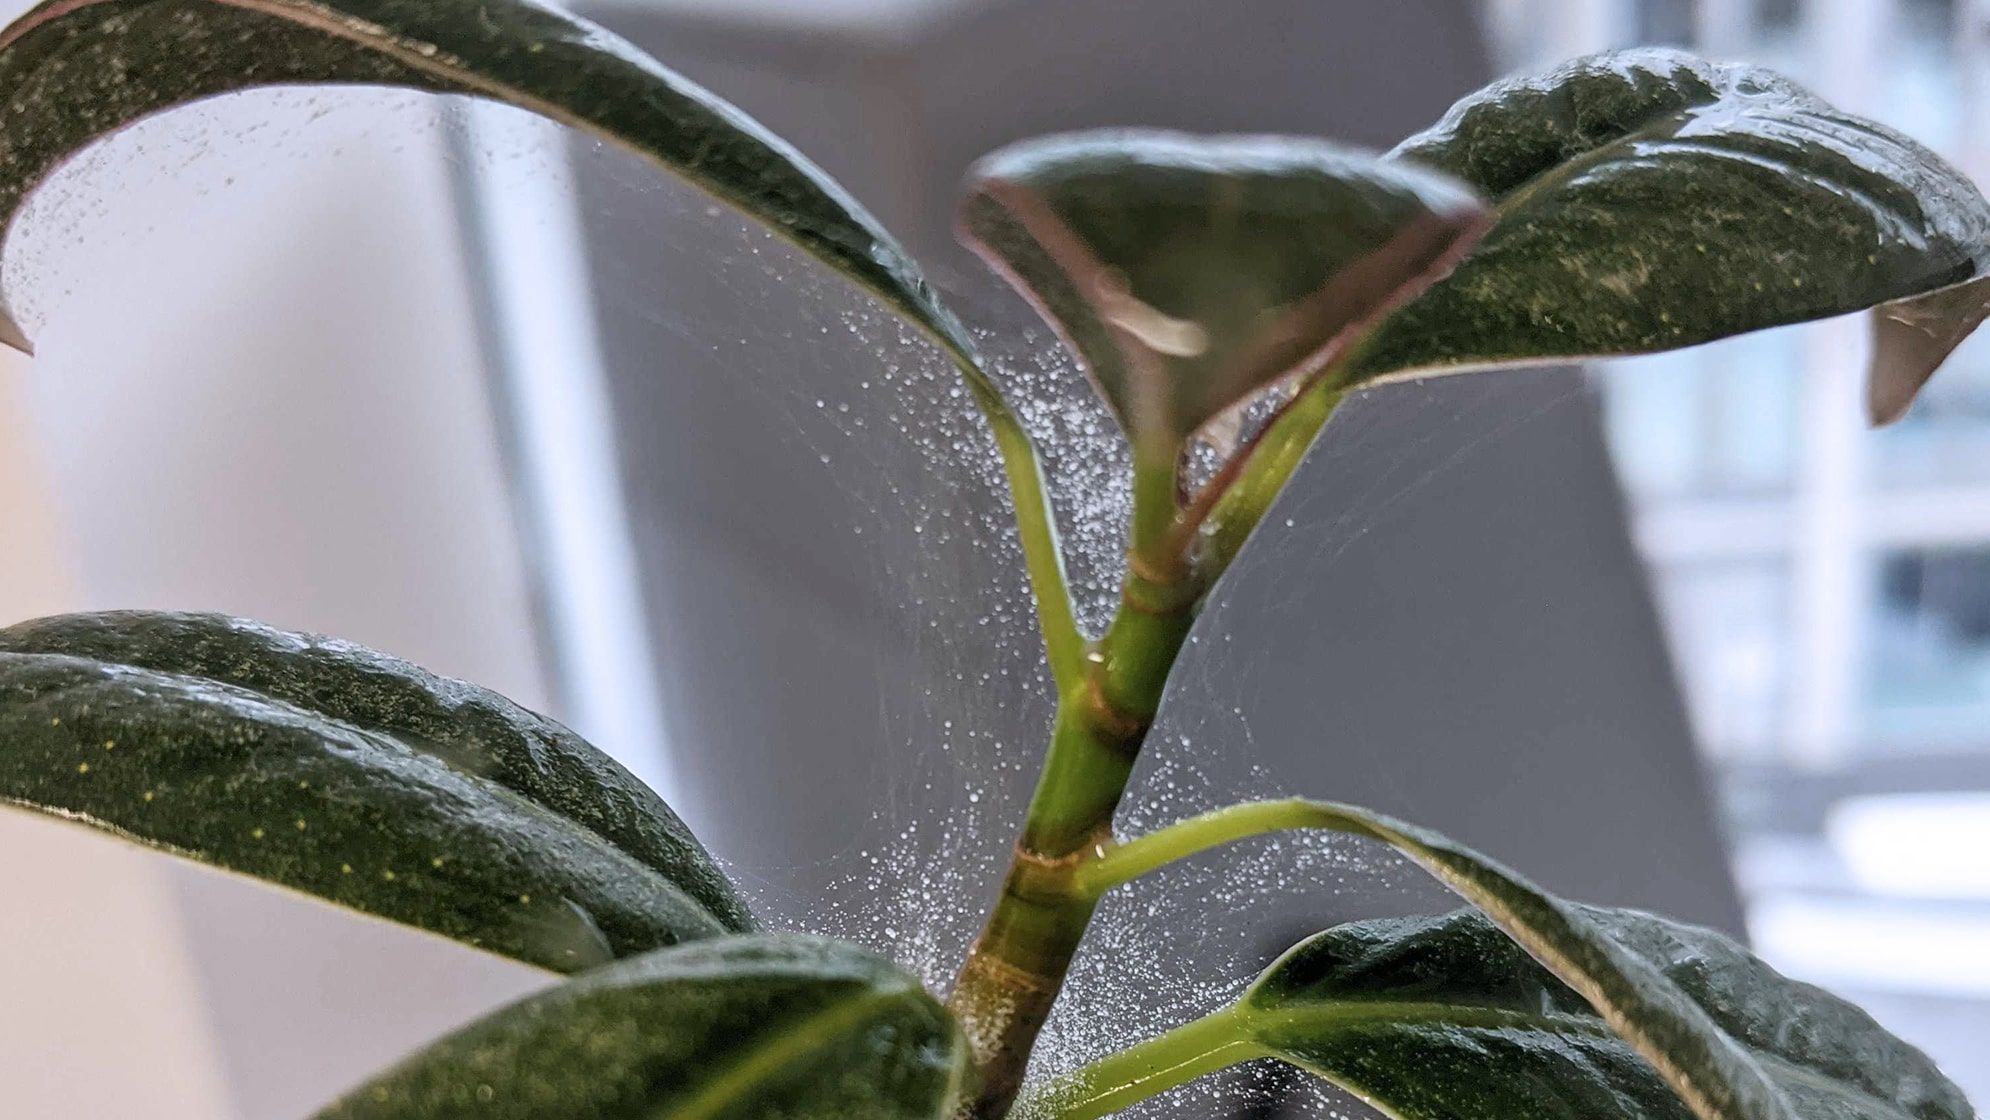
Spider mites often gather on the undersides of leaves, where they feed, lay eggs, and shelter from some disturbances. Some species also create fine silk webbing. A plant may carry a small population for a while before the damage becomes obvious, so regular checks matter.
Source: joyusgarden.com
They are not true spiders
Spider mites belong to the arachnid group, but they are plant pests. Their silk can resemble a tiny spiderweb, though the webbing is often much finer.
They can spread between plants
Mites may move from one plant to another through contact, on plant material, or on objects that brush against infested foliage. Air movement may also help disperse some mites.
They can multiply quickly
Warm conditions may speed up their life cycle. A small infestation can become more noticeable in a short time when conditions favor the mites and the plant remains untreated.
Which Indoor Plants Are Most at Risk?
Spider mites can attack many kinds of houseplants, but plants with dense foliage or many small leaves can be hard to inspect. Palms, ivy, crotons, dracaena, ficus, and some indoor herbs may show damage when mites establish themselves. Thin leaves can also reveal speckling clearly, while broad leaves make it easier to inspect the underside for mites and eggs.
A plant is not safe just because it looks healthy or has glossy leaves. New plants, plants brought indoors from a patio, and plants that sit close together deserve careful checks. Susceptibility varies by plant species, growing conditions, and the mite species involved.
Inspect new arrivals
Check leaf undersides, leaf joints, and stems before placing a new plant near your existing collection.
Check plants near windows
Bright windows can be warm and dry, particularly in heated homes. Inspect foliage that faces the glass and leaves close to radiators or heating vents.
The Most Common Signs of Spider Mites on Indoor Plants
The clearest signs of spider mites are fine leaf speckles, fading color, delicate webbing, and tiny moving mites. You may notice only one sign at first. Check several parts of the plant because early infestations can be concentrated on a few leaves.
No single symptom proves that spider mites are present. Yellow leaves, dry edges, and pale spots can also result from poor watering, sun damage, nutrient problems, or other pests. Look for several clues together and confirm that small moving mites are present whenever possible.
Source: houseplantcentral.com
Tiny pale speckles
Look for many small white, cream, or yellow dots scattered across a leaf. The marks often appear where mites have damaged individual cells.
Fine silk webbing
Check the undersides of leaves, the spaces between leaf stalks, and the tips of growing shoots. Delicate webbing combined with leaf speckling is a strong clue.
Faded or bronze foliage
As feeding continues, the leaf may lose its healthy green color and develop a dusty, gray-green, yellow, or bronze appearance.
Dry, brittle, or falling leaves
Heavy feeding can cause leaves to dry, curl, turn brown, or drop. These symptoms are more likely when the infestation is advanced or the plant is stressed.
Tiny moving dots
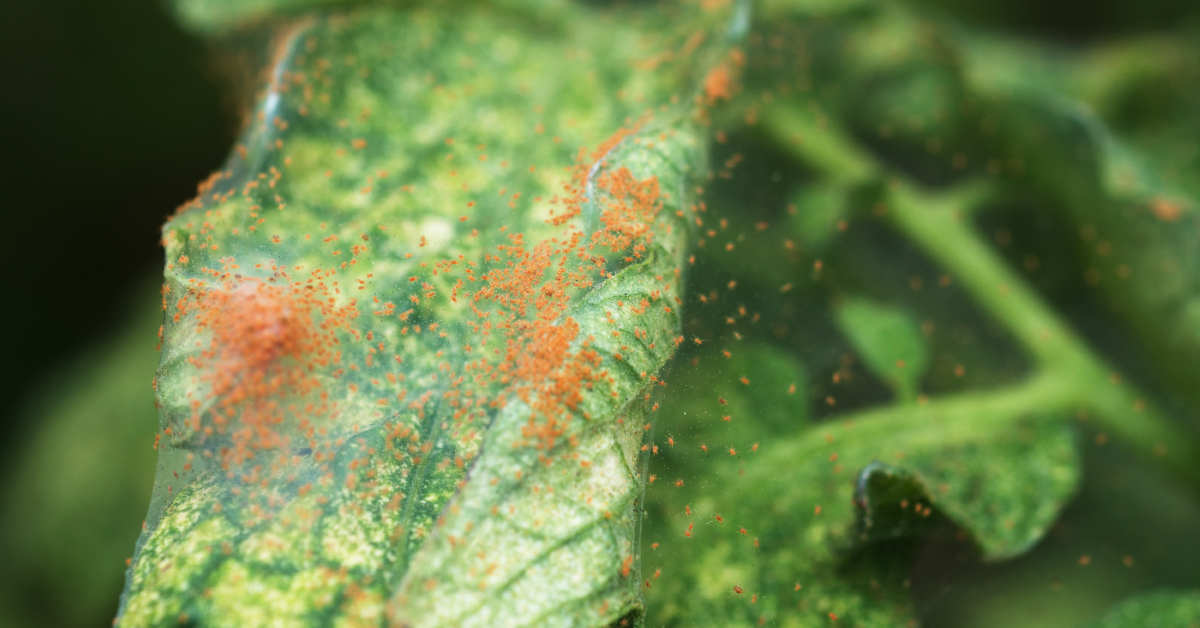
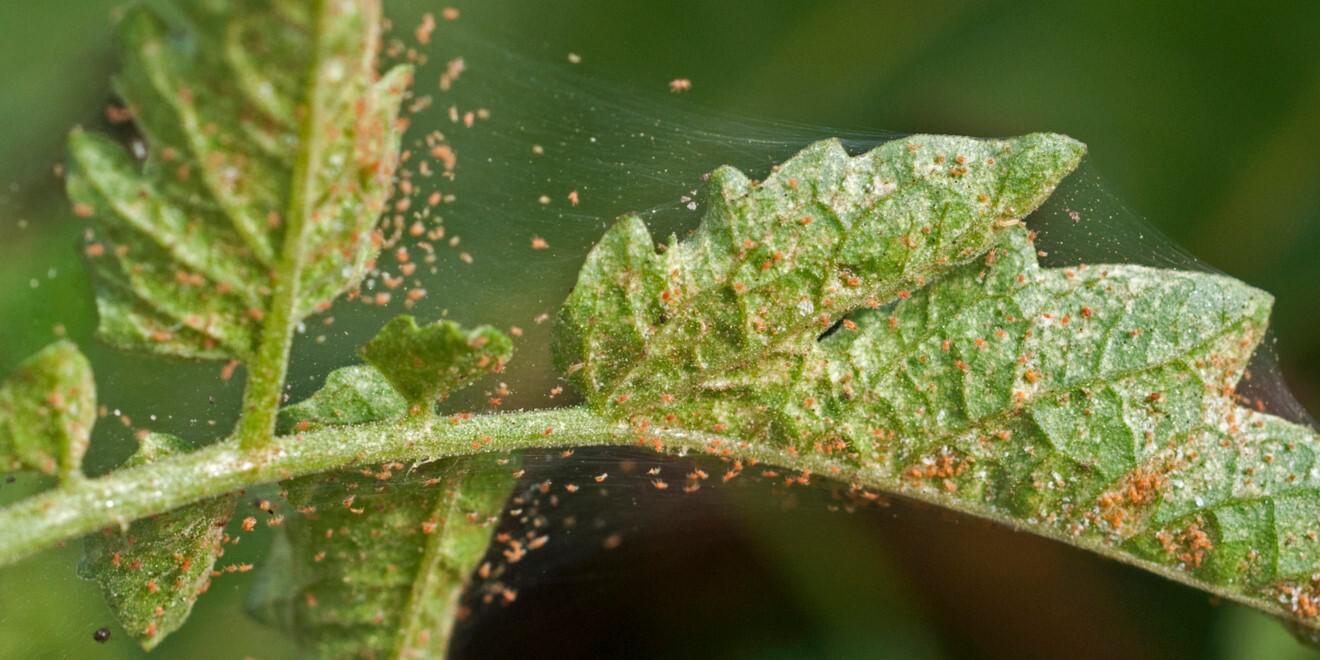
Adult and immature mites may look like minute moving dots on leaves. Some are pale, greenish, yellowish, or reddish, depending on the species and life stage.
1. Tiny White or Yellow Spots on Leaves
Small pale specks are often the first visible sign of spider mite feeding. At first, the spots may be scattered across otherwise green leaves. As the mites feed and the damage grows, the specks can become dense enough to make the whole leaf appear washed out.
Look closely at older leaves and the undersides of foliage, but do not assume that older leaves must be affected first. The pattern depends on where the mites are feeding. If the spots occur alongside moving mites or fine webbing, spider mites become a more likely explanation.
What to look for
Fine, repeated dots rather than one large, sharply defined patch. The marks may be visible against the light when you tilt the leaf.
What to do next
Turn the leaf over and inspect it with a hand lens. Check nearby leaves for mites, eggs, or similar speckling.
2. Fine Webbing Around Leaves and Stems
Spider mites may spin fine silk around leaf veins, leaf stalks, and the spaces between leaves. The webbing can look like a thin, dusty thread rather than the clear, organized web made by many ordinary spiders. It may be easiest to see when light catches it from the side.
Webbing alone does not always mean spider mites. A harmless spider may have built a web, especially near a window or in a plant’s outer foliage. The difference is easier to judge when you also see widespread speckling, tiny mites, or eggs on the leaf undersides.
Inspect the leaf joints
Look where leaf stalks meet stems and where crowded leaves touch. These sheltered spaces can hide early webbing.
Avoid pulling the plant apart
Move leaves gently so you can see into the canopy. Rough handling may damage already stressed foliage.
3. Yellowing, Bronze, or Dull Leaves
A plant with a growing mite problem may lose its bright green color. Leaves can turn pale, yellow, gray-green, or bronze as cell damage builds up. This change may begin in small patches and spread across much of the leaf.
Yellowing is not unique to spider mites. Overwatering, underwatering, root trouble, and poor light can cause similar changes. Before changing fertilizer or watering, inspect the leaf undersides and use the paper test to look for moving mites.
Compare several leaves
Look for a repeated speckled pattern on more than one leaf rather than judging the plant from a single yellow leaf.
Check the growing conditions
Review soil moisture, light exposure, and recent temperature changes while also checking for pests.
4. Curling, Dry Edges, and Leaf Drop
Severe spider mite damage can make leaves curl, crisp up, or fall from the plant. The plant may also produce weak new growth if the infestation is extensive. These signs often indicate that the plant has been under stress for some time, though other problems can produce the same symptoms.
Do not assume that every brown edge is caused by mites. Low humidity, irregular watering, salt buildup, and direct sun can also dry leaf tissue. Look for the more distinctive clues, especially pale stippling and live mites, before deciding on treatment.
Check before pruning
Confirm the likely cause before removing large amounts of foliage. Leaves with minor damage may still help the plant make energy.
Remove badly damaged leaves when needed
If a leaf is mostly dead, trim it with clean tools. Bag and discard infested plant debris instead of leaving it beside other houseplants.
How to Confirm Spider Mites Before Treating Your Plant
Confirming the pest helps you avoid treating the wrong problem. Spider mites are so small that a quick glance may reveal only a few specks or a faint web. Use a simple inspection routine and repeat it on several leaves.
A hand lens can help you see tiny mites and round eggs, but you can begin with a plain sheet of white paper. The paper test is useful because it can reveal movement that is hard to notice against green foliage. It does not identify every mite species, so combine it with a leaf inspection.
Source: rerootgardens.com
Gather simple tools
Use a white sheet of paper, a hand lens if available, a soft cloth, and a small flashlight. Keep the plant away from other houseplants while you inspect it.
Check several leaves
Inspect the top and underside of leaves, especially those with pale specks or dull color. Check leaf joints and tender growth for silk.
Tap the foliage
Hold the white paper under a leaf and tap the leaf gently. Watch the paper for tiny dots that begin to move.
Repeat the check
Inspect other leaves and repeat the test on another part of the plant. A single speck may be dust or debris, so look for a consistent pattern.
A Simple Step-by-Step Inspection
Start with the leaves that look most damaged. Turn each one over without tearing it, and shine a light across the surface. Spider mites and their eggs are often found on the underside, along veins, or near the base of a leaf.
Next, tap a leaf over the paper and wait a few moments. If small specks move, use a hand lens to examine them. Spider mites may move slowly across the paper, while dust and soil particles usually remain still unless the paper is disturbed.
Finish by checking nearby plants, including plants that share a shelf or touch the affected foliage. If you find likely mites, isolate the affected plant and begin a treatment plan suited to the plant species.
Keep the test gentle
Do not shake or strike the plant hard. A light tap is enough to dislodge some mites without causing needless damage.
Record what you see
Take a clear photo of the leaf damage and note which leaves are affected. This makes it easier to tell whether the problem is spreading.
How Spider Mites Differ From Other Houseplant Pests
Several common pests can cause yellow leaves or weak growth, but their feeding patterns and appearance differ. Aphids are generally easier to see and often gather in clusters on soft growth. Mealybugs look like small cottony patches, while thrips may leave silvery streaks and tiny dark droppings.
Fungus gnats are small flying insects usually seen around damp potting mix. They do not normally create the fine leaf stippling and webbing associated with spider mites. Scale insects may appear as fixed bumps on stems or leaves and do not move around like mites when disturbed.
When the symptoms do not fit neatly into one category, avoid mixing several pest treatments at once. Take a close photo, inspect a sample with a hand lens, or ask a local extension office or plant diagnostic service for help.
Spider mites
Fine leaf stippling, possible delicate webbing, and tiny moving specks.
Aphids
Clusters of soft-bodied insects on new growth, sometimes with sticky honeydew.
Mealybugs
White, cotton-like deposits around leaf joints, stems, or roots.
Thrips
Silvery or pale scars on leaves, sometimes with small dark fecal spots.
Scale insects
Fixed shell-like bumps on stems or leaves, sometimes accompanied by sticky residue.
Why Spider Mites Appear on Indoor Plants
Spider mites can enter a home on a newly purchased plant, a plant brought inside from outdoors, or an infested plant that has been sitting nearby. They may also spread when leaves or tools contact infested foliage. A plant does not need to be dirty or poorly cared for to develop an infestation.
Warm, dry conditions can favor many spider mite species. Indoor heating during winter can lower relative humidity, while hot, sunny windows may create warm leaf surfaces. Still, the presence of mites depends on more than humidity alone, and some species can persist under a range of indoor conditions.
Plant stress can make an infestation harder to manage. A plant with damaged roots, poor light, or inconsistent watering may have less capacity to replace damaged leaves. Good care supports recovery, but watering or misting changes will not remove an established mite population by themselves.
Source: southernbotanical.com
New plants
A plant may carry mites or eggs even if it looks healthy at the store. Keep new arrivals separate for a period of observation and inspect them regularly.
Plants moved indoors
Houseplants that spent the summer on a porch or patio may bring outdoor pests inside. Inspect them before placing them near other plants.
Crowded foliage
Plants pressed together can make pest checks harder and allow infested leaves to touch healthy ones. Leave enough space to inspect and care for each plant.
Dry indoor air
Heated rooms may provide conditions that favor some spider mites. Improving plant care can help, but do not rely on a humidifier as the sole control.
Does Low Humidity Cause Spider Mites?
Low humidity does not create spider mites from nothing. The pests must already be present or arrive on a plant or other material. However, warm and dry conditions can help certain species multiply faster, which is one reason indoor outbreaks may become more noticeable during the heating season.
If your home is dry, maintain suitable conditions for the plant rather than trying to make the room extremely humid. Some plants need good airflow and should not remain wet for long periods. A room humidifier may improve comfort for moisture-loving plants, but it should complement inspection and pest control rather than replace them.
Use a humidity meter if needed
A basic hygrometer can help you understand indoor conditions. Follow the needs of your plant rather than aiming for one humidity level for every species.
Avoid constant leaf wetness
Do not leave foliage wet for long periods, especially in cool rooms with poor airflow. Wet leaves can create other plant health problems.
What to Do When You Find Spider Mites
Once you suspect spider mites, act early but avoid rushing into a harsh treatment. Isolate the plant, remove some of the mites with water when the plant can tolerate rinsing, and inspect every leaf surface. Then choose a treatment labeled for the plant and pest if the infestation needs more control.
Spider mite eggs can survive an initial cleanup, and some treatments do not kill every life stage. That is why one rinse or one spray may not be enough. Repeated inspections and treatment according to the product label are more useful than applying a strong mixture once and assuming the problem is gone.
Source: growingjoywithmaria.com
Isolate the plant
Move it away from other houseplants, if practical. Avoid letting its leaves brush against healthy plants during the move.
Rinse suitable foliage
Use a gentle stream of lukewarm water to dislodge mites from leaf undersides and stems. Protect the potting mix from becoming waterlogged.
Prune severely damaged leaves
Remove leaves that are mostly dead or heavily infested when doing so will not strip the plant of too much healthy foliage. Discard them in a sealed bag.
Choose a suitable treatment
If mites remain, consider an insecticidal soap or horticultural oil labeled for the plant and pest. Follow the label for application, protective equipment, and repeat intervals.
Using Insecticidal Soap or Horticultural Oil
Insecticidal soaps and horticultural oils can help control spider mites when the product label includes the intended use. These products generally work through direct contact, so coverage of leaf undersides and other infested areas matters. They may not control eggs reliably, which makes follow-up inspection important.
Do not assume that dish soap is the same as a labeled insecticidal soap. Household detergents may damage plant surfaces because their ingredients and concentrations are not designed for plant pest control. Use a product formulated and labeled for the purpose.
Test a small area of the plant first when the label permits this approach, and watch for signs of leaf injury. Some plants are sensitive to oils or soaps, particularly under heat or strong light. Follow the label’s restrictions on temperature, timing, plant species, and repeat use.
Cover the target areas
Apply only as directed, paying attention to leaf undersides where mites often gather. Avoid runoff and do not exceed the label rate.
Follow repeat instructions
Check the label for the correct interval and maximum number of applications. Do not spray more often or mix products unless the directions explicitly allow it.
Protect people and pets
Keep children and pets away during application and until the label says it is safe to return. Use the protective equipment specified on the product.
Can Natural Remedies Get Rid of Spider Mites?
A plain water rinse can reduce the number of mites on a plant, especially when the leaves are rinsed carefully on both sides. It is a useful first step for many sturdy houseplants, but it may not reach every mite or egg. Plants with fragile leaves, flowers, or special moisture needs may require a gentler approach.
Neem-based products and other botanical treatments vary in formulation and permitted uses. Natural does not automatically mean harmless to plants, people, or pets. Use only products labeled for the intended indoor plant use, and follow all directions.
Avoid homemade mixtures that use rubbing alcohol, strong detergent, essential oils, or other concentrated ingredients without reliable plant-specific directions. Such mixtures can burn foliage or create exposure risks. A simple rinse and a correctly labeled treatment are often more predictable than an untested recipe.
Start with physical removal
For plants that tolerate it, rinse foliage and wipe sturdy leaves with a soft damp cloth. Clean the cloth between plants.
Do not depend on misting
Occasional misting does not reliably control spider mites. It also may not raise room humidity for long.
Avoid broad, unverified claims
No home remedy should be assumed to kill every mite and egg. Judge progress by repeated inspections rather than by whether a spray smells natural.
When Is It Better to Replace the Plant?
Most houseplants with a manageable infestation can be treated, but replacement may be reasonable when a plant is severely weakened, has lost most of its foliage, or continues to spread mites despite careful treatment. This can also be a practical choice for a low-cost plant that is heavily infested and sits among a large collection of valuable plants.
Before discarding a plant, consider whether the infestation can be contained and whether the species can recover. If you choose to remove it, bag the plant and debris to reduce the chance of spreading mites. Clean the pot and the area where the plant stood before bringing another plant into that spot.
Consider the severity
A few speckled leaves are very different from widespread webbing, extensive leaf loss, and declining growth.
Protect nearby plants
Keep the plant isolated while deciding what to do. Do not place infested cuttings in another room or share them with other plant owners.
How to Prevent Spider Mites From Returning
Prevention works best when it combines regular inspection, sensible plant spacing, clean tools, and care suited to each plant. You cannot make every houseplant immune to spider mites, but you can catch new infestations before they spread across a shelf or room.
Make pest checks part of your normal watering routine. Look under leaves rather than checking only the visible top surfaces. Pay extra attention to plants that recently came home from a store, spent time outdoors, or sit near an affected plant.
Source: mosquitosquad.com
Inspect new plants
Check leaves and stems before introducing a new plant to your collection. Keep it separate while you watch for signs of pests.
Give plants space
Avoid crowding foliage. Space makes it easier to spot webbing, reach leaf undersides, and prevent leaves from touching.
Clean tools and surfaces
Wipe pruning tools and clean shelves after handling infested plants. Remove fallen leaves and other debris.
Keep plants healthy
Provide suitable light, watering, and nutrition for each species. Healthy growth supports recovery, though good care alone will not eradicate mites.
Recheck treated plants
Continue inspecting the plant and its neighbors after treatment. New speckling or moving mites may mean the infestation remains active.
A Practical Weekly Houseplant Check
A short weekly check is enough to make pest detection part of your normal routine. Choose a time when you can move leaves gently and look at the undersides. For a large collection, inspect a few plants each day and rotate through the group.
Check plants more often if one has had spider mites before or if you have just brought home new foliage. During active treatment, inspect according to the product directions and the severity of the problem rather than relying on a weekly schedule alone.
Step 1
Look for pale speckles, yellow patches, curling, and fine silk.
Step 2
Turn over several leaves and inspect the veins, stalks, and leaf joints.
Step 3
Use the white-paper test if you see suspicious marks but cannot identify the pest.
Step 4
Isolate any plant with likely mites and check plants that share its shelf or touch its foliage.
How to Know Whether Treatment Is Working
The best sign of success is that repeated inspections find fewer or no live mites and no fresh webbing or expanding speckling. Existing damaged areas may remain visible even after the pests are gone. Old leaf damage does not turn green again simply because treatment worked.
Watch the plant’s newest growth and compare photos taken several days apart. If fresh leaves appear healthy and the number of live mites falls, the plant may be recovering. If new damage keeps appearing, reassess your identification, coverage, treatment interval, and nearby plants.
Signs of improvement
Fewer live mites on leaf undersides, no new webbing, and no spread of fresh pale specks.
Signs of continued trouble
Newly damaged leaves, renewed webbing, or live mites after treatment.
When to seek help
If the pest remains uncertain or the plant continues to decline, consult a local cooperative extension service or a qualified plant care professional.
Common Mistakes When Identifying Spider Mites
The biggest mistake is treating a symptom without checking the cause. Yellow leaves can result from several problems, and a plant may have spider mites alongside another source of stress. A short inspection can help prevent unnecessary sprays, excess watering, or fertilizer changes that make recovery harder.
Another common error is stopping treatment as soon as the webbing disappears. Fine silk may be less visible after rinsing, but mites or eggs can remain. Continue to inspect the plant and follow the treatment label until repeated checks indicate the infestation is under control.
Source: keengarden.com
Mistake: Assuming every web is from spider mites
Ordinary spiders also make webs. Look for fine leaf stippling and tiny mites before deciding that the web is evidence of an infestation.
Mistake: Looking only at the top of leaves
Mites often gather underneath. A quick look at the upper surface can miss the main infestation.
Mistake: Spraying once and stopping
One application may not control every life stage. Reinspect the plant and follow label directions for any repeat application.
Mistake: Using too much fertilizer
Extra fertilizer does not remove mites and may create additional stress if the plant does not need it. Address the pest and review normal care.
Mistake: Applying household chemicals
Undiluted alcohol, dish detergent, and other homemade mixtures can injure foliage or pose risks to people and pets. Use a suitable labeled product.
Mistake: Ignoring nearby plants
A treated plant may become reinfested if another plant nearby still carries mites. Inspect the whole group and isolate affected plants.
A Quick Symptom and Cause Comparison
Use this comparison as a starting point, not as a substitute for inspecting the plant. Symptoms often overlap, and a plant may have more than one problem. Look for the pest itself whenever possible.
Fine pale speckles plus webbing
Spider mites are a strong possibility. Inspect leaf undersides and confirm the presence of moving mites.
Uniform yellowing with wet soil
Overwatering or root stress may be involved. Check soil moisture and drainage while inspecting for pests.
Crisp edges after strong sun
Sun scorch or water stress may explain the damage. Look for mite signs before treating for pests.
Sticky leaves and clustered insects
Aphids or other honeydew-producing pests may be present. Inspect tender growth and stems closely.
Silvery streaks with dark specks
Thrips may be responsible. Inspect the leaf surface and folds for insects and feeding scars.
Frequently Asked Questions
Q
What is the first sign of spider mites on indoor plants?
The first sign is often a pattern of tiny pale dots on the leaves. These speckles form when mites damage individual plant cells. You may notice them before you can see the mites or any webbing.
Turn the affected leaves over and inspect them closely. If you also find tiny moving specks or fine silk, spider mites become a more likely cause.
Q
Can spider mites live on indoor plants without webbing?
Yes. Some infestations show little or no obvious webbing, especially when the mite population is small or the species produces less visible silk. Do not rule out spider mites just because you cannot see a web.
Check for fine stippling and use a white-paper test. A hand lens can help reveal mites and eggs on the undersides of leaves.
Q
Are spider mites harmful to people or pets?
Plant-feeding spider mites are not known for biting people or pets in the way that some other mites do. Their main concern in the home is damage to plants. However, any pest treatment you use may pose risks if it is applied or stored incorrectly.
Follow product labels, use the specified protective equipment, and keep treatments away from children and pets as directed. If you are unsure what kind of mite you have, seek a reliable identification before assuming it is a plant-feeding species.
Q
Can a plant recover from spider mite damage?
Many houseplants can recover if the infestation is brought under control before too much foliage is lost. Damaged leaves may remain speckled, faded, or brown, but new growth can look healthy once the mites are no longer feeding.
Provide suitable light, water, and nutrition while continuing to inspect the plant. If the stems and growing points remain healthy, the plant may gradually replace damaged foliage.
Q
How often should I check a plant after treating spider mites?
Inspect the plant frequently during treatment, paying close attention to leaf undersides and fresh growth. Follow the label for the timing of any repeat applications because products differ in how they work and how often they can be used.
Continue checking after the last application. If live mites or fresh damage return, inspect nearby plants and reassess the treatment rather than applying more product than the label allows.
Q
Does misting indoor plants prevent spider mites?
Misting is not a reliable way to prevent or eliminate spider mites. It may raise humidity around the leaves for only a short time, and it does not ensure that mites and eggs are removed.
Use care suited to the plant, keep foliage and airflow conditions appropriate for the species, and inspect leaves regularly. If mites are present, use physical removal and a suitable labeled treatment when needed.
✦ Wrapping Up
Conclusion
The most useful signs of spider mites on indoor plants are tiny pale leaf speckles, fine webbing, faded or bronze foliage, and small moving mites. Because these symptoms can overlap with other plant problems, inspect the undersides of leaves and confirm the pest before choosing a treatment.
If you find spider mites, isolate the plant, rinse suitable foliage, and use a labeled treatment when necessary. Keep checking nearby plants and repeat inspections over time. Old leaf damage may remain, so judge progress by the lack of live mites and the health of new growth rather than expecting every marked leaf to recover.
💡 Key Takeaway
Today, inspect the undersides of several leaves on your most suspicious plant, tap one over white paper, and look for moving specks. If you find likely spider mites, isolate the plant and begin a careful, label-guided control plan.
I enjoy sharing simple gardening ideas, lawn care tips, and honest product reviews that help make outdoor work easier. From home gardening guides to helpful tools and lawn care advice, I write easy-to-follow content to help readers create a healthier and better-looking outdoor space without wasting time or money.